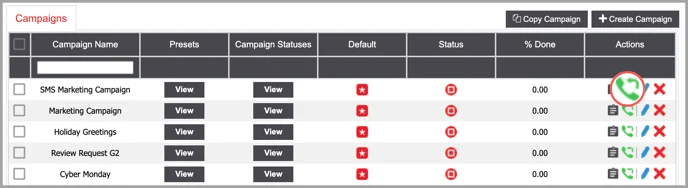
Campaigns
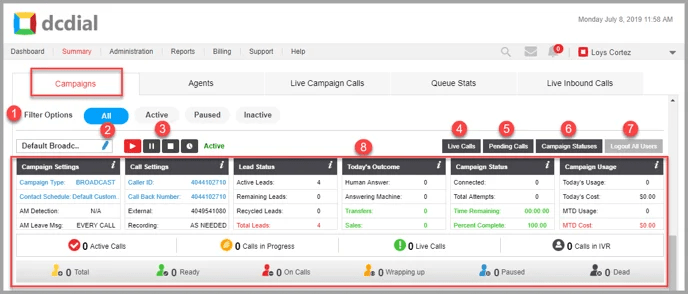
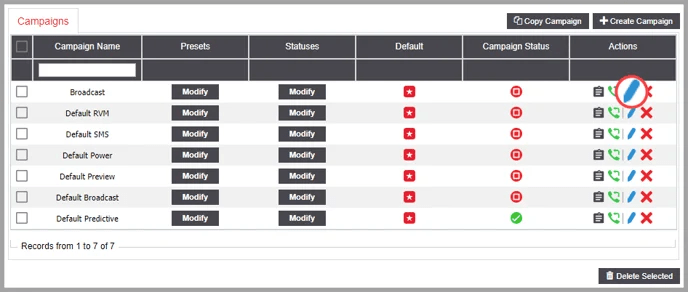
The Campaigns page allows you to create new campaigns and manage existing campaigns configured in DCDial.
Each campaign is a collection of properties that tell DCDial how to process a contact list. A campaign defines how agents interact with contacts (if at all) and specifies the dialing mode, allowing you to meet specific campaign goals. The campaign modify page contains a set of tabs that break down all the tasks involved in configuring and managing campaign settings. In addition, you'll find that the majority of the tabs contain expandable screen sections that group related settings.
- Campaign Name: The name of the campaign.
- Presets: Presets allow you to add a list of pre-saved phone numbers to a campaign where agents can easily transfer calls from the Agent interface. Click on 'View' in the 'Presets' column to see a list of presets for the campaign.

- Create Campaign Preset: Click the 'Create Campaign Present' button on the top right to add a new entry. Complete the required fields and click 'Create' to continue.
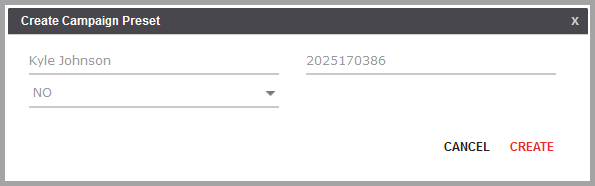
- Preset Name: Enter a unique name.
- Preset Number: Enter a phone number.
- Hide Number: Select whether you want to hide the number:
- Yes: The preset number will not be displayed to the agent. Agents will only see the preset name.
- No: The preset number will be displayed to the agent.
Action: Click on to delete the preset.
- Campaign Statuses: You can create campaign-specific statuses or dispositions for a specific campaign by using this feature. Status or disposition is the end result of a call such as “sale” or “no answer”. A status includes a short name (an abbreviation) and a description. Adding campaign-specific statuses will supplement the system statuses already available in your system but will only be visible for a specific campaign and will not affect any other campaigns.
Click on 'View' in the Campaign Statuses column to see a list of campaign-specific statuses.
Please note: Campaign statuses should be unique and cannot be the same as system statuses.

- Create Campaign Status: Click the 'Create Campaign Status' button on the top right to add a new entry. Complete the required fields and click 'Create' to continue.
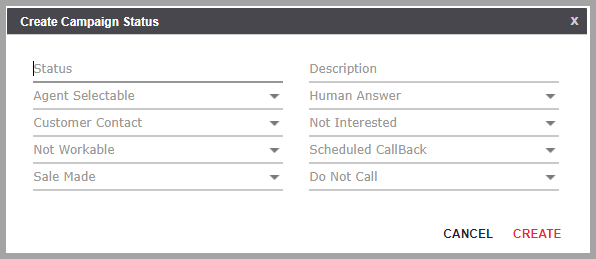
- Status: Enter a name.
- Description: Enter a description.
- Agent Selectable: Enable this tag if you would like the status to appear in the Agent Portal.
- Human Answer: Enable this tag if you would like this status to be included in human-answered statuses for reporting purposes.
- Customer Contact: Enable this tag if you would like this status to reflect that the lead was contacted.
- Not Interested: Enable this tag if a lead does not want to be redialed.
- Not Workable: Enable this tag if you would like this status to indicate that the customer does not meet requirements for service regardless if interested or not.
- Scheduled Call Back: Enable this tag if you would like this status to allow agents to schedule a callback date and time.
- Sale Made: Enable this tag if you would like this status to be included as a sale-type status for reporting purposes.
- Do Not Call: Enable this tag if you want the lead to be added to the DNC list.
- Actions: Click on the icon to delete the status. A confirmation screen will appear to confirm the deletion.
- Default: The default campaign is automatically selected when a user navigates to the dashboard page in the admin portal or mobile app. To select a default campaign, click on the icon.
- Status: The current status of the Campaign. The campaign may be 'Active', 'Paused', or 'Inactive'. You can change the status on the Dashboard or Summary page.
- Active
- Paused
- Inactive
- % Done: Shows the percentage of completion. This is based on how many leads have been contacted from the uploaded lists.
- Actions:
- activity log-2 View Activity Log: Click the icon to view a summary of events. Learn More About the Activity Log.
- View Call Backs: Click the icon to view the callbacks scheduled for the campaign. Learn More About Call Backs.
- image12-png-Mar-28-2022-07-40-02-50-PM Modify Campaign: Click the icon to modify the campaign. Learn More About Modifying Campaigns.
- Delete Campaign: Click the icon to delete an entry. A confirmation screen will appear to complete the deletion.
Create Campaign
Create Campaign
STEP 1. Click on the ‘Create Campaign’ button on the top right to create a new Campaign. Complete the required fields in the pop-up window and click ‘Create’ to proceed. You will see a confirmation once the Campaign has been created successfully and you will be redirected to the campaign details page to complete the setup process.
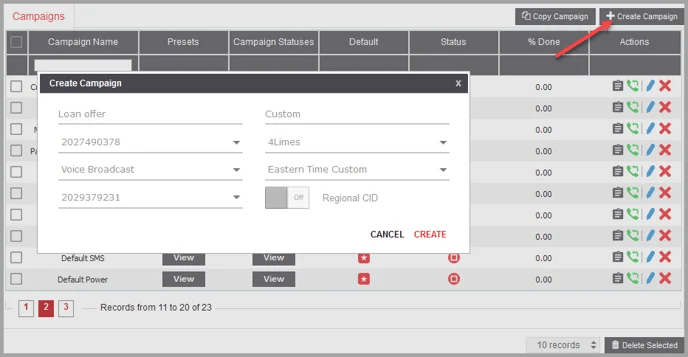
- Campaign Name: Enter a unique name.
- Campaign Description: Enter a description.
- Select CallBack Number: Select the callback number. If there are no selections available or you want to create a new callback number, click on ‘Create New’ in the drop-down. Select the number to be used, fill out the description, choose ‘Callback’ in the drop-down, and click on 'Create'. You can also create or modify callback numbers in the Company Numbers menu.
Please Note: Prior to assigning a callback number, it must first be added to the DID Manager.
- Select Company Name: Select the company name. If there are no selections available or you want to create a new company number, click on ‘Create New’ in the drop-down. Fill out the company name and company description, and click on create. You can also create or modify company names in the Company Branding menu.
- Select Dial Mode: Select the campaign's dial mode. You can choose from any of the following options: Click Voice Broadcast, Click Predictive, Preview Manual, Predictive Dialer, Power Dialer, SMS Broadcast, and Voice Broadcast. Learn More About Dial Modes
- Select Contact Schedule: Select the contact schedule you want to use for the Campaign. If there are no selections available or you want to create a new one, click on ‘Create New’ in the drop-down. Add the Customer Contact Schedule Name and Description, and click on 'Create'. You can also create or modify contact schedules in the Customer Contact Schedule menu.
- Select Caller ID: Select the campaign caller ID. If there are no selections available or you want to create a new one, click on ‘Create New’ in the drop-down. Select the number to be used, fill out the description, choose ‘Caller ID’ in the drop-down, and click on create. You can also create or modify caller ID numbers in the Company Numbers menu.
- Please Note: Prior to assigning a callback number, it must be added to the DID Manager first.
- Regional CID: To enable this feature, toggle the 'Regional CID' button to ON and select a 'Regional CID list'. To use a single caller ID for your outbound calls, toggle the button to OFF. Learn More About Regional Caller IDs
STEP 2. Configure the Campaign settings on the campaign details page. When done, click on ‘Submit’ to save your changes.
Copy Campaign
Copying a campaign is a quick and easy way to create a similar campaign, without starting from scratch. The 'Copy Campaign' feature allows you to copy settings from an existing campaign and personalize the campaign through the 'Modify Campaign' page.
STEP 1. Click on the button on the top right to copy a campaign. Complete the required fields in the pop-up window and click 'Create' to proceed. You will see a confirmation once the Campaign has been copied successfully and you will be redirected to the campaign details page to complete the setup process.
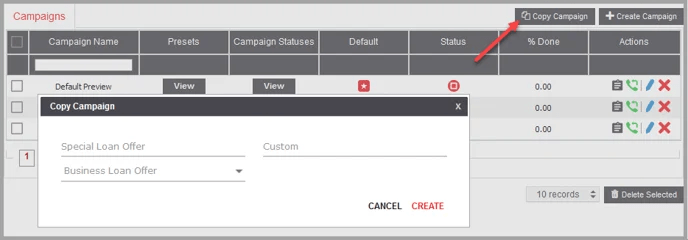
- Campaign Name: Enter a unique name.
- Campaign Description: Enter a description.
- Select Source Campaign: Select the source campaign to transfer the campaign settings from.
- Please Note: Copying a campaign will copy all settings from the source campaign you select, besides the campaign-specific DNC lists.
STEP 2. Configure the Campaign settings on the campaign details page. When done, click on ‘Submit’ to save your changes.
Modify Campaign
Click on image12-png-Mar-28-2022-07-40-02-50-PM to Modify a Campaign.
There are Basic, Advanced, and Broadcast Settings. The customizable settings will vary depending on the dial mode of the campaign. The settings below apply to the following dial modes:
- Voice Broadcast
- Predictive Dialer
- Preview Manual Dialer
- Power Dialer
- Click Voice Broadcast
- Click Predictive
Go to SMS Broadcast for SMS campaign-specific settings, and to Email Broadcast for Email campaign-specific settings.
| BASIC | ADVANCED | BROADCAST |
| Campaign Name | Pace Tempo | Initial Recording |
| Campaign Description | Lead Search | Secondary Recording |
| latest Campaign Events | Agents Announcement | Response options |
| Payment Collection | Call Launch | No Response Options |
| Company Name | Clipboard Copy | Not Interested |
| Callback Number | Inbound Calls | |
| Caller ID | Call Timer Settings | |
| Contact Settings | Transfer Settings | |
| Answering Machine Detection | Scheduled Callbacks | |
| Strategy Settings | Drop Call Settings | |
| Hold Music | Wrap Up Settings | |
| Do Not Call (DNC) | Set Call Status | |
| Click Settings | Manual Dialing | |
| Preview Dialing | ||
| 3 Way Call | ||
| Automatic List Activation | ||
| Agent Screen Settings | ||
| Lead Modification | ||
Basic Settings
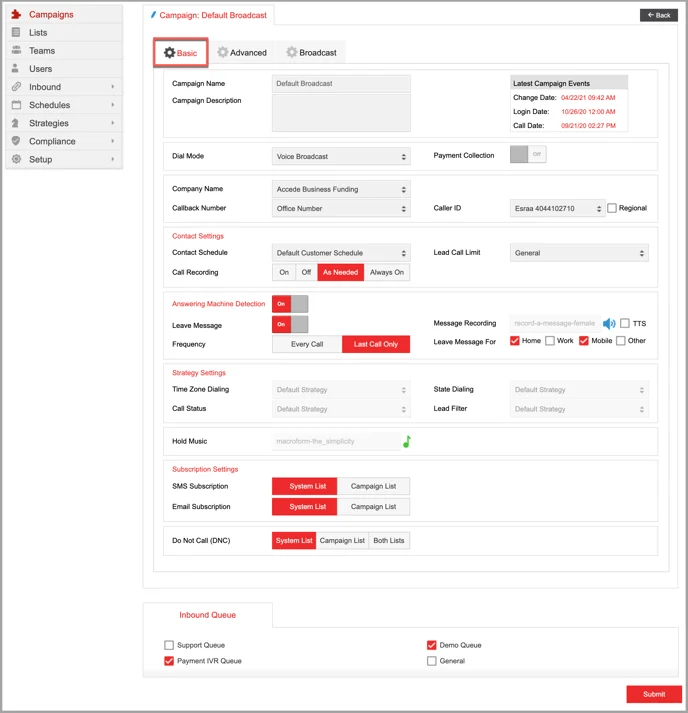
- Campaign Name:(Applies to all voice dial modes) The name of the campaign.
- Campaign Description:(Applies to all voice dial modes) A description of the campaign.
- Latest Campaign Events:(Applies to all voice dial modes) A summary of events for the campaign including:
- Change Date: The date and time when the most recent change was made.
- Login Date: The date and time when an agent last logged in to the campaign.
- Call Date: The date and time when a call was made or came into the campaign.
- Dial Mode: There are nine dial modes: Voice Broadcast, Predictive Dialer, Preview Manual Dialer, Power Dialer, SMS Broadcast, Click Voice Broadcast, Click Predictive, Click Power, and Email Broadcast.
- Payment Collection:(Applies to Voice broadcast and Click Voice broadcast dial modes)
- Please Note: A payment gateway should be added to your system before using this feature. You can edit the outbound payment IVR settings using the IVR Designer.
- Company Name:(Applies to all voice dial modes) The company name that will be read in the TTS (Text to Speech) message when applicable. To add or modify a company, go to the Company Branding menu.
- Call Back Number:(Applies to all voice dial modes) Callback numbers can be dynamically inserted via text-to-speech in your live broadcast or voicemail messages. This option is relevant only if the campaign is using text-to-speech audio messages that incorporate a campaign callback number. Go to the Company Numbers menu to add new call back numbers or modify existing ones.
- Caller ID:(Applies to all voice dial modes) Caller ID is the number that appears on your customer's phone when you call them. You can choose to display one Caller ID for all your outbound calls or use the 'Regional Caller ID' feature to display a custom Caller ID based on the location you are calling. Check the 'Regional CID' checkbox to show a local CID to each client contacted.
To use the Regional Caller ID feature, check the 'Regional' box and select a regional caller ID set in the drop-down menu that will appear. You can purchase numbers to use as regional caller ID’s in the Billing section.
Please note: You may assign only the toll-free numbers provided by DCDial as a Caller ID for the SMS Broadcast campaigns.
- Contact Settings:(Applies to all voice dial modes) Contact Settings allow you to designate when leads will be called and whether or not those calls will be recorded.
- Contact Schedule: The Contact Schedule delimits a time frame to call your leads based on their local time zone. If your 'Contact Schedule' is set from 10 am – 8 pm, and the lead's local time is 8 am EST, then DCDial will not dial that lead until their local time is 10 am EST.
Use the drop-down menu to designate the call destination’s local hours and the time frames in which leads can be dialed. You can designate unique Contact Schedules, based on your campaign needs: city, state, time zone, lead preferences, contact compliance, etc.
- Lead Call Limit: Select the Account Call Limit assigned to each campaign. You can manage the number of times a lead can be contacted on a daily or weekly basis. Go to 'Lead Call Limit' in the 'Compliance' section to create or modify limits.
- Call Recording: To record a campaign’s inbound and outbound calls, enable this setting.
Please Note: Inbound calls can be recorded ONLY if the numbers were purchased through DCDial.
- On: Recording is enabled. Agents with recording override permissions can disable recording from the Agent Portal.
- Off: Recording is disabled.
- As Needed: Allow agents to start and stop recording from the Agent interface as needed.
Always On: Recording is enabled. Agents will not be able to modify it even if they have permission to modify call recording in the Agent interface.
- Answering Machine Detection:(Applies to all voice dial modes) If Answering Machine Detection (AMD) is enabled, DCDial will detect answering machines and can either ignore that call or leave a message depending on your settings.
- Answering Machine Detection: To enable this feature, toggle the Answering Machine Detection button to ON and choose the desired settings for 'Leave Message', 'Message Recording', 'Frequency', and 'Leave Message For'.
- Leave Message: If the system detects an answering machine, you may leave a message by toggling this option to ON. If enabled, select the desired settings for 'Message Recording', 'Frequency', and 'Leave Message For'.
- Message Recording: The field is blank by default. Click on the audio icon-1 icon to choose a file to play when an Answering Machine picks up the call. If you prefer to use Text to Speech, check the ‘TTS’ box and the TTS options will appear as a drop-down menu in the ‘Message Recording’ field.
- Frequency: Users can choose how often a message will be left. Choose 'Every Call' to leave a message every time the number is called and an answering machine picks up. Otherwise, users can choose to leave a message for the last call made to the number when an answering machine picks it up. The last call is based on how many times a call will be made to an answering machine as defined in the Call Strategy.
- Leave Message For: Users can choose which phone type the message can be left for. Messages can be left for Home, Work, Mobile, or Other phone types. Users can select one or all of them as needed.
- Strategy Settings:(Applies to all voice dial modes) In this section, Admins can see which strategies have been assigned to the campaign.
- Time Zone Dialing: The Time Zone strategy attached to the campaign. To change the Time Zone strategy, go to the 'Advanced Settings' under the Dashboard page.
- State Dialing: The State Dialing strategy attached to the campaign. To change the State Dialing strategy, go to the 'Advanced Settings' under the Dashboard page.
- Call Status: The Call Status strategy attached to the campaign. To change the Call Status strategy, go to the 'Advanced Settings' under the Dashboard page.
- Lead Filter: The Lead Filter strategy attached to the campaign. To change the Lead Filter strategy, go to the 'Advanced Settings' under the Dashboard page.
- Hold Music:(Applies to all voice dial modes) The Hold Music used for the Campaign. Click on note icon-1to change the Hold Music. Click on the file name on the Music On Hold screen to select the Hold Music that you would like to use.
- Subscription Settings:(Applies to all dial modes) Manage your SMS Subscription and Email Subscription settings to capture your customers' permission to receive communications from your company and to ensure compliance.
- SMS Subscription
- System List: the phone numbers will be opted-in to / opted-out from all existing lists within the system.
- Campaign List: the phone numbers will be opted-in to / opted-out from all lists associated with a campaign.
- Email Subscription
- System List: the email addresses will be opted-in to / opted-out from all existing lists within the system.
- Campaign List: the email addresses will be opted-in to / opted-out from all lists associated with a campaign.
- Do Not Call:(Applies to all voice dial modes) An agent can status a lead as Do Not Call (DNC) to indicate that a certain number may not be contacted. This feature allows the Admin to specify whether leads marked DNC will be blocked for a single campaign or will be blocked system-wide for all campaigns.
- System List: Select this option if you want numbers marked as DNC to be blocked in all campaigns.
- Campaign List: Select this option with the numbers you want marked as DNC to be blocked for this campaign only.
- Both: DNC numbers will be added to both the system-wide DNC list and the campaign-specific DNC list.
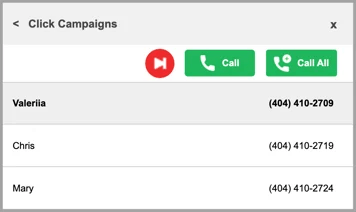
- Click Settings:(Applies to Click Voice Broadcast, Click Predictive, and Click Power dial modes only)

If you select Click Broadcast, Click Predictive, or Click Power campaigns from the Dashboard page, an admin click screen will appear on the left side. Click on the admin click screen to view active leads.
You can modify the layout of the click screen to adjust the available information about each lead.
- Layout:
- Simple View: This view displays each lead's name and phone number.
- Maximum Leads Shown: The maximum number of leads shown on the admin click screen at any given time.
- Map Key to Call All: To map a keyboard key to the 'Call All' button, select the key from the available options.
- Map Key to Call: To map a keyboard key to the 'Call' button, select the key from the available options.
- Map Key to Skip: To map a keyboard key to the 'Skip' button, select the key from the available options.
Advanced Settings
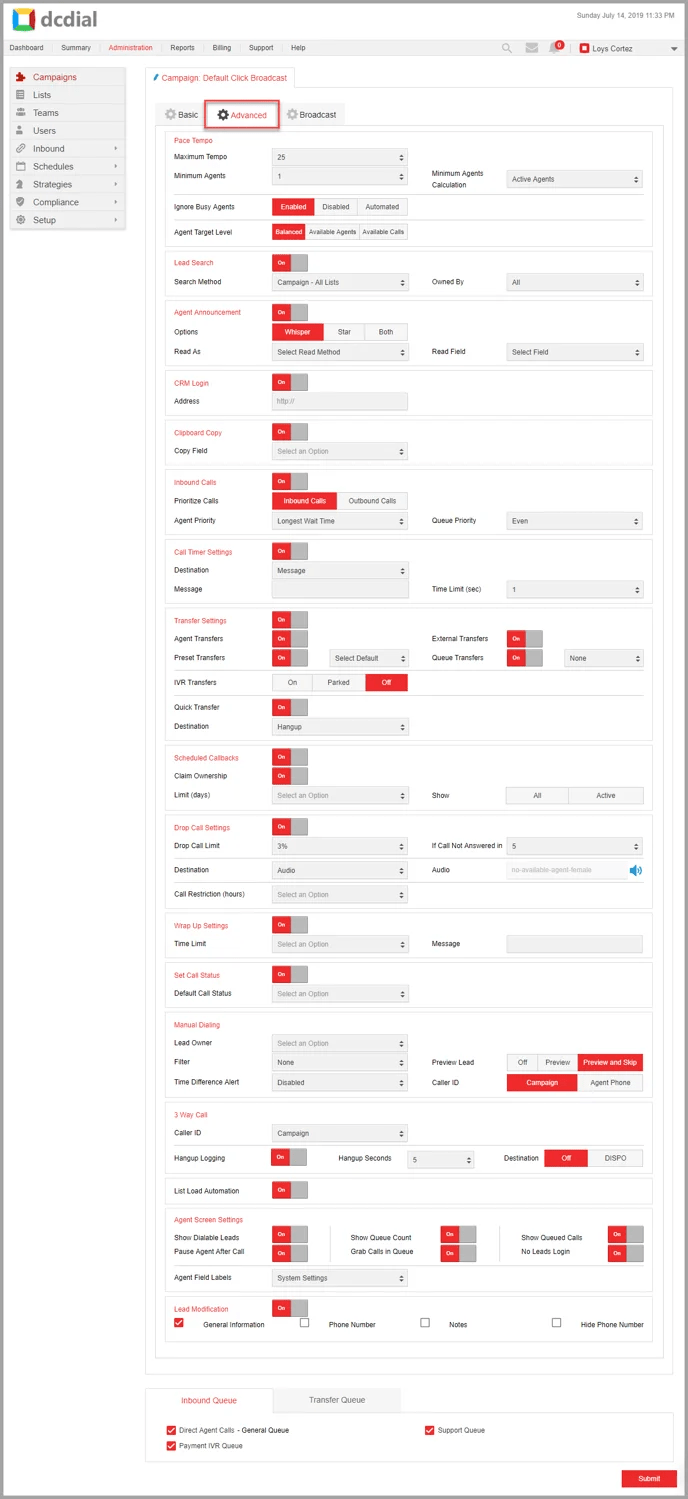
- Pace Tempo:(Applies to Predictive Dialer, Power Dialer, and Click Predictive Dialer dial modes only)
Please Note: The Predictive Dialer uses mathematical formulas to predict both the average time it will take for phone calls to be answered and agent availability, and adjusts the Pace Tempo automatically.
- Maximum Tempo: The maximum number of lines that can be used per agent. Use the drop-down to choose from 5 to 25 maximum lines per agent.
- Minimum Agents: Enable this feature if you require a minimum number of agents to be available before the campaign can start dialing. Select one of the options to choose how the system should calculate available agents:
- Total Agents: Will count all agents logged into the campaign regardless of their status.
- Active Agents: Will count agents who are in Ready, On Call, and Wrapping Up status.
- Ready Agents: Will count agents in Ready status.
- Disabled: There is no minimum agent requirement set.
- Minimum Agents Calculation: The minimum number of agents required in for the system to dial out. The system will not dial out unless the minimum number of agents is met.
- Ignore Busy Agents: For predictive and ratio campaign types, the system calculates the number of outbound calls to make by multiplying the pace tempo by the number of agents logged in. You can choose to ignore busy agents from this calculation by enabling this option. Busy agents are considered busy if the agent status is On Call or Wrapping Up.
There are three options available:
- Enabled: Agents with a busy status will not be included in the outbound call calculation.
- Disabled: Agents with a busy status will be included in the outbound call calculation.
- Automated: This allows you to automate when this feature is enabled. If the number of agents in the selected state falls below the number that you have set, the system will automatically enable this feature temporarily until the agent count is equal to or greater than the defined threshold. Total will count all agents logged into the campaign regardless of their status. Active will only count agents who are in Ready, On Call, and Wrapping Up status. Ready will only count agents in Ready status.
- Agent Target Level: This setting allows users to fine-tune calls according to the agent the availability of the calls in regards to the agents:
- Balanced: Keeps all agents busy with a live call.
- Available Agents: Keeps the selected number of agents free at all times.
- Available Calls: Will keep the selected number of calls in queue unanswered, and waiting for an agent.
- Lead Search:(Applies to all voice dial modes) Users can allow an agent to search for leads and view lead information in the Agent interface.
- Lead Search: To allow agents to search for leads, turn the Lead Search button to ON.
- Search Method: Once Lead Search is ON, click on the drop-down to select the Lead Search Method. There are three options: Campaign All Lists, Campaign Active Lists, or Manually Dialed Leads.
- Campaign All Lists: Agents are allowed to search for leads in all active or inactive lists within the campaign.
- System Lists: Agents are allowed to search for leads in any existing list in the system.
- Campaign Active Lists: Agents are allowed to search for leads in all active lists within the campaign.
- Manually Dialed Lists: Agents are allowed to search only for the manually dialed leads within the campaign.
- Owned By: Users can further manage the Lead Search by limiting the search to ownership. There are three options: All, Team, or User.
- All: Agents are allowed to search all active or inactive lists within the campaign owned by anyone.
- Team: Agents are allowed to search all active or inactive lists within the campaign owned by the Team.
- User: Agents are allowed to search all active or inactive lists within the campaign owned by the user doing the search.
- Agent Announcement:(Applies to all voice dial modes) The Agent Announcement feature reads a designated announcement or message to the agent when a call comes in. The customer will not hear this message.
- Agent Announcement: To enable the feature, turn the Agent Announcement button to ON.
- Options: Once turned on, users can choose how the announcement or message will be played. There are three options: Whisper, Star, or Both.
- Whisper: Plays the announcement to the agent when the call is connected.
- Star: Plays the announcement to the agent when they press *.
- Both: Automatically play the announcement when the call is connected and allow the agent to replay the announcement by pressing *.
- Read As: Select a Read Method from the drop-down menu. There are two options: Read Text or Read Number.
- Read Field: Select a Read Field that contains the announcement or message that will be read to the agent.
- Call Launch:(Applies to all voice dial modes) This feature allows you to define the information that will appear to the agent as soon as a call is connected.
- Lead Info: Select this option if you would like the lead details screen to open.
- CRM Link: Select this option if you would like your lead record opened in your external web-based Customer Relationship Management (CRM) System when a call is initiated with that lead. In the CRM Link field, enter the URL of the lead record from your CRM and then use the drop-down menu to select the CRM marker needed to locate the lead record.For example, the lead record is located at this web address: https://app.hubspot.com/contacts/4439111/contact/925151/.
In this case, 925151/ represents the lead account ID in the CRM.

The rest of the link address https://app.hubspot.com/contacts/4439111/contact/ should be pasted in the CRM Link field.

Next, for the CRM Marker, select the correct system field that will serve as a variable to locate the correct lead record. In our example, we used CRM lead account ID, 925151/, so we will use Lead ID as our marker.
- Call Launch Open In: This option allows users to keep the current window open, while they have a lead record opened in a new window or tab.
- Agent Script: Select this option if you would like a script to open and then select a script from the available options.
- CRM Login:(Applies to all voice dial modes) This option is helpful in reminding your agents to login to their external CRM system by automatically opening the CRM login page when they login to the Agent interface.
- CRM Login: To enable the feature, turn the CRM Login ON.
- Address: Paste the URL of the CRM login page.
- CRM Login Open In: This option allows users to keep the current window open, while they have a CRM login page opened in a new window or tab.
- Clipboard Copy:(Applies to all voice dial modes) This feature will automatically copy a pre-selected system field to the agents clipboard as soon as they are connected with a live customer.
- Clipboard Copy: Turn the Clipboard Copy button to ON to enable the feature.
- Copy Field: Once the feature is enabled, use the drop-down menu to choose which field will be automatically copied to the agent’s clipboard.
- Inbound Calls:(Applies to all voice dial modes) The Inbound Calls feature allows you to define whether agents are able to receive inbound calls.
- Inbound Calls: To enable the feature, toggle the Inbound Calls button to ON.
- Prioritize Calls: By enabling Inbound Calls, agents are allowed to receive inbound calls in this campaign. Once you have enabled Inbound Calls, you need to designate where inbound calls will be routed by selecting the inbound queue at the bottom of the page. Then, choose whether your campaign will prioritize inbound or outbound calls. By default, Queues sort customers on a first-come-first-serve basis. But, Queue Priority allows you to give callers in selected queues priority over callers in other queues. By giving a queue a higher priority, callers from that queue are allowed to bypass callers in other queues with a lower priority to receive faster service.
- Inbound Highest: Calls in a queue with the highest priority will be answered first.
- Inbound High: Selecting this option gives the calls in inbound queue priority over outbound calls.
- Balanced: This option gives equal priority to both inbound and outbound calls.
- Inbound Only: Selecting this option will prevent outbound auto-dialing when inbound calls are waiting in the inbound queue.
- Inbound Low: Selecting this option will deprioritize inbound calls.
- Inbound Lowest: Calls in a queue with the lowest priority will be answered last.
- Agent Priority: In Agent Priority, determine in which order agents logged into the Inbound queue will receive calls.
- Campaign Rank: Agents will be prioritized based on their campaign rank.
- Fewest Calls: The call will be sent to the agent who has received the fewest calls from the queue.
- Longest Wait Time: The agent with the longest wait time between calls will be prioritized.
- Oldest Call Start: The call will be sent to the agent who has been waiting the longest since the start of their last call.
- Oldest Call Finish: The call will be sent to the agent who has been waiting the longest since their last call completed.
- Overall User Rank: Agents will be prioritized based on their rank defined in the queue member list.
- Random: Calls will be assigned to a randomly selected agent.
- Queue Priority: If Inbound Call is enabled, you can choose whether inbound or outbound calls have a higher priority. Outbound calls are the calls the campaign is making to connect agents with live customers. Calls with a higher priority will be sent to the Agents first. We do not recommend setting inbound calls to a higher priority than the outbound calls since customers calling in expect to be on hold while customers being called expect to speak with an agent immediately.
- Call Timer Settings:(Applies to all dial modes) The feature allows you to automate an action if an agent call lasts longer than the designated call time limit.
- Call Timer Settings: To enable the feature, toggle the Call Timer Settings button to ON.
- Destination: Select the Call Timer destination. You can choose from any of the following options:
- Agent: The call will be transferred to an agent.
- Hang-Up: The call will be disconnected.
- IVR: The call will be transferred to an IVR.
- Queue: The call will be transferred to a queue.
- Timer Action Destination: Select the timer action based on the selected destination:
- Agent: Choose the agent to whom the call will be routed.
- Hang-Up: No timer action destination necessary.
- IVR: Choose the IVR to which the call will be routed.
- Queue: Choose the queue to which the call will be routed.
- Time Limit (sec): Choose the time limit when the designated timer action will be initiated.
- Message: A message will be displayed to the agent in the Agent interface. Type the message that will be displayed.
- CRM Link: The CRM link will open in a new window.
- Transfer Settings: (Applies to all voice dial modes) When an agent is logged in to the Agent Portal, they have an option to transfer calls. Transfer Settings allow users to manage the transfer process.
- Transfer Settings: To allow agents to transfer the call in the Agent interface, toggle the Transfer Settings button to ON. When it's turned OFF, the transfer button will not be clickable in the Agent interface.
- Agent Transfers: To allow agents to transfer calls to another Agent, toggle the Agent Transfers button to ON.
- External Transfers: To allow agents to transfer calls to an external number, toggle the External Transfers button to ON.
- Preset Transfers: To allow call transfers to a preset destination, toggle the Preset Transfer button to ON. Once turned on, use the drop-down to select the default Preset that will appear as the first option transfer pop-up.
- Queue Transfers: To allow agents to transfer calls to another queue, toggle the Queue Transfers button to ON and choose which queue they can transfer calls to.
- IVR Transfers: When allowing agents to transfer calls to an IVR, there are three options to choose from: On, Parked, and Off.
- On: The agent will be able to transfer the call to an IVR and move on to another call.
- Parked: The agent will remain on the call while the customer is on the IVR. They will be able to retrieve the call from the IVR at any point.
- Off: The agent will not be able to transfer calls to an IVR.
- Quick Transfer: Quick Transfers allow the one-click blind transfer of calls to a preset destination. To enable this feature, toggle the Quick Transfer button ON, and choose one of the five destinations from the drop-down menu.
- Audio: An audio message will be played to the customer.
- Message: A message will be displayed to the agent in the Agent interface.
- Agent: The call will be transferred to an agent.
- Hang-Up: The call will be disconnected.
- IVR: The call will be transferred to an IVR.
- Queue: The call will be transferred to a queue.
- Scheduled Callbacks:(Applies to all voice dial modes) Scheduled Callbacks allow agents to schedule a time to call a lead back using the Agent interface.
- Scheduled Callbacks: To enable the feature, toggle the Scheduled Callbacks button to ON.
- Claim Ownership: To allow the user who scheduled the callback to claim ownership of the callback, turn the Claim Ownership button to ON. When a user claims ownership, the callback will appear on their Agent interface Callback Screen.
- Limit (days): Click on the drop-down menu to select the maximum number of days in the future the user can schedule a callback. You can select from 1 to 90 days.
- Show: Click 'All' to show all callbacks, whether Active or Inactive. Click on 'Active' to show only the callbacks that are scheduled to be contacted.
- Drop Call Settings:(Applies to all voice dial modes) In order to comply with certain call abandonment regulations, the Drop Call Settings allow you to designate when a call is considered a dropped call/abandoned call. This feature only applies to Outbound Calls.
- Drop Call Settings: To enable the feature, toggle the Drop Call Settings button to ON.
- Drop Call Limit: Select the Drop Call Limit %. When a Drop Call Limit is specified, the software adjusts the call rate to ensure that the campaign does not exceed this threshold.
- If Call Not Answered In: Indicate how many seconds after connection an outbound call is considered a drop call when unanswered. Choose from 1 to 60 seconds.
- Destination: Use the drop-down menu to designate where the dropped call is routed. There are six options:
- Audio: An audio message will be played to the customer. Select the audio file by clicking on the audio icon-1 icon.
- Agent: The call will be transferred to an agent. Select the agent from the drop-down.
- Hangup: The call will be disconnected.
- IVR: The call will be transferred to an IVR. Select the IVR from the drop-down.
- Queue: The call will be transferred to a queue. Select the transfer queue from the drop-down.
- Voicemail: The call will be routed to a voicemail box. Select the voicemail box by clicking on the vm icon icon.
- Call Restriction (hours): Determine how long the system must wait before it is allowed to dial numbers of previously dropped calls.
- Wrap-Up Settings:(Applies to all voice dial modes) The Wrap-Up setting allows the option to give agents a buffer time in between calls by designating how much time the agent has to wrap up the call prior to receiving the next call. The timer starts as soon as an agent hangs up the call.
- Wrap-Up Settings: To enable the feature, toggle the Wrap-Up Settings button to ON.
- Time Limit: Indicate how many seconds the agent has to wrap up. Choose from 1 to 360 seconds. When the timer runs out, a message will be displayed to the agent.
- Please Note: Even after the timer has run out, the system will wait to dial the next call until the outcome of the previous call has been selected on the call disposition screen.
- Message: A message that your agents will see on the disposition screen after the call has completed.
- Set Call Status:(Applies to all voice dial modes) Once the Set Call Status option is turned on, agents will not see the disposition screen once the call has ended. The call status will be set automatically based on the Default Call Status selected.
- Set Call Status: To enable the feature, toggle the Set Call Status button to ON.
- Default Call Status: Select which default call status will be used.
- Manual Dialing: (Applies to all voice dial modes) The Manual Dialing feature allows you to manage call settings for agents making manual calls.
- Filter: You can filter the calls agents can make in a campaign using on of the following options:
- DNC: Numbers in the do-not-call (DNC) list used by this campaign will be blocked.
- Campaign All Lists: Numbers not present in an active or inactive campaign list will be blocked.
- Campaign Active Lists: Numbers not present in an active campaign list will be blocked
- DNC & Campaign All Lists: Applies DNC and Campaign All Lists rules mentioned above.
- DNC & Campaign Active Lists: Applies DNC and Campaign Active Lists rules mentioned above.
- Time Difference Alert: This feature blocks agent from manually dialing numbers that fall outside of the campaign's contact schedule. Use the Time Difference Alert drop-down menu to choose from five different settings:
- Disabled: All-Time Difference Alerts are disabled.
- Zip Code Mismatch: Displays an alert and blocks the call if the time zone for the lead's zip code is outside of the campaign’s contact schedule.
- Area Code Mismatch: Displays an alert and blocks the call if the time zone for the area code of the phone number is outside of the campaign’s contact schedule.
- Area Code or Zip Code Mismatch: Displays an alert and blocks the call if the time zone for the lead's zip code or the area code of the phone number is outside of the campaign’s local contact schedule.
- Area Code & Zip CodeMismatch: Displays an alert and blocks the call if the time zone for both the lead's zip code and the area code of the phone number is outside of the campaign’s contact schedule.
- Caller ID: Select whether to display the caller ID assigned to the campaign or to the caller ID assigned to the agent for manually dialed calls.
- Preview Dialing:(Applies to Preview Manual mode) The Preview Dialing settings allow you to manage specific call controls for campaigns using Preview Dial mode.

- Lead Owner: If this setting is enabled, the system will only allow the agent to dial leads that belong to them or that belong to the team they are a member. To use this feature, make sure that a user or team is mapped to the Lead Owner field in your import format builder
- None: Agents can dial any lead, regardless of lead ownership.
- Agent: Leads owned/assigned to the agent will appear.
- Team: Leads owned/assigned to the team the agent is a member of will appear.
- Preview Lead:
- Off: The Preview Lead option is disabled.
- Preview: The lead details will be shown and the agent can only call this lead and will not be allowed to skip to a different lead.
- Preview and Skip: The lead details will be shown and the agent may skip this lead and go to a different lead.
- 3-Way Call:(Applies to all voice dial modes) The 3-Way Calling feature allows the agent to add an additional call to an existing live call.
- Caller ID: Use the Caller ID drop-down menu to select which number will appear when a 3-way call is initiated. There are five options:
- Customer: Will show the phone number of the customer.
- Campaign: Will show the campaign-assigned caller ID.
- Agent: Will show the agent's phone number.
- Select: The agent can choose which caller ID will appear.
- Custom: A customer CID will appear.
- Hangup Logging: Enabling this setting will allow the system to log when a 3-way call is disconnected by the customer.
- Hangup Seconds: Hangup seconds allows you to define the number of seconds to wait before logging a disconnected call and sending the call to the disposition screen. Use the drop-down to define the number of seconds. The default is 5 seconds.
- Destination: Setting this option to DISPO will automatically show the disposition screen to the agent when the 3-way call ends. The Default is OFF.
- Automatic List Activation:(Applies to all voice dial modes) The Automatic List Activation feature will automatically activate any List added to the Campaign. This applies to Lists that are uploaded manually, through the list automation feature, or via API connectivity. To enable this feature, toggle 'Automatic List Activation' to ON.
- Agent Screen Settings:(Applies to all voice dial modes) The Agent Screen Settings allows you to select which feature the Agent will have access to in the Agent interface.
- Show Dialable Leads: To show dialable leads, toggle the button to ON. This allows the agent to view the Active Leads in the agent portal.
- Show Queue Count: Shows how many calls are in 'Calls in Queue' in the Top Menu of the Agent interface.
- Show Queued Calls: When the agent clicks on Calls in Queue, the screen with the details of the calls will appear on the screen.
- Pause Agent After Call: When an agent finishes a call, there will be a brief pause before the next call is connected.
- Grab Calls in Queue: Once the Calls in Queue screen appears, the agent will have an option to grab a call from the queue.
- No Leads Login: Agents can log in to the campaign even if there are no leads available.
- Agent Field Labels: Use the Agent Field Labels drop-down menu to select which field labels to display on the Lead Details screen. The Lead Details can be viewed by the agents when they log into the Agent interface.
- Lead Modification:(Applies to all voice dial modes) Lead Modification allows an agent to make changes to the lead's information. To enable this feature, toggle the Lead Modification button to ON and choose which lead information may be modified by the agent:
- General Information
- Phone Number
- Notes
To hide a lead's phone number, check the box next to Hide Phone Number.
Broadcast Settings
Applies to Voice Broadcast and Click Voice Broadcast Dial Modes only.
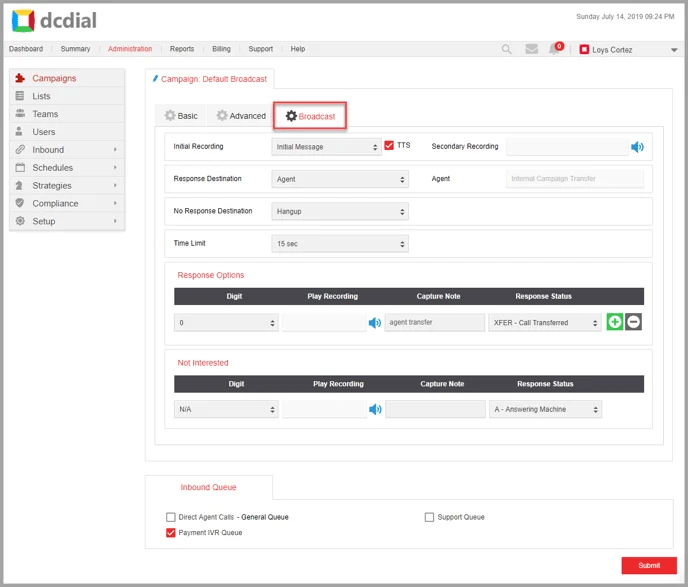
- Initial Recording: You can choose an initial audio file or a TTS (text-to-speech) message to play once a call is answered.
- Audio File: Click on audio icon-1 icon to select an audio file from the audio store.
- TTS: Check the TTS box and use the drop-down to choose a text-to-speech message.
Please Note: Your audio recording or TTS message should coincide with the response options defined in the sections below.
- Secondary Recording: Use this option to play a second audio file after the called party responds using one of the response digits defined.
- Audio File: Click on audio icon-1 icon to select an audio file from the audio store.
Please Note: Any recording linked with a response digit will play before the secondary recording plays.
- Response Options:
- Response Destination: Select where the call will be routed to once a response is received from the customer. You can choose from the following options:
- Agent: The call will be transferred to the next available agent.
- External: The call will be routed to an External Number. Use the drop-down to select the number to use.
- Please Note: You can add or modify external numbers in the Company Numbers menu.
- Hangup: The call will be disconnected.
- IVR: The call will be routed to an IVR (Interactive Voice Response). Use the drop-down to choose the IVR to which the call will be transferred.
- Please Note: You can add or modify IVRs in the IVR Designer menu.
- Recording: This option will capture a voice recording from the customer. Customer recordings are saved in Broadcast Recordings under System Recordings.
- Voicemail: Calls will be routed to a voice mailbox where the customer can leave a message. Click on the vm icon icon to choose which Voicemail Box the call will be transferred to.
- Response Digits: You can select up to five digits that will route the called party to the Response Destination selected above. You can also capture lead notes and/or update the lead status when a digit is pressed by the lead. For example, you could use a broadcast message to gather voter data or marketing research. Leads can respond to “yes” or “no” questions by pressing 1 or 2. At least one digit must be enabled in this section. Use the add delete buttons to add or delete response options respectively
- Digit: Select which digit in the handset keypad can be pressed by the recipient. You can configure up to five options.
- Play Recording: Click on the audio icon-1 icon to choose which recording will be played when a recipient presses the respective digit.
- Capture Note: Enter the capture note that will be saved under the lead activity. For example, if a customer receives a call and presses ‘1’, DCDial saves the capture note for digit ‘1’ with the call log, so the Admin can view which digit a customer pressed.
- Response Status: Select the lead status update when the digit is selected.
- No Response Options: If a call is answered but the called party does not make a selection, it is considered a no response.
- No Response: Choose where the call will be routed if no response is received from the called party.
- Time Limit: Select a time limit before the No Response Destination action is triggered.
- Not Interested: This feature can be used to prevent the called party from receiving further calls. For example, if a 'Not Interested' response is received, you may choose to update the status of the lead to Do Not Call (DNC) which will prevent the system from contacting the lead again.
To enable this option, select a digit from the drop-down and enter an optional capture note and lead status update.
- Not Interested: Select which digit in the handset keypad can be pressed by the recipient. You can configure up to five options.
- Play Recording: Click on the audio icon-1 icon to choose which recording will be played when a recipient presses the respective digit.
- Capture Note: Enter the capture note that will be logged when the digit is selected.
- Response Status: Select the lead status update when the digit is selected.
Inbound Queue
The Inbound Queue setting indicates which queues agents from this campaign will be able to receive calls from. Check on all Queues you wish to allow.

SMS Broadcast
Basic Settings
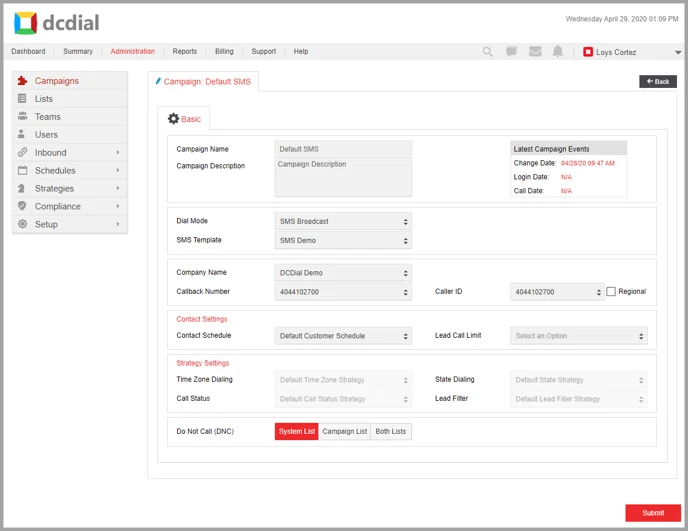
- Campaign Name: The name of the campaign.
- Campaign Description: A description of the campaign.
- Latest Campaign Events: This contains a summary of events for the campaign, including the most recent Change Date, Login Date, and Call Date.
- Dial Mode: Should display SMS Broadcast in this case. There are eight other dial modes: Voice Broadcast, Predictive Dialer, Preview Manual Dialer, Power Dialer, Click Voice Broadcast, Click Predictive, Click Power, and Email Broadcast.
- SMS Template: The SMS template used for the SMS Broadcast. Click on the drop-down to select which template to use. You can create or modify the templates in the SMS Templates menu.
- Company Name: The Company Name that can be added to the SMS Template. You can create or modify company names in the Company Branding menu.
- Caller ID: Caller ID (CID) is the number that appears on your customer's phone when you message them.
Please Note: You may assign only the toll-free numbers provided by DCDial as a Caller ID for the SMS Broadcast campaigns.
- Contact Settings:
- Contact Schedule: The Contact Schedule delimits a time frame to contact your leads based on their local time zone. If your Contact Schedule is set from 10 am – 8 pm, and the lead's local time is 8 am EST, then DCDial will not dial that lead until their local time is 10 am EST.
You can create or modify contact schedules in the Customer Contact Schedule menu.
- Lead Call Limit: Use the drop-down to select the Lead Call Limit assigned to each campaign. You can manage the number of times a lead can be contacted on a daily or weekly basis. Go to the Lead Call Limit menu to create or modify limits.
- Strategy Settings: The Strategy Settings feature allows Admins to view the Time Zone Dialing Strategy, State Dialing Strategy, Call Status Strategy, and Lead Filter Strategy to be used in the Campaign.
- Time Zone Dialing: This Shows the Time Zone Strategy attached to the campaign. To change the Time Zone Dialing strategy, go to the Advanced Settings in the Dashboard. You can add or modify time zone dialing in the Time Zone Strategy menu.
- State Dialing: This shows the State Dialing Strategy attached to the campaign. To change the State Dialing Strategy, go to the Advanced Settings in the Dashboard. You can add or modify state dialing in the State Dialing Strategy menu.
- Call Status: This shows the Call Status Strategy attached to the campaign. To change the Call Status strategy, go to the Advanced Settings in the Dashboard. You can add or modify call statuses in the Call Status Strategy menu.
- Lead Filter: This shows the Lead Filter Strategy attached to the campaign. To change the Lead Filter Strategy, go to the Advanced Settings in the Dashboard. You can add or modify lead filters in the Lead Filter Strategy menu.
- Do Not Call (DNC): Do Not Call (DNC) prevents the system from contacting any number saved in a system-wide or campaign-specific DNC list. If enabled, you will have to select a DNC list you would like the Campaign to filter leads against.
- Do Not Call (DNC): To enable the feature, toggle the Do Not Call (DNC) button to ON and select the DNC list to be used for the Campaign.
- DNC Options: The Campaign can filter the leads using either the System List, Campaign List, or both.
- System List: Includes the numbers added in the DNC list in the system for all Campaigns in the dialer.
- Campaign List: Includes the numbers that have been added to the DNC list for the Campaign only.
- Both Lists: Includes both System and Campaign DNC lists.
Email Broadcast
Basic Settings
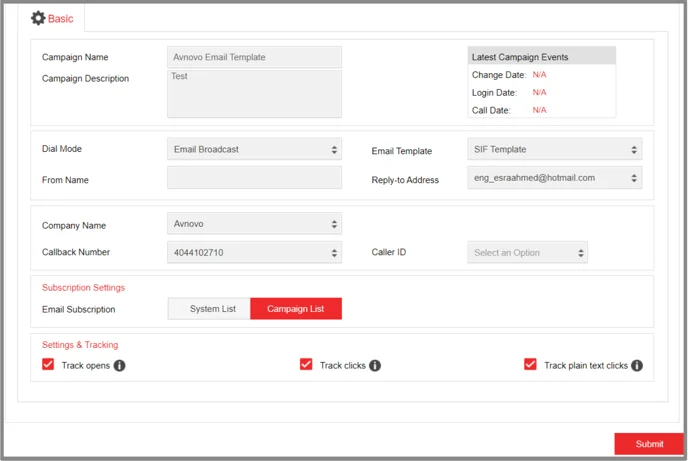
- Campaign Name:(Applies to all voice dial modes) The name of the campaign.
- Campaign Description:(Applies to all voice dial modes) A description of the campaign.
- Latest Campaign Events:(Applies to all voice dial modes) A summary of events for the campaign including:
- Change Date: The date and time when the most recent change was made.
- Login Date: The date and time when an agent last logged in to the campaign.
- Call Date: The date and time when a call was made or came into the campaign.
- Dial Mode: Should display Email Broadcast in this case. There are eight other dial modes: Voice Broadcast, Predictive Dialer, Preview Manual Dialer, Power Dialer, SMS Broadcast, Click Voice Broadcast, Click Predictive, and Click Power.
- Email Template: The email template applied to the current campaign.
- From Name: The name that is displayed in an inbox above or to the left of the subject line. It tells the recipient who sent the message or who it's from.
- Reply-to Address: It is the email address that the reply message is sent to when you want the reply to go to an email address that is different than the From Name address.
- Company Name: The Company Name that can be added to the Email Template. You can create or modify company names in the Company Branding menu.
- Callback Number:
- Caller ID: Caller ID (CID) is the number that appears on your customer's screen when you message them.
Email Subscription:
- System List: The email addresses will be opted-in to / opted-out from all existing lists within the system.
- Campaign List: The email addresses will be opted-in to / opted-out from all lists associated with a campaign.
- Settings & Tracking
- Track opens: Email tracking enables you to see whether your email where opened and how many times
- Track clicks: Click tracking is an analytics feature that measures and reports where people click or tap on a link
- Track plain text clicks
Callbacks
When the system contacts a customer and transfers the call to an agent, the customer can request to be called back later. The agent enters the date and time that the customer wants a callback in the agent interface to schedule the callback. DCDial will alert the agent when a callback is due and it is time to contact a customer.
To view scheduled callbacks, click on the icon.
The 'Callbacks' screen will open, listing callbacks along with the following details:
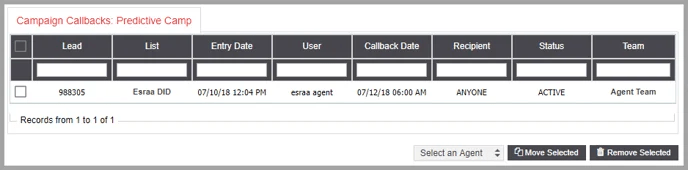
- Lead: The lead ID.
- List: The list the lead is in.
- Entry Date: The date and time the callback was created.
- User: The agent user ID that scheduled the callback.
- Callback Date: The date and time the callback is scheduled for.
- Recipient: The owner of the callback. If the callback is not assigned to a specific agent, the recipient will show 'Anyone'.
- Status: The status of the callback.
- Team: The team the callback is assigned to.
- Move Selected: To assign a callback to a specific agent, choose the callback, select an agent from the drop-down menu, and click on 'Move Selected'.
- Remove Selected: To delete a callback, select the callback you want to delete and click on 'Remove Selected'.