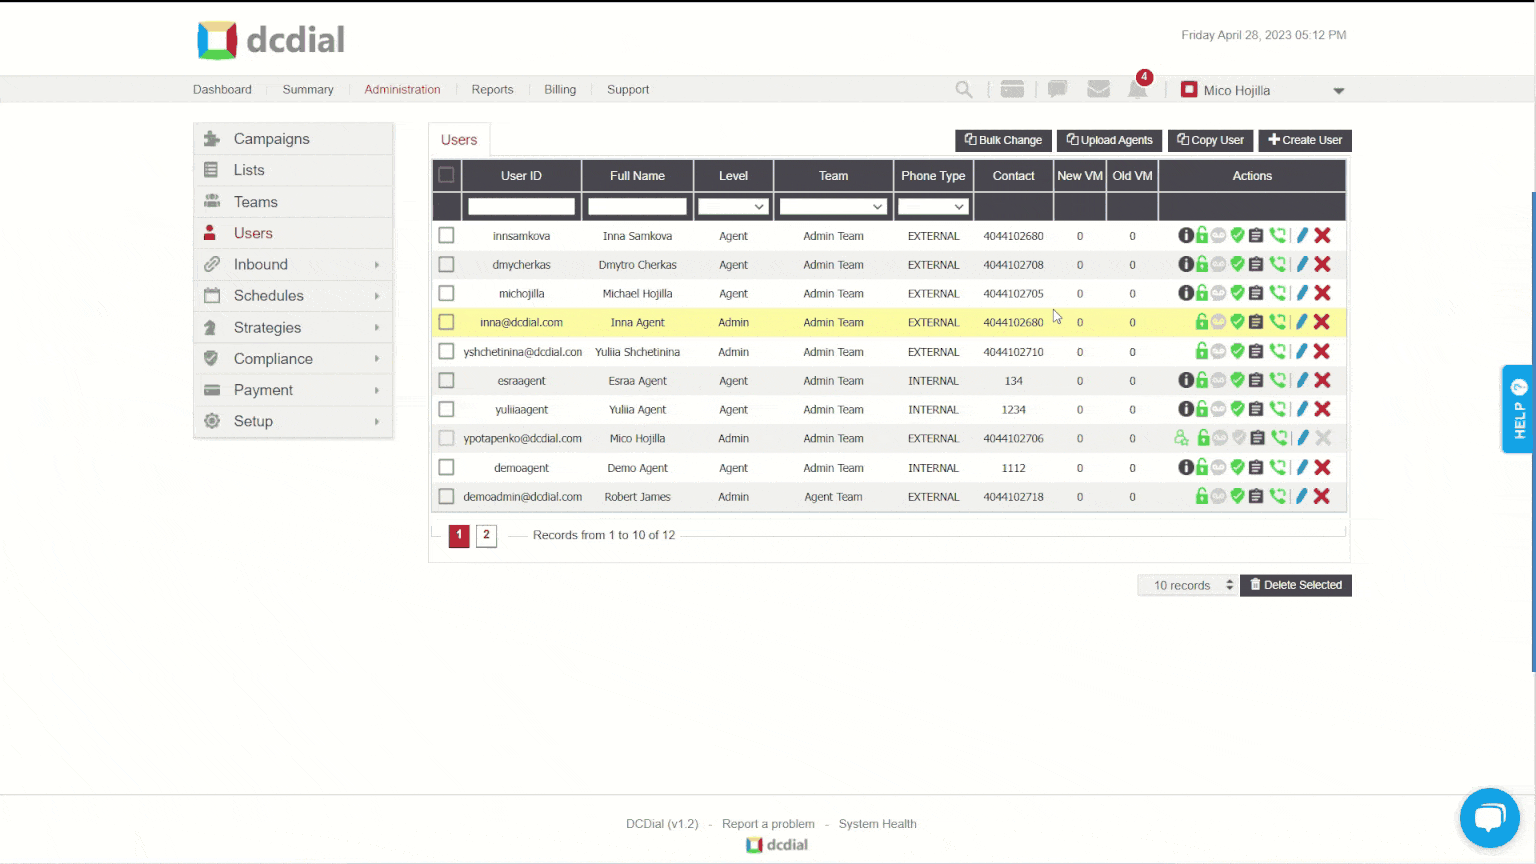
Users
The user management page provides a central location for creating, provisioning, and managing user accounts for administrators, managers, agents, and payment users who can access DCDial.
Agents are users who handle customer interactions directly and can access the agent interface only. Non-agent users include managers and administrators who have access to the admin portal. Payment users are agents who can access the agent interface and some pages in the admin portal.
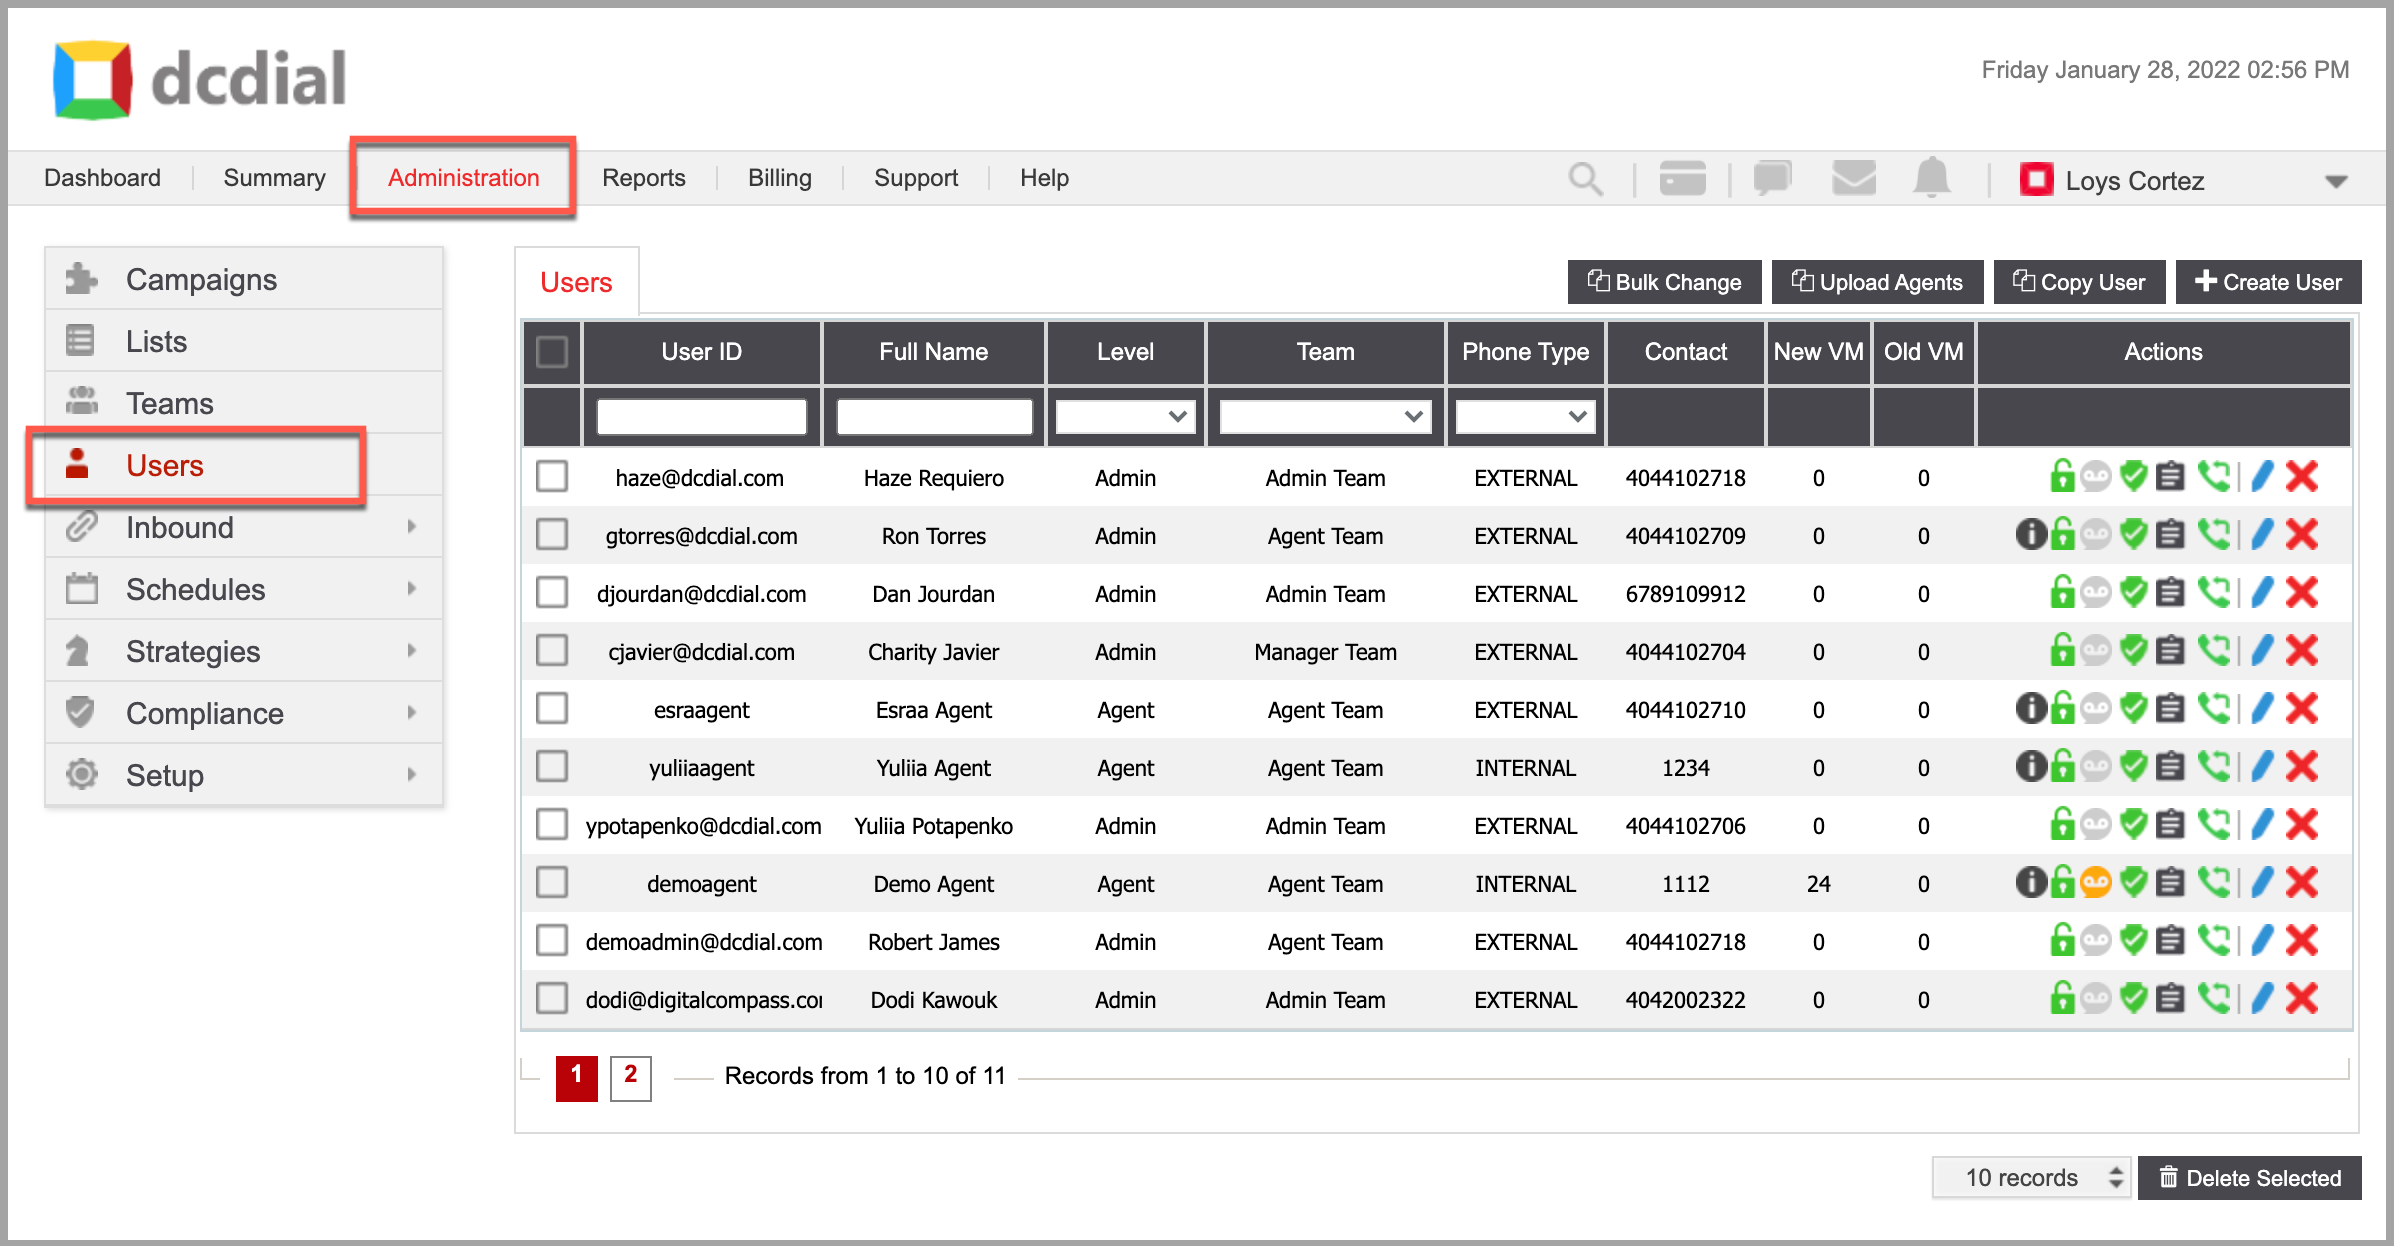
- Level
The user's access level. There are four user levels:
- Agent: Allows user access to the agent interface only for inbound and outbound calling.
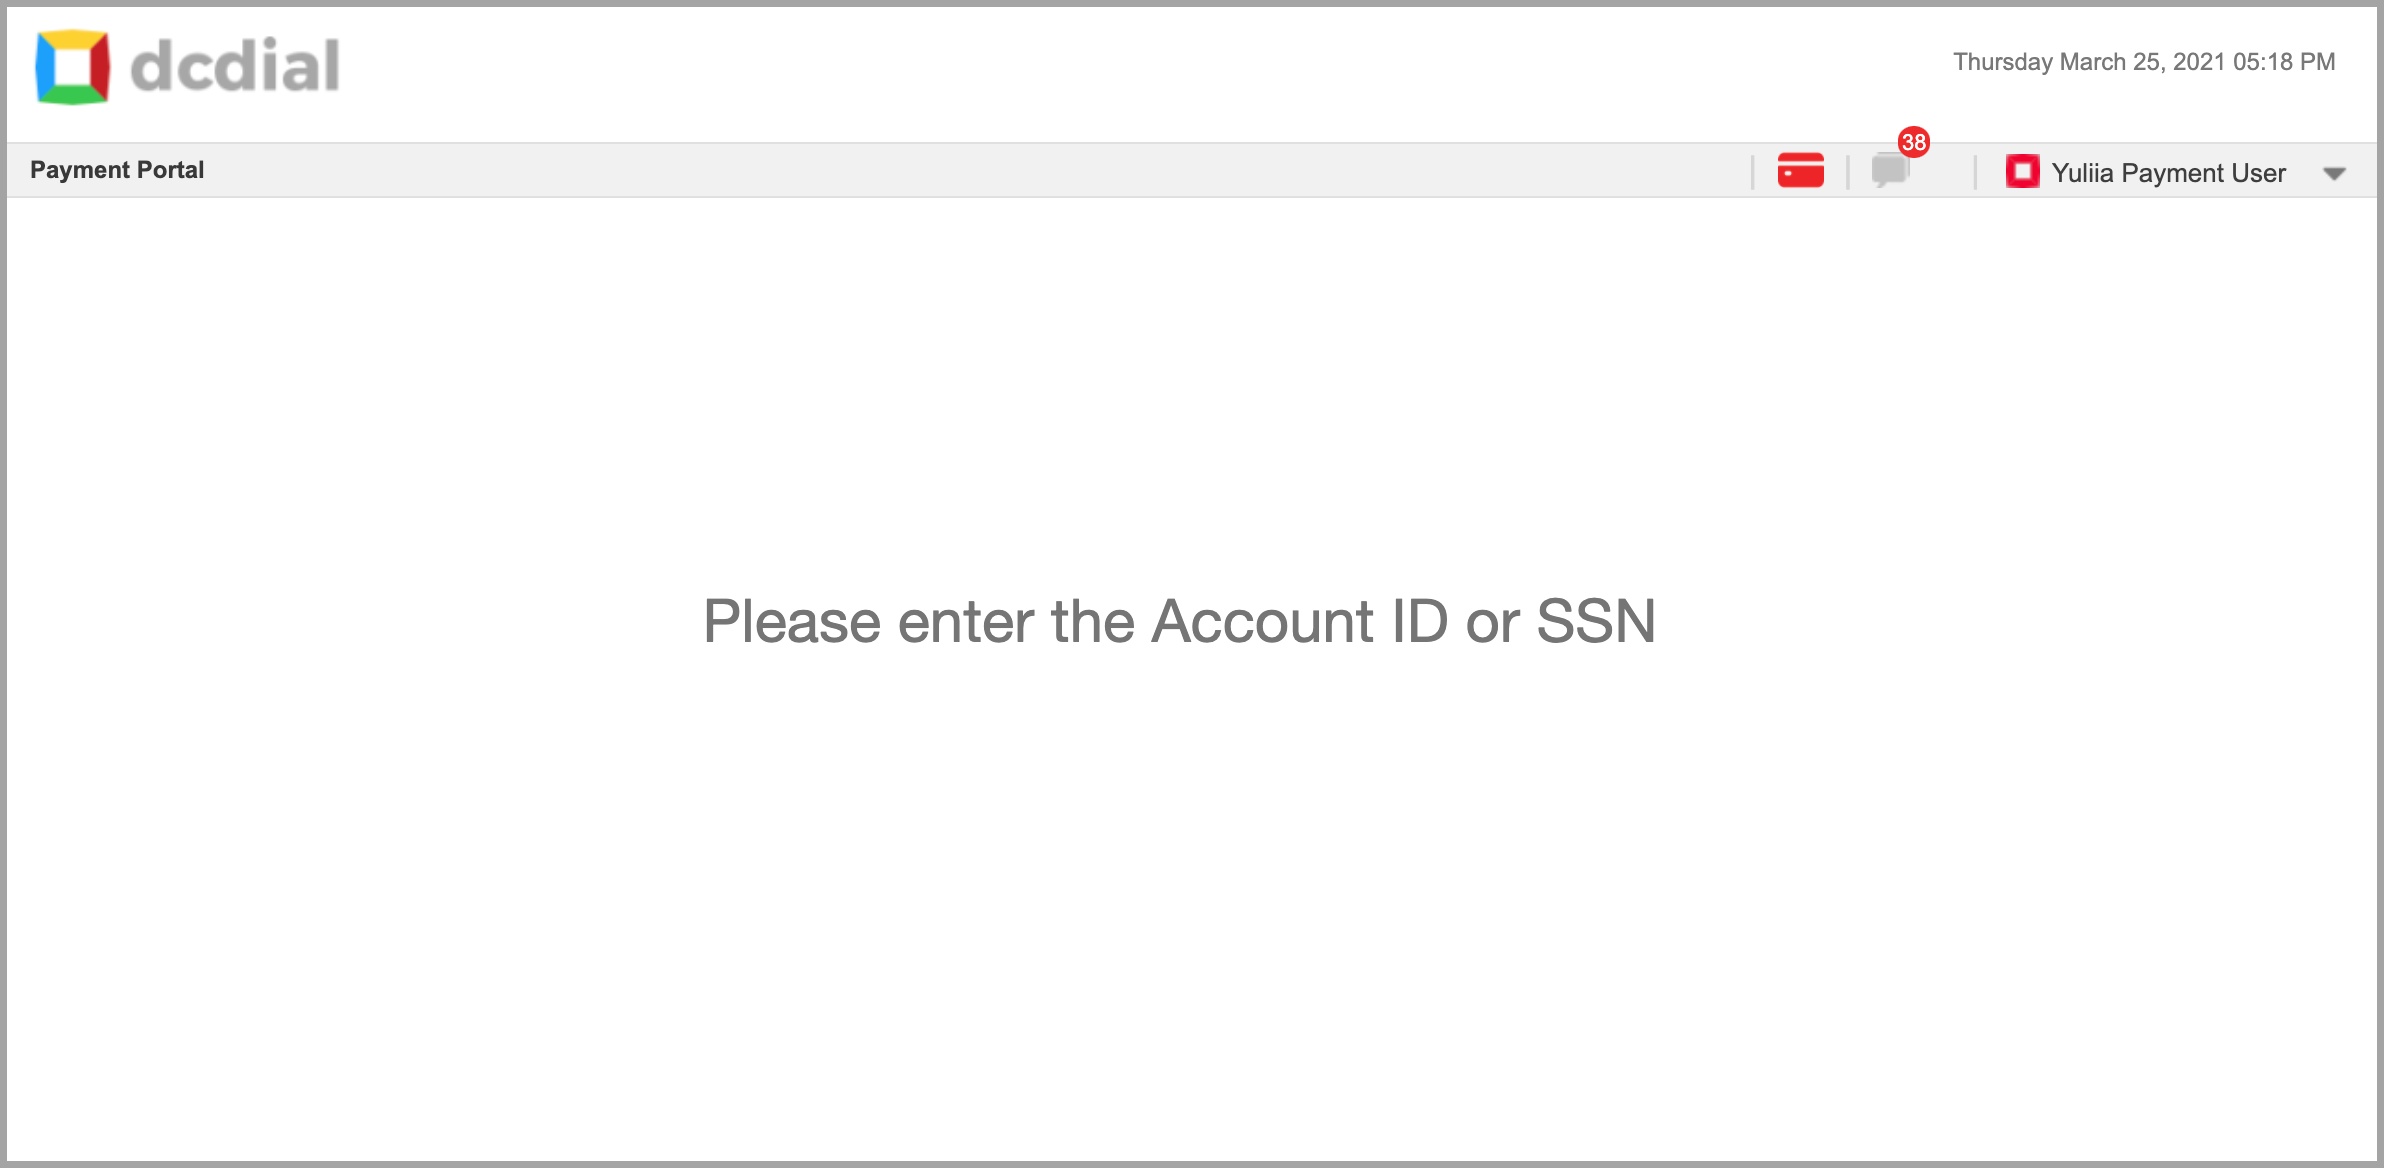
- Payment User: This allows the agents to access the internal payment portal and the conversation window, aside from the agent interface. All other pages in the admin portal are not available to Payment Users.
- Manager: Allows access to the admin portal. Managers cannot initiate changes to Users with an equal or higher user level.
- Admin: Allows System Administrators unrestricted access to the DCDial interface and all User and Campaign settings.
- Team
- Phone Type
- Contact
- New VM
- Old VM
- Actions
- Primary Account: The user is currently set as the account owner. Contact support if you want to transfer account ownership to a different user.
- Active Overrides: Permissions set for the user override campaign and/or team settings.
- User Unlocked: The user's account is unlocked.
- User Locked: The user's account is locked after 5 failed login attempts. Click on the icon to unlock the account.
- No Voicemail Found: The voicemail box is empty or has no new messages
- New Voicemail Message: The user has received a new voicemail message.
- Active Status: The user is active. Click on the icon to deactivate the user.
- Inactive Status: The user is inactive. Click on the icon to activate the user.
- View Activity Log: Click on the icon to view a summary of events. Learn more about the activity log
- View Callbacks: The scheduled callbacks for the user.
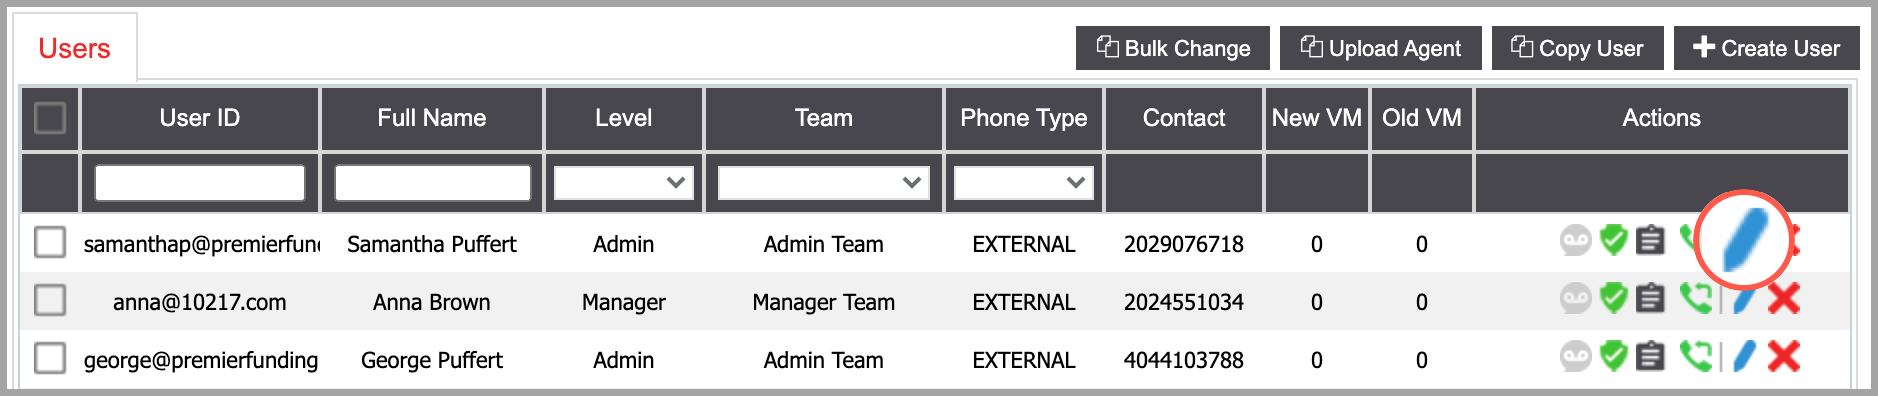
- Modify User: Click on the icon to modify the user.
- Delete User: Click the icon to delete the user. A confirmation screen will appear to confirm the deletion.
CREATE USER
Step 1. Click on the ‘Create User’ button on the top right to create a new user. The steps vary depending on the user level:
- Creating Admin / Manager Level User
- Creating Agent Level User
- Creating Payment Level User

CREATE ADMIN / MANAGER LEVEL USER
Step 2.1. Complete the required fields in the pop-up window and click ‘Create’ to proceed. You will see a confirmation once the User has been created successfully and you will be redirected to the user details page to complete the setup process.
- Select User Level
- Select User Team
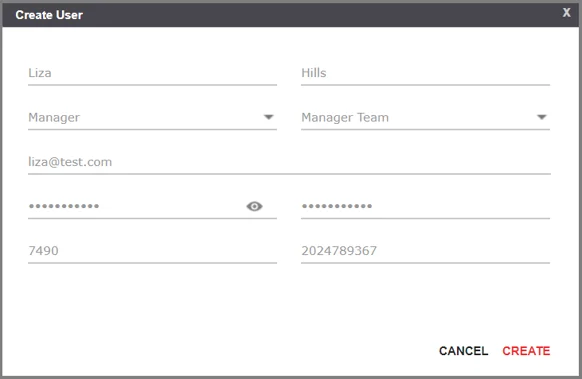
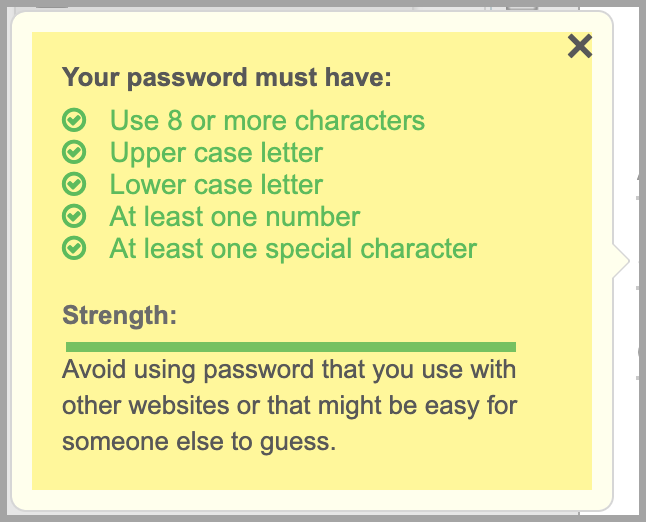
- Password
Create a unique password.
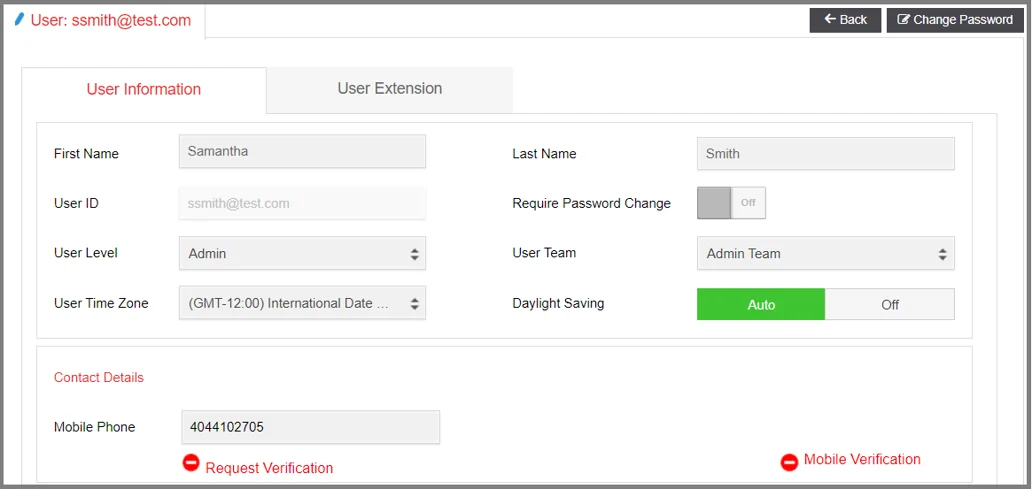
Step 2.2. Configure the User settings on the user details page. When done, click on ‘Submit’ to save your changes.
User Information
- Change Password
You can change a user's password by clicking on the 'Change Password' button on the top right. Enter the new password and click on 'Update'.
- First Name
- Last Name
- User ID
- Require Password Change
- User Level
- User Team
- User Time Zone
- Daylight Saving
- Contact Details (Admin and Manager level users)
- Phone Number: Click on 'Mobile Verification' to confirm the mobile phone number.
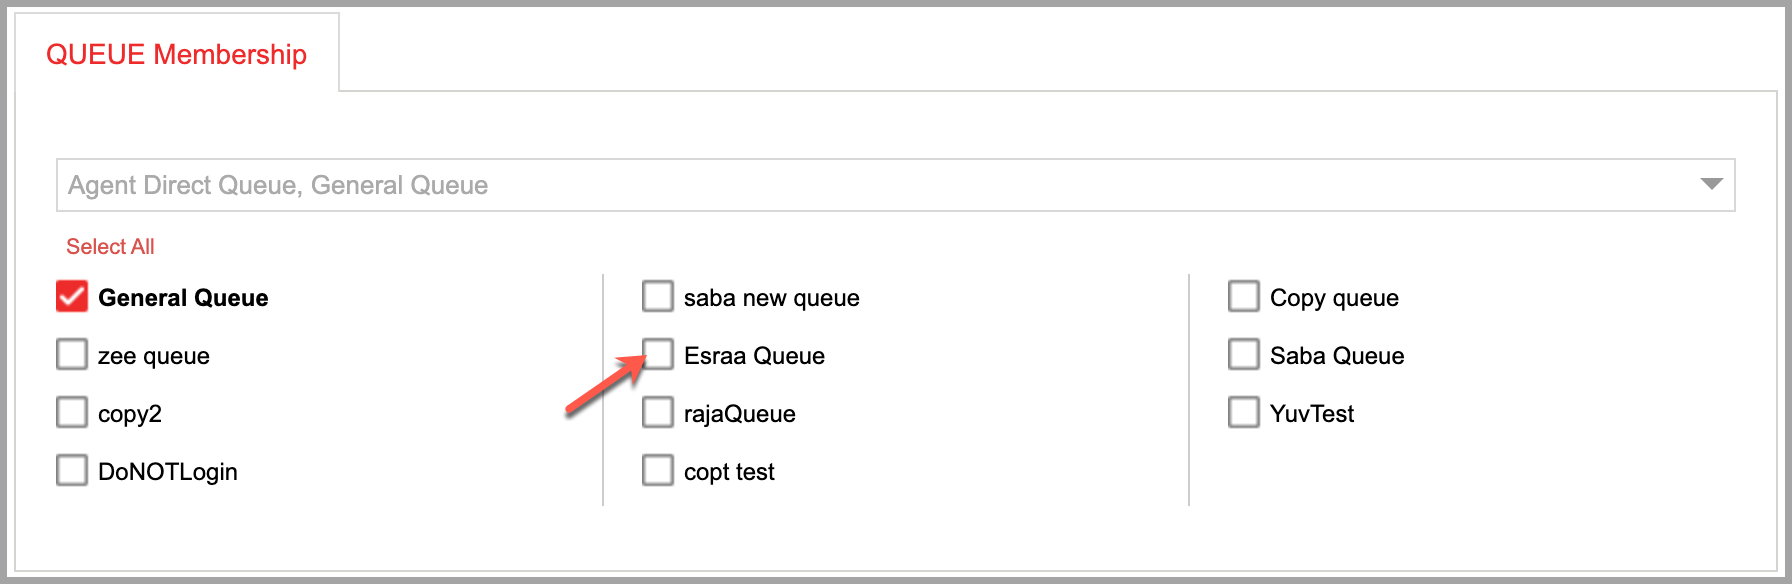
Queue Membership (Agent level users)
To assign the user to a specific Queue, check the box next to the queue name. You can select multiple queues.
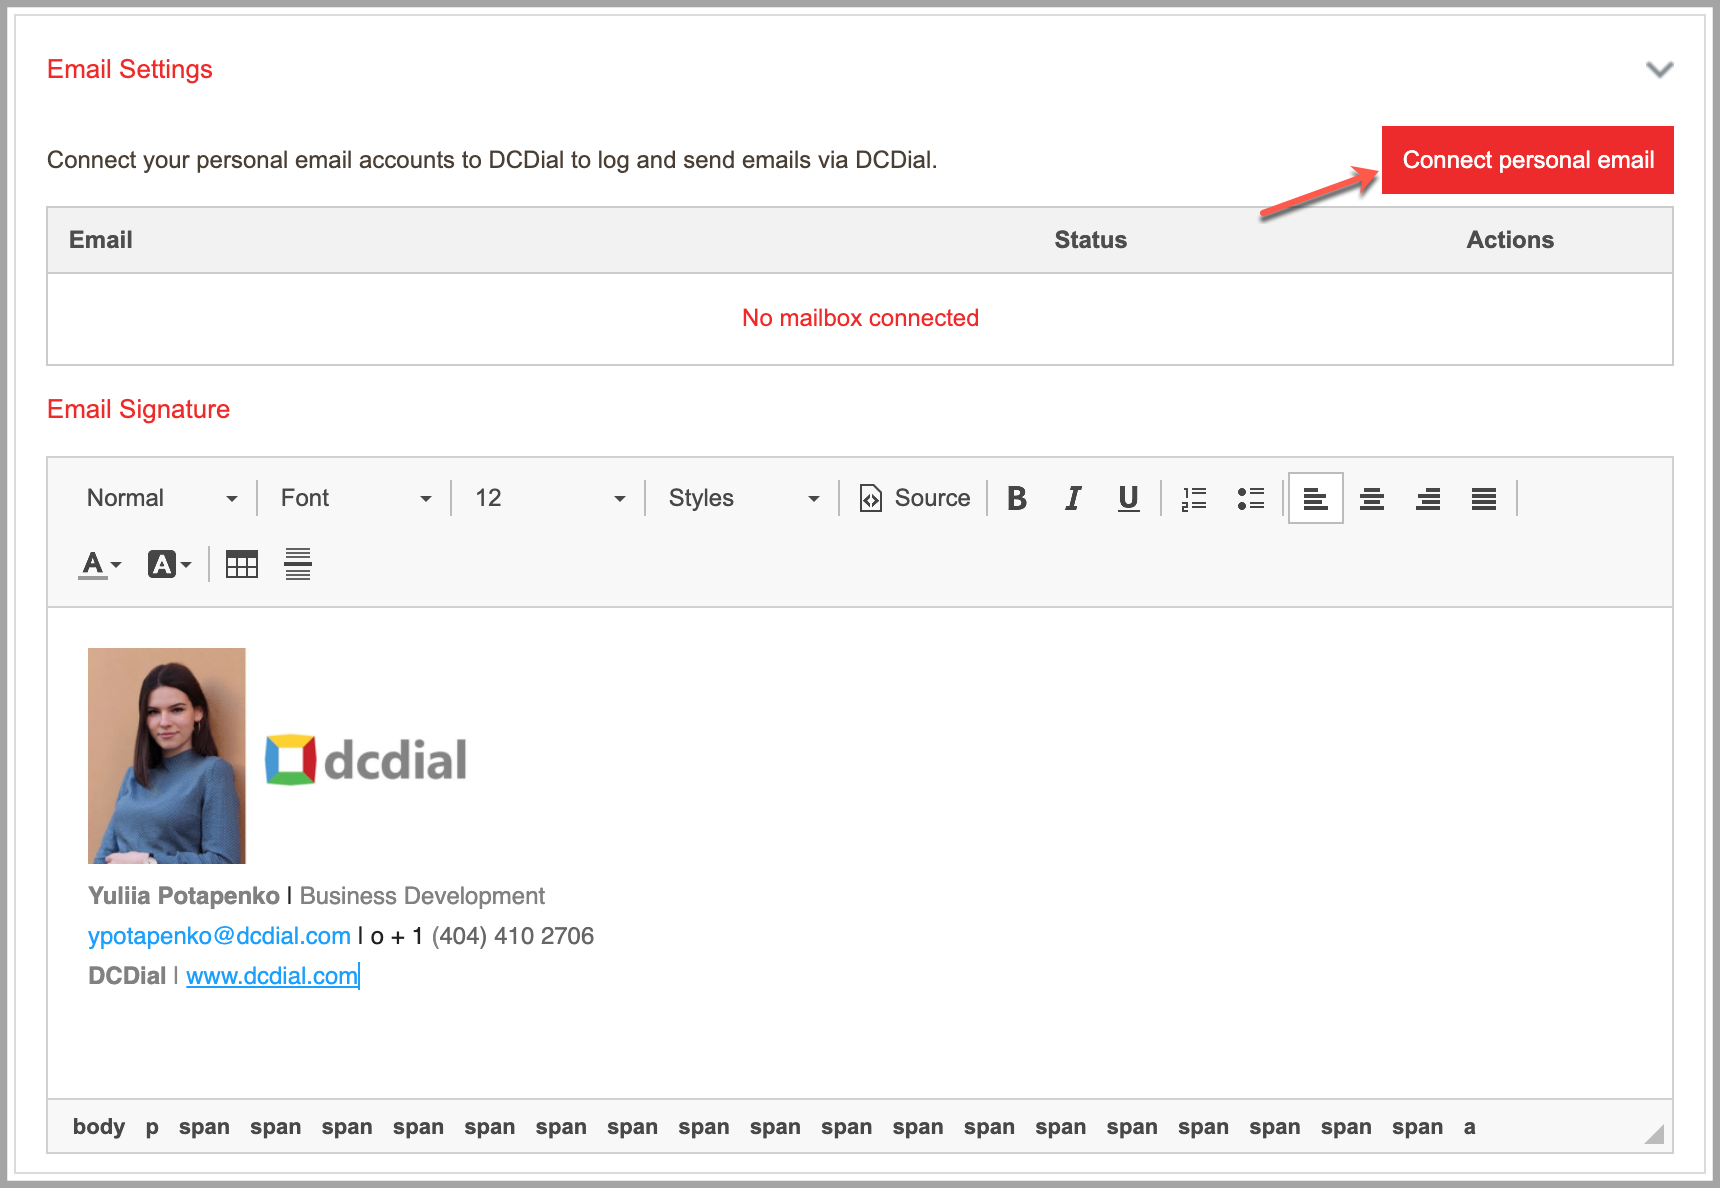
Email Settings
Connect a personal email to DCDial to send one-to-one emails from the internal portal. By connecting your personal email, you give DCDial permission to send emails to your customers on your behalf. You can also add a professional email signature to establish a personal association and connection with the customers receiving emails from you. The signature may include your branding, social media links, contact information, legal disclaimers, etc.
STEP 1. To connect your personal email to DCDial, click 'Connect Personal Email.'
STEP 2. Select your email provider from the available options.
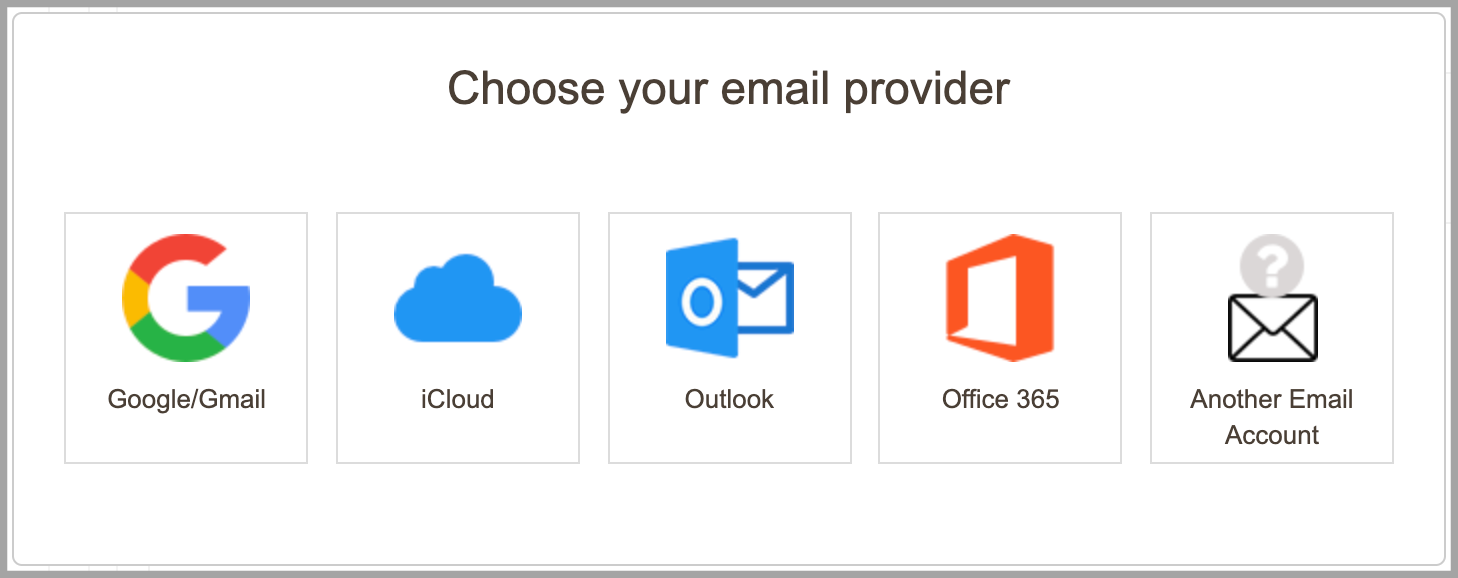
STEP 3. Read through what to expect when you connect your inbox to DCDial, then click 'Continue'. The requirements may differ depending on your email provider. You will be prompted to log in to your account.
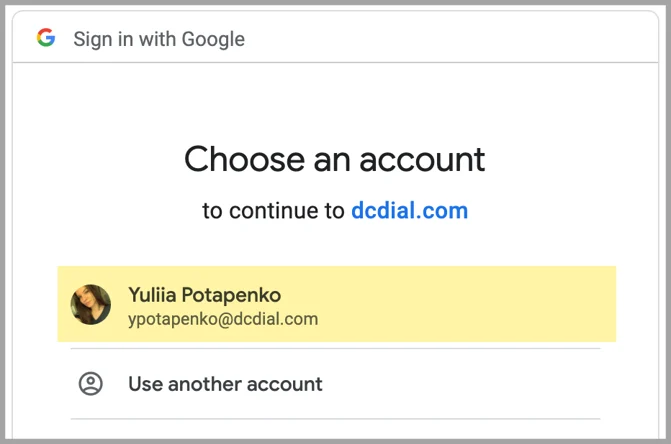
If you are using a Gmail account, enter the email address of the Google account you want to use. If you are already logged into one or more of your Gmail accounts, choose the account you want to connect.
STEP 4. Review the required permissions, then click 'Allow'.
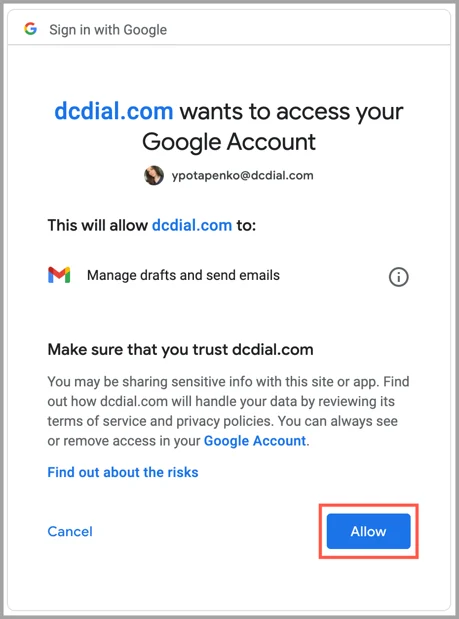
You will be redirected back to the user settings, and a dialog box will appear to inform you that your inbox is now connected to DCDial. To remove your personal email account from DCDial, click on icon. To disable your email account, click on icon. Later, you can enable it if needed.

User Extension
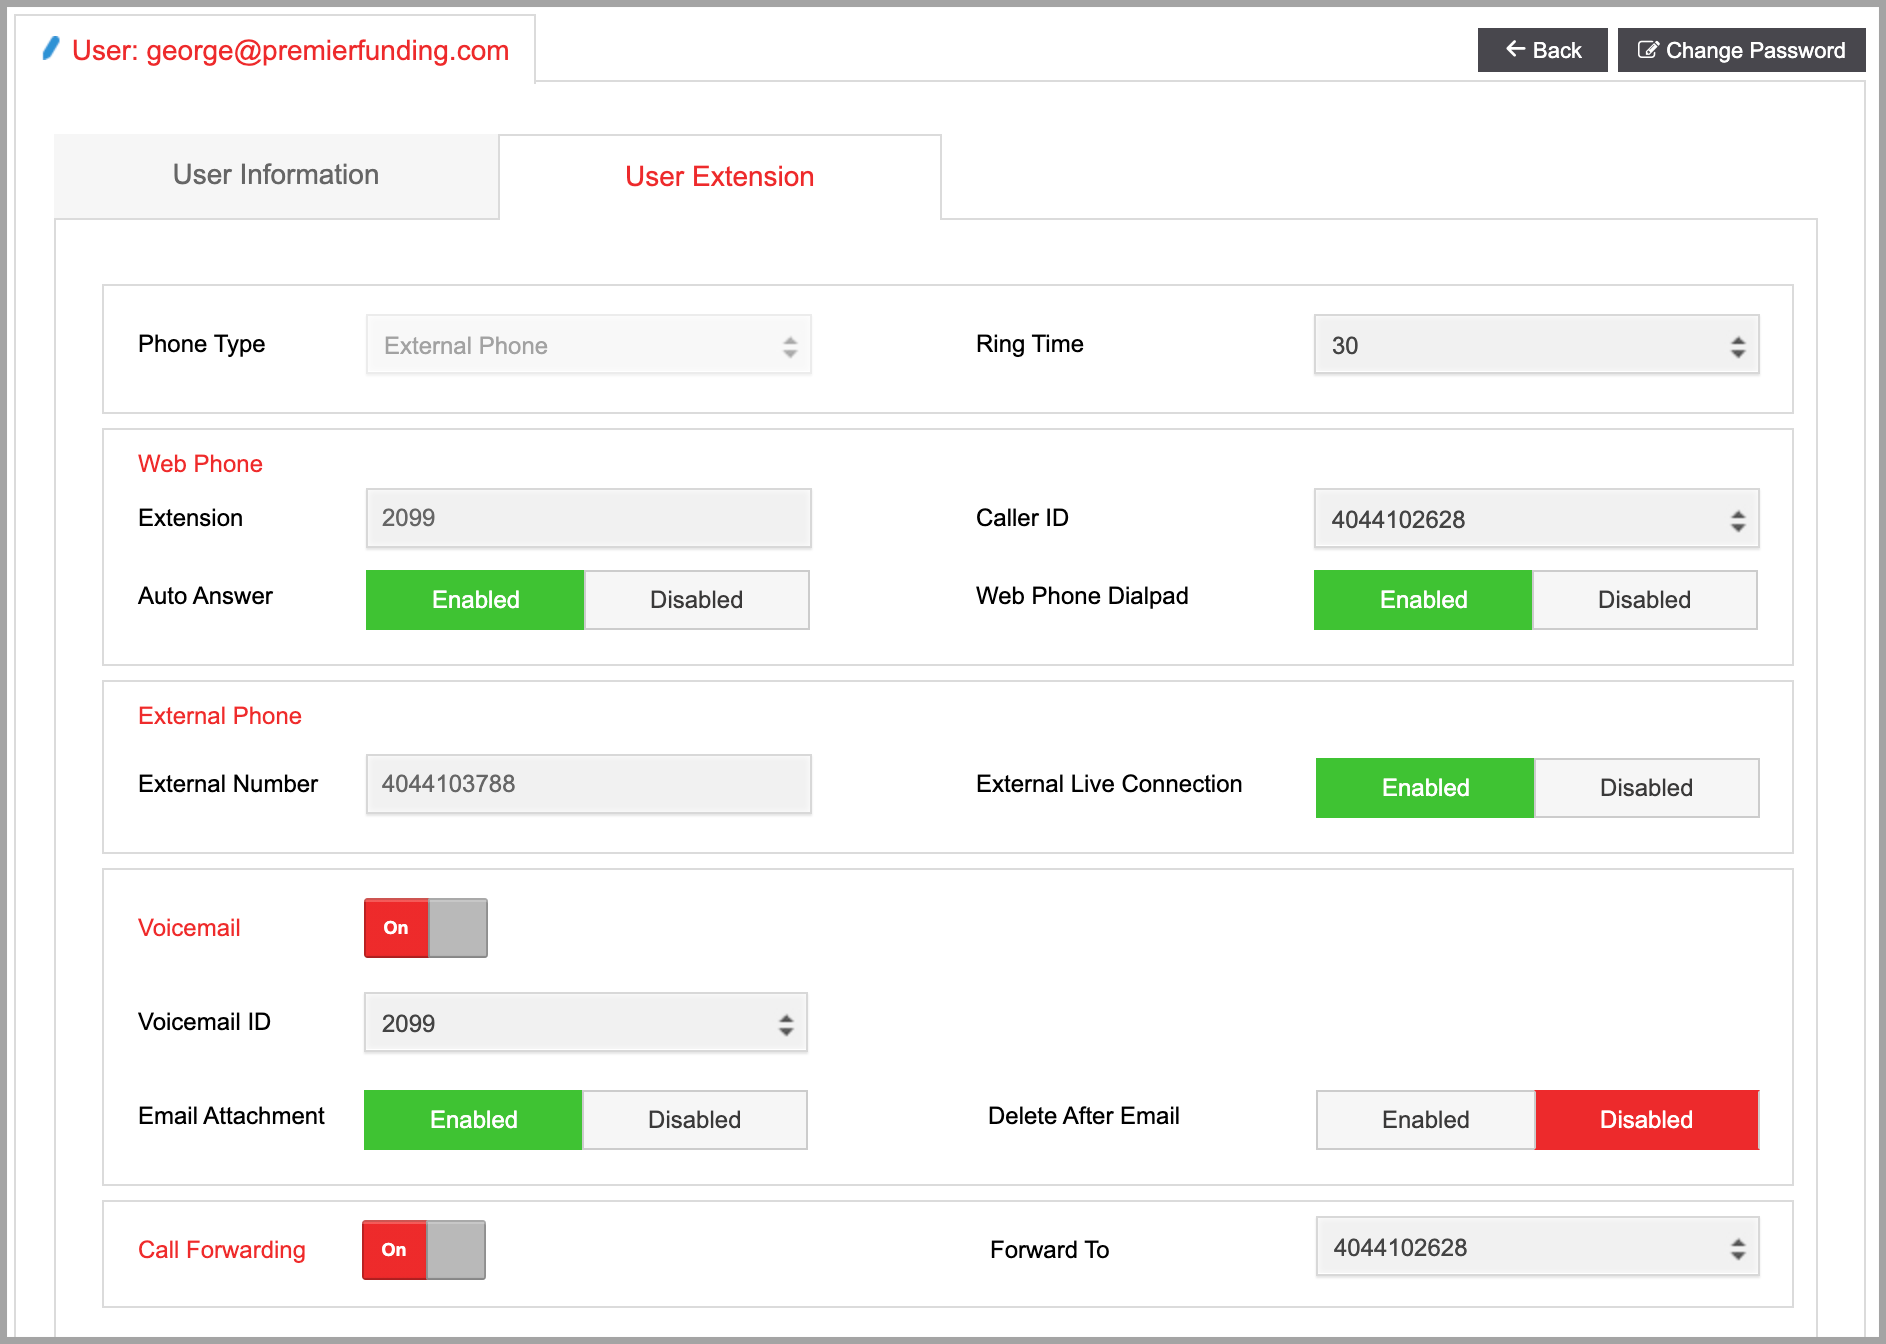
- Phone Type
Select between the External Phone and Internal WebPhone. For the admin level users, the phone type will be set to External Phone automatically.
- Ring Time
Select the number of seconds the agent's phone will ring before the call is terminated. We recommend setting the ring time to a minimum of 30 seconds. You may adjust the time later as needed.
- Extension
The user's extension number.
- Caller ID
Select a caller-ID for the user. If the Caller ID under Advanced Campaign Settings is set to use the agent phone, the caller ID selected in this field will be used when an agent dials manually.

Please note: If no caller ID is selected here, the system will automatically use the caller ID defined in the campaign settings.
- Auto Answer
- Web Phone Dialpad
- External Number
- External Live Connection
If disabled, the system will not maintain a live connection and will call the agent only when an INBOUND call is connected, please note that this option doesn't work with outbound calls
Please note: We recommend keeping this option enabled to connect agents with live customers immediately.
- Voicemail
- Voicemail ID
- Email Attachment
- Delete After Email
- Call Forwarding
- Forward to Select the alternative phone number from the drop-down menu
Permissions
Permissions may vary based on the user level. Admin-level users are automatically granted all permissions.
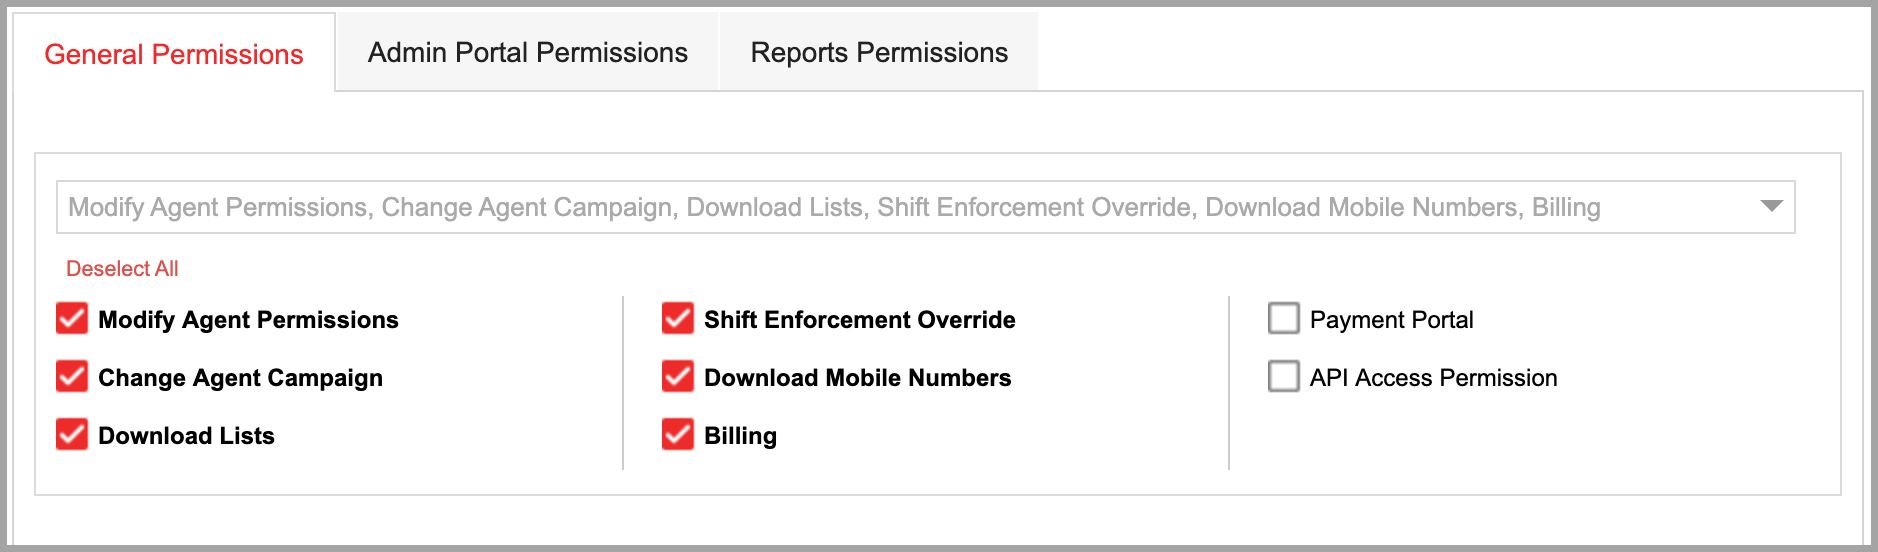
Admin and Manager User Level
- General Permissions
- Modify Agent Permissions: This allows the user to modify permissions for agent user levels.
- Change Agent Campaign: This allows the user to change the campaign an agent is logged into.
- Download Lists: This allows users to download a list from the modified list page.
- Shift Enforcement Override: This allows the user to override shift restrictions for an agent.
- Download Mobile Numbers: This allows the user to download all mobile numbers in a list from the modified list page.
- Billing: This allows the user to access the Billing page.
- Payment Portal: This allows the user to access the payment portal.
- API Access Permission: Available for admin-level users only
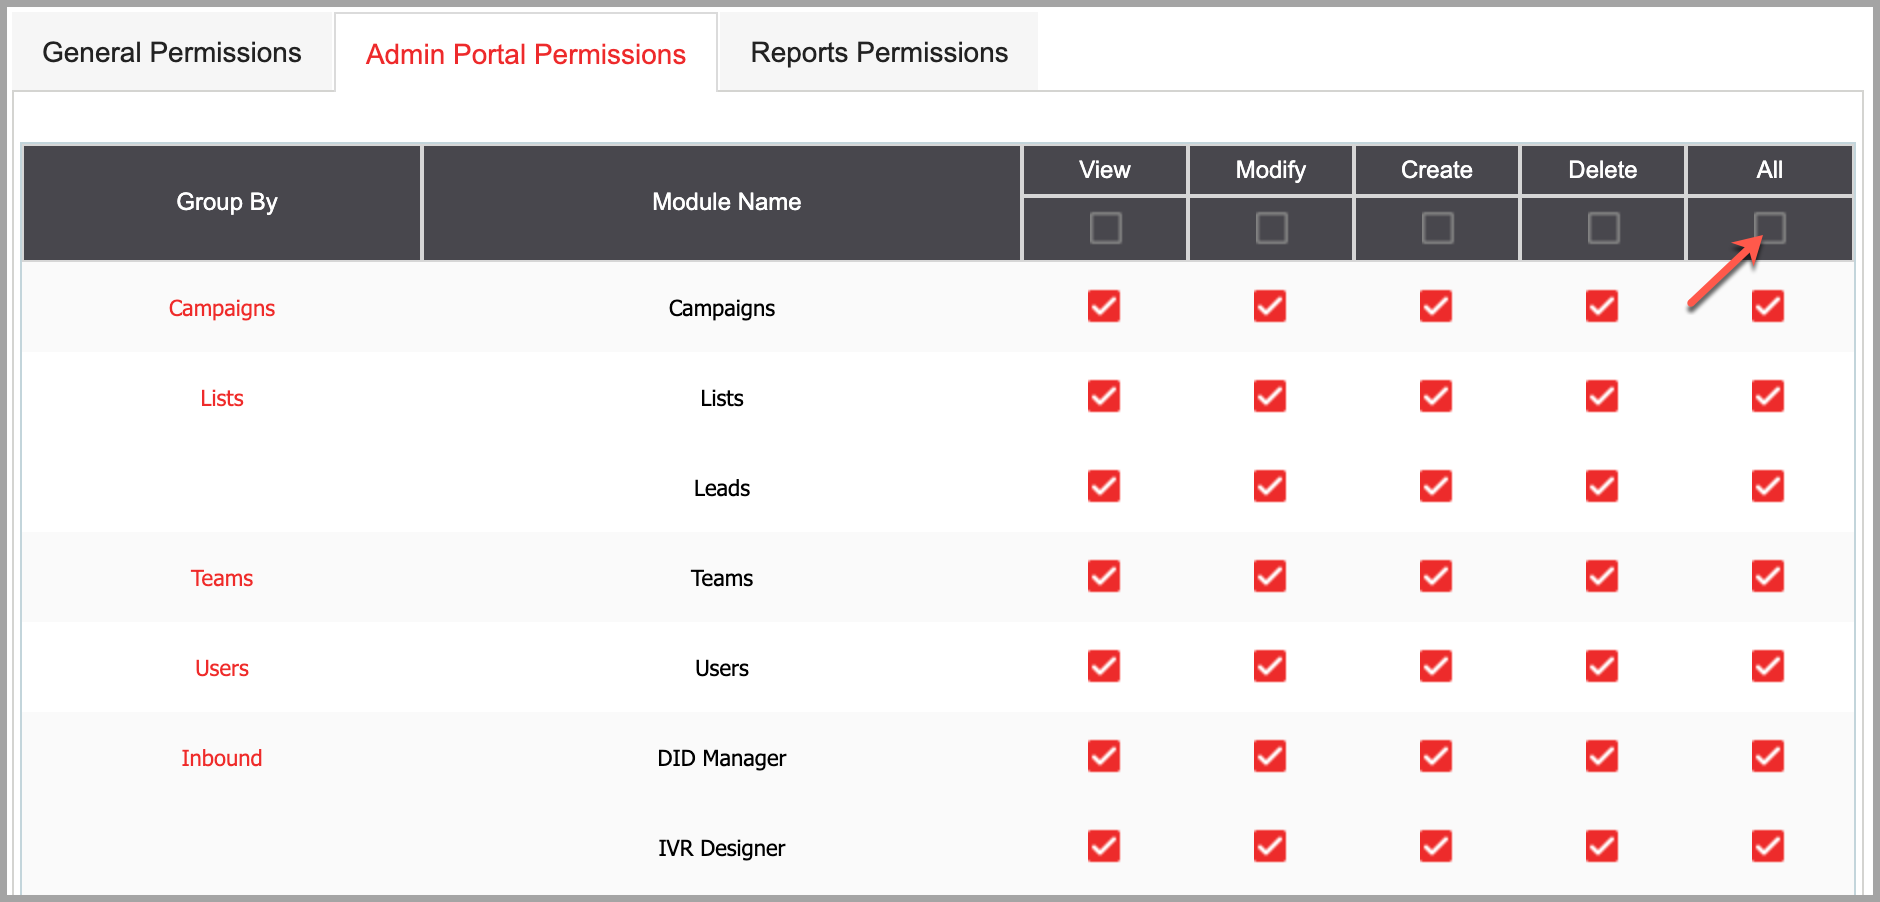
- Admin Portal Permission
Admin and manager-level users can be granted permissions for each Administration module in the admin portal. Check the 'View' to allow users to view the information. Check the 'Modify', 'Create', and 'Delete' boxes to allow users to make changes. To grant all permissions at once, check the 'ALL' box
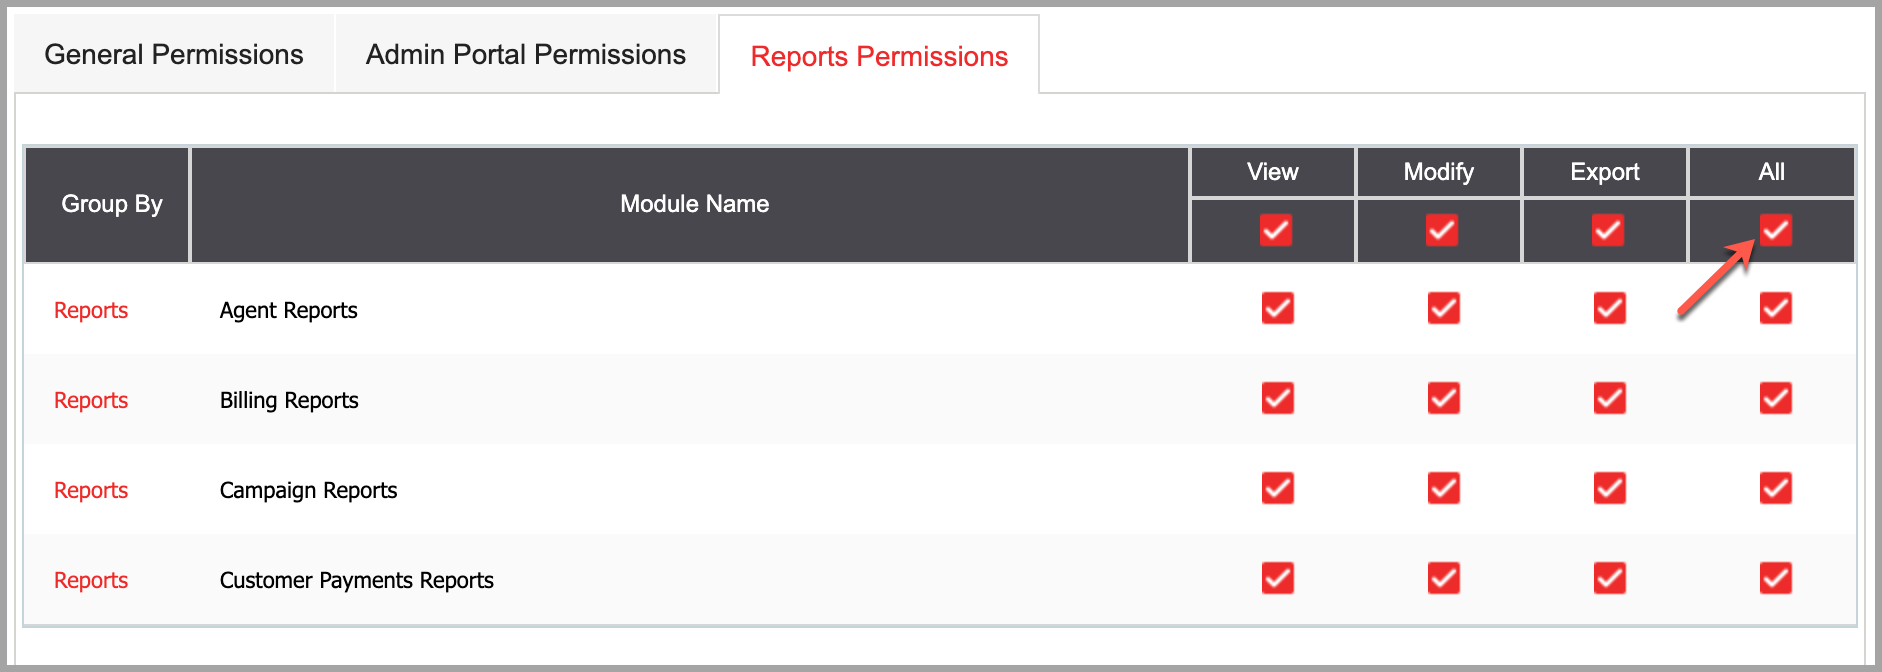
- Reports Permissions
Admin and manager-level users can be granted permissions for each Reports module in the admin portal. To grant all permissions at once, check the 'ALL' box.
- View: Allows users to only view the reports.
- Modify: Allows users to modify the reports' dashboard settings.
- Export: Allows users to export a copy of the report.
- All: Grants users all report-related permissions.
Agent Portal Permissions
Agent level users can be granted the following permissions:
- Outbound Calls
- Manual Calls
- Transfer Calls
- Record Calls
- Off: No calls will be recorded for this user. This will override the call recording option defined in the campaign settings.
- On: Agents will be able to turn call recording on and off. This will override the call recording option defined in the campaign settings.
- Campaign: Call recording settings defined in the campaign will apply.
- Outbound Calls Override
This option allows agents to enable or disable blended calls in the Agent interface.
- Off: Agents will not be able to modify blended calling.
- On: Agents will be able to turn off blended calling.
- Queue Membership Override
This option allows agents to enter or exit queues using the Queue Membership link in the top menu of the agent interface.
- Call Log Access
This option allows agents to view their call logs in the agent interface.
- Shift Enforcement
This option allows agents to override their team's shift enforcement settings.
- Off: Shift enforcement is turned off.
- Start: Enforce login time only.
- All: Enforce both login and logout times.
- Team: Shift enforcement settings defined for the agent's team will apply.
- Lead Details Modification
This option allows agents to override the campaign lead detail modification setting (except for the phone number field) in the agent interface.
- Off: Agents will not be able to modify customer information. This will override the call recording option defined in the campaign settings.
- On: Users will be able to modify customer information. This will override the call recording option defined in the campaign settings.
- Campaign: Lead detail modification settings defined in the campaign will apply
- Lead Phone Modification
This option allows agents to override the campaign lead phone number modification setting in the agent interface.
- Off: Agents will not be able to modify the lead's phone number. This will override the call recording option defined in the campaign settings.
- On: Agents will be able to modify the lead's phone number. This will override the call recording option defined in the campaign settings.
- Campaign: Lead phone modification settings defined in the campaign will apply.
- Callback Scheduling
This option allows agents to override campaign callback scheduling settings.
- Off: Agents will not be able to schedule callbacks. This will override the call recording option defined in the campaign settings.
- On: Agents will be able to schedule callbacks. This will override the call recording option defined in the campaign settings.
- Campaign: Callback scheduling settings defined in the campaign will apply.
- Callback Ownership
This option allows agents to take ownership of their callbacks. Only the agent that scheduled a callback can call the customer back.
CREATE AGENT USER LEVEL
Step 3.1. Complete the required fields in the pop-up window and click ‘Next’ to proceed.
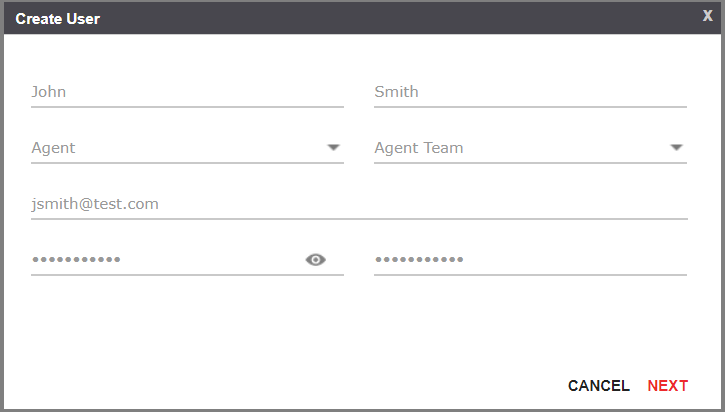
- Select User Level
Select the user's permission level.
- Select User Team
- User ID
- Password
Step 3.2. Complete the required fields in the 'Additional Info' window and click ‘Create’ to proceed. You will see a confirmation once the user has been created successfully, and you will be redirected to the user details page to complete the setup process.
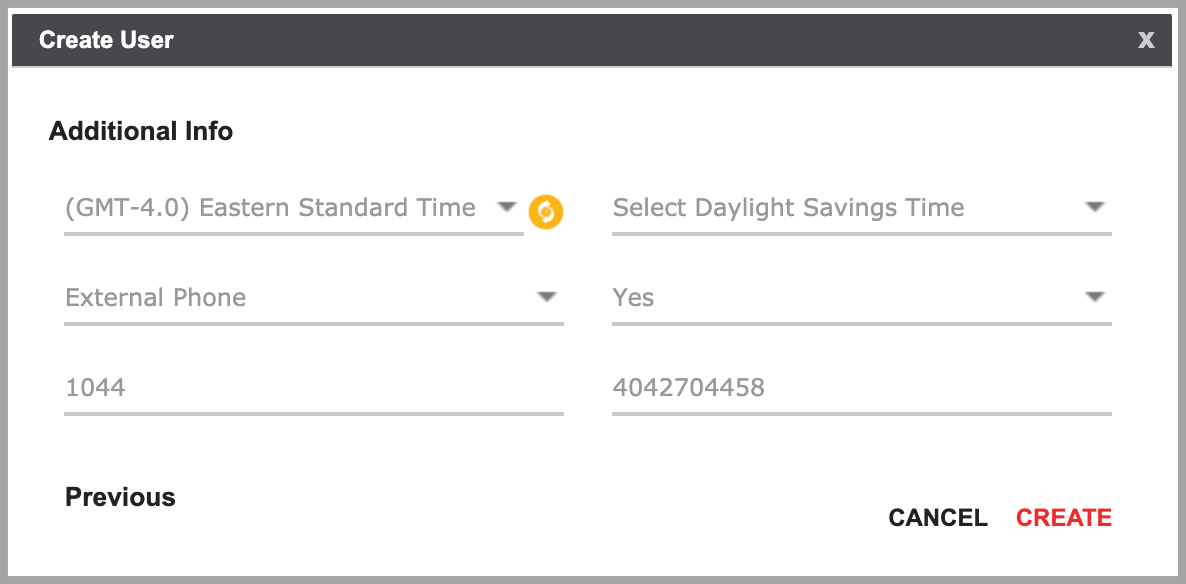
- Select User Time Zone
Select the user's time zone from the drop-down menu. The icon indicates that Daylight Savings Time is available for the time zone selected.
- Select Daylight Savings Time
Select whether daylight savings time should be automatically observed for this user.
- Internal Web Phone / External Phone
Select whether you want to assign an Internal WebPhone or an External Phone to the user.
- Create Voicemail
If you want to create a voicemail box for the user, select 'Yes'.
- Extension
Enter a user's extension number.
- External Number
If you selected External Phone, enter a phone number in the designated field.
Step 3.3. Configure the User settings on the user details page. When done, click on ‘Submit’ to save your changes.
CREATE PAYMENT LEVEL USER
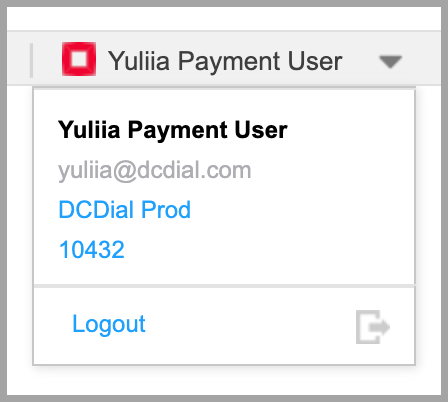
Payment Users can access the agent interface, as well as the internal payment portal and the conversation window from the admin portal. After login, users will arrive at the internal payment portal.
The profile settings menu for the Payment Level User will contain the following information:
To create a new payment user, follow the steps:
Step 4.1. Complete the required fields in the pop-up window and click ‘Create’ to proceed. You will see a confirmation once the User has been created successfully and you will be redirected to the user details page to complete the setup process.
- Select User Level
- Select User Team
Enter an email that will be used as a username when logging in to the admin portal.

- Password
Create a unique password.
Step 4.2. Configure the User settings on the user details page. When done, click on ‘Submit’ to save your changes.
COPY USER
You can create a new user quickly without starting from scratch by copying an existing user.
Step 1. Click the ‘Copy User’ button on the top right to copy an existing user.
Step 2. Complete the required fields in the pop-up window and click ‘Create’ to proceed. You will see a confirmation once the User has been copied successfully and you will be redirected to the user details page to complete the setup process.
First Name
Enter the user's first name.
Last Name
Enter the user's last name.
Select Source User
Select the user you want to copy. The settings of the original user will be applied to a new user.
Enter an email address for the new user.
Password
Create a unique password.
Phone Type
Select an Internal or External Phone.
- Internal Phone: Allows agents to make and receive calls using the built-in webphone in the agent interface.
- External Phone: This allows the agent to connect to DCDial using an external device.
Step 3. Configure the User settings on the user details page. When done, click on ‘Submit’ to save your changes.
MODIFY USER
Click onto Modify the User.
UPLOAD AGENT
The 'Upload Agent' feature allows you to create multiple user accounts for an agent in a few simple steps. Start by creating an XSL or CSV file that contains the following information:
- First Name
- Last Name
- External Number
- Extension
- User ID
Uploading Agents
Step 1. Click on the 'Upload Agents' button on the top right to upload your list. In the pop-up window, choose the file you would like to upload and select a delimiter for your file. If you want to exclude column headers from your import file, enable the Ignore header option. Click on 'Create' to proceed. You will be redirected to the Information Map section where you will see a list of agents to be uploaded.
Step 2. Use the drop-down menu to map the values that will reflect in each field. Click on 'Next' to proceed.
- First Name
- Last Name
- Phone Type
- External Number
- Extension
- User ID
- User Password
Displays the password that the agents will use when they log in. You can require the agents to change their passwords after logging in for the first time.
Please Note: You will not be able to click on 'Next' if any of the values are invalid. Hover your mouse over the error icon to check if there are any errors. You can delete values by clicking on .
Step 3. For the next step, you need to configure settings that will apply to the list of agents. When done, click on ‘Next’ to proceed.
- Standard User Team
Select the team to which agents will be assigned.
- Standard Time Zone
Select the agents' local time zone.
- Daylight Savings Time
Select whether the agents are observing Daylight Savings Time (DST).
- Caller ID
Select the Caller ID number for agents. This Caller ID will be used when the agent makes a manual call or a three-way conference call.
- Live Connection
If this option is enabled, DCDial will establish a live phone connection with the Agent as soon as they log into the Agent Portal. If this option is disabled, DCDial will not maintain a live connection but instead will call the agent each time a campaign call is routed to them.
Please Note: This option will only apply if the selected phone type is External Number.
- Ring Time
- Voicemail
Step 4. Configure Agent Permissions as needed. Click on 'Upload' to proceed.
Step 5. Click on ‘Finish’ to close a confirmation message that indicates how many agents were uploaded successfully.
BULK CHANGE
This feature allows you to make modifications to multiple agents.
Bulk Change
Step 1. Click on the 'Bulk Change' button on the top right. You will be redirected to the 'Update Agent List' page where you will see a list of all agents in the system.
Step 2. Select the agents you want to modify from the list. When done, click on 'Next' to proceed.
Step 3. For the next step, configure agent settings including the team, time zone, ring time, caller ID, DST, and voicemail settings. You will also see to which agents the changes will apply. Click on 'Next' to proceed.
- Standard User Team
Select the team to which agents will be assigned.
- Standard Time Zone
Select the agents' local time zone.
- Ring Time
Select how long the agents' phones should ring before timing out.
- Caller ID
Select the caller ID number for agents. This caller ID will be used when the agent makes a manual call or a three-way conference call.
- Daylight Savings Time
Select whether the agents are observing Daylight Savings Time (DST).
- Voicemail
Select whether a voicemail box should be created or not.
Step 4. Configure Agent Permissions as needed. Click on 'Update' to proceed.
Step 5. Click on ‘Finish’ to close a confirmation message that indicates how many agents were updated successfully.