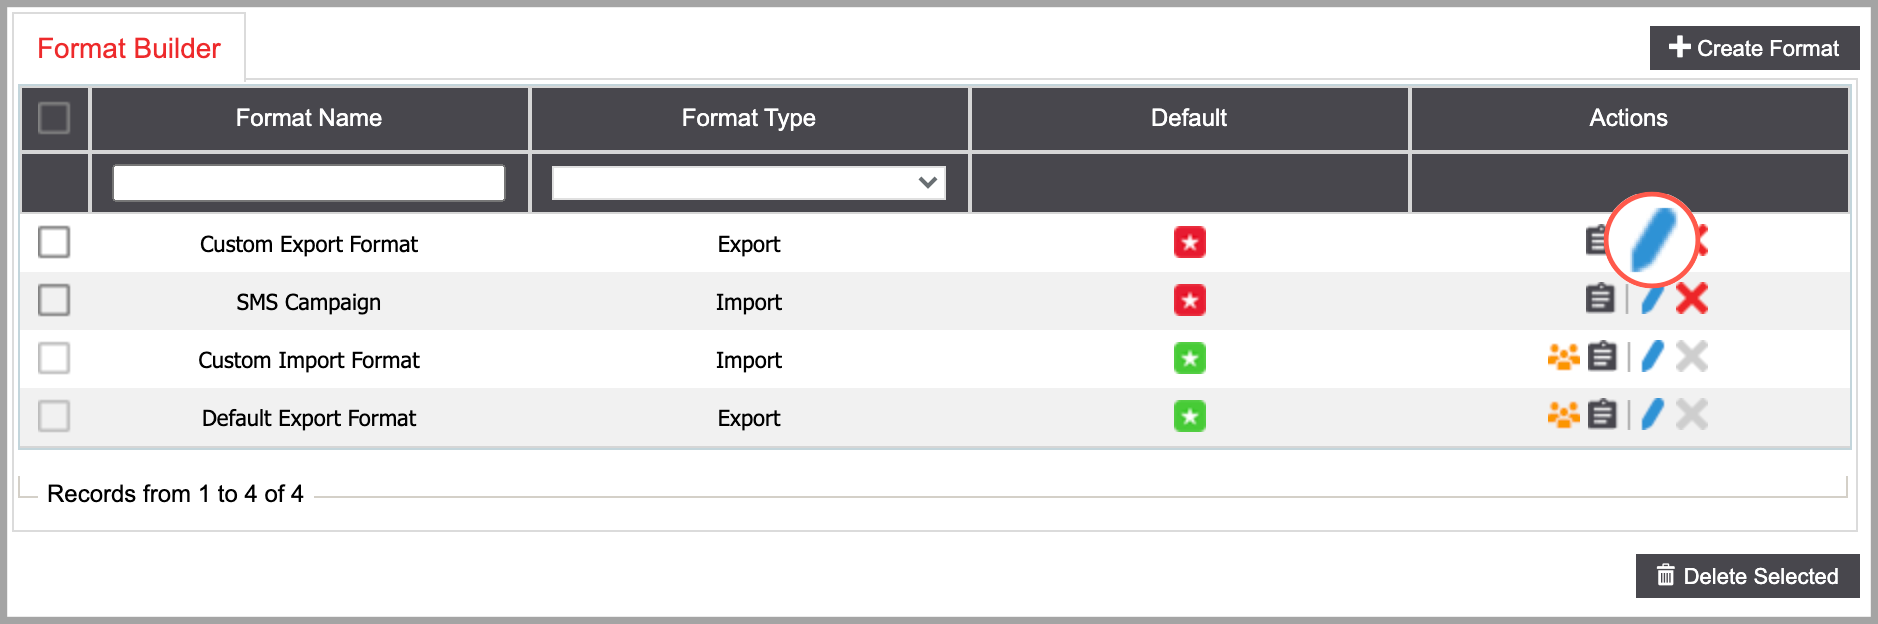
Format Builder
Before importing a contact list, you need to decide how you want the contact data to be mapped in DCDial.
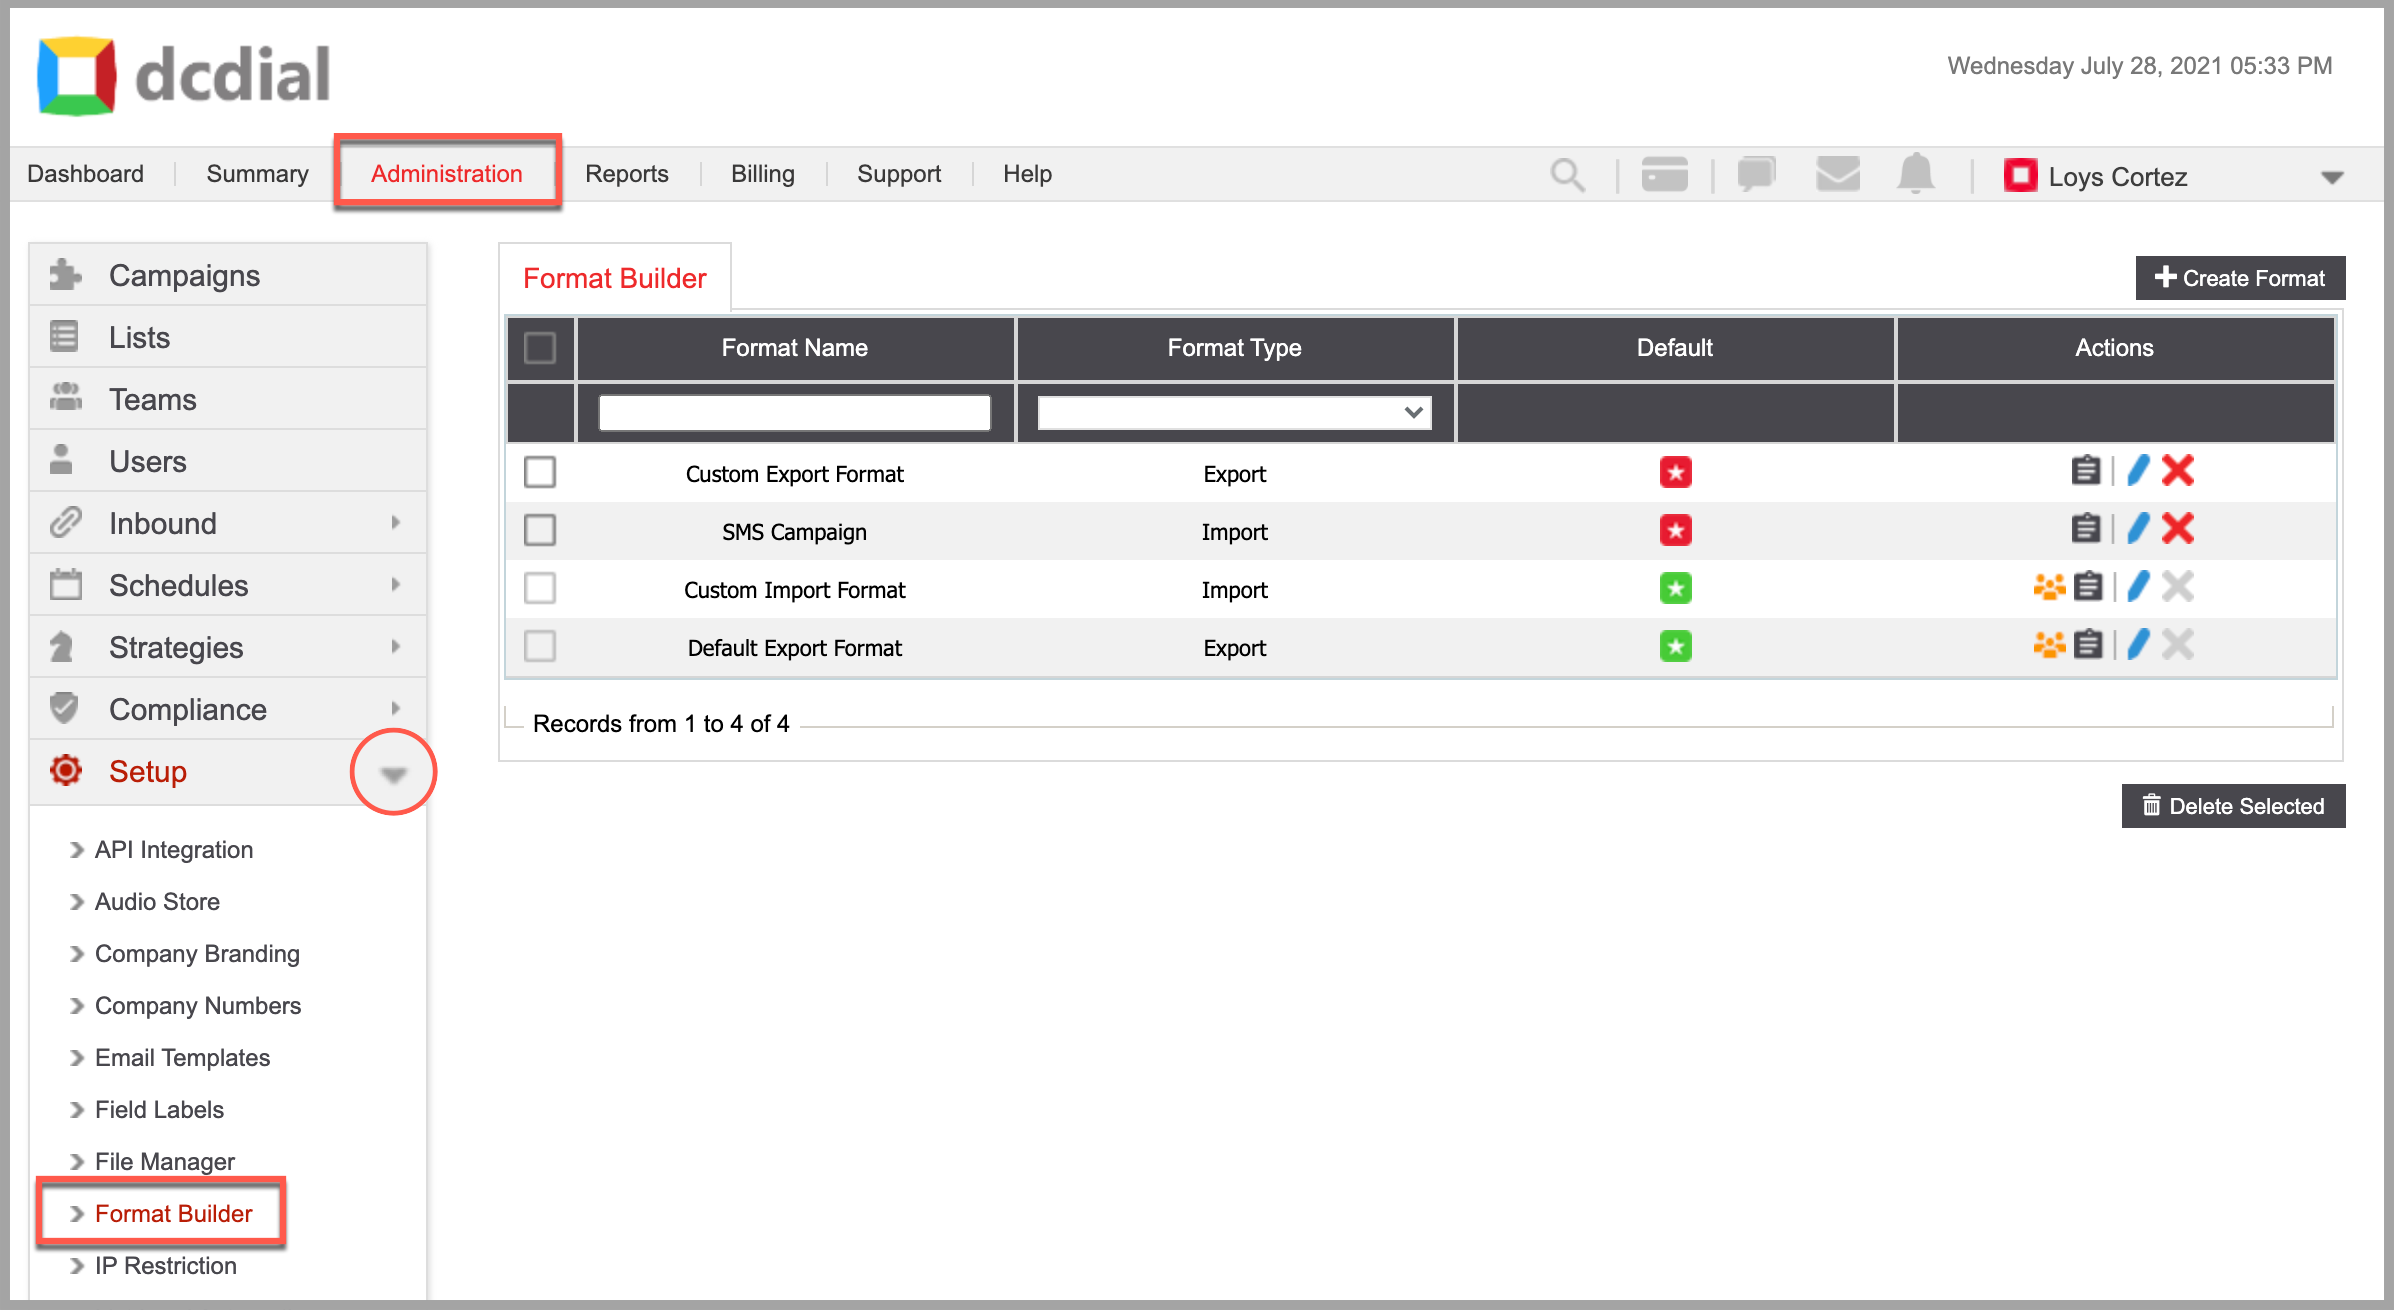
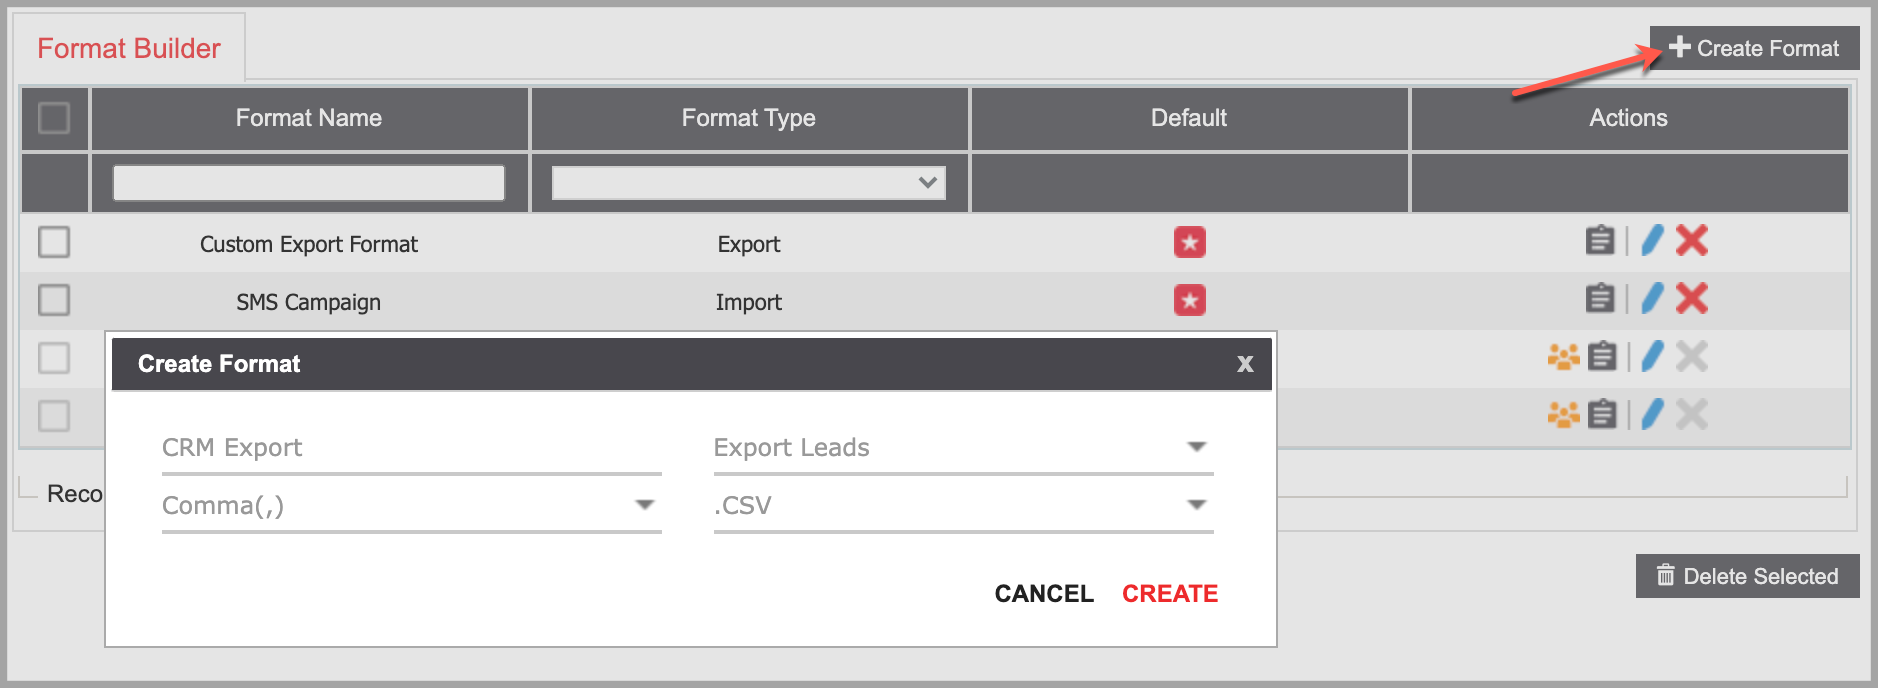
The Format Builder page provides essential data import tools to ensure that calling lists and contacts can be uploaded accurately and as frequently as desired. DCDial administrators can import .csv and .xls formatted files to create new contact lists using automatically scheduled FTP file transfers or a user-friendly wizard.
Format Builder allows you to create import formats that map your contact lists to DCDial's system fields. You can create unique import formats for each data source you have; if you are importing lead lists from multiple sources that are formatted differently, you can create an import format specific to each source. Additionally, you can create a custom export format to receive your daily campaign result files.
- Format Name
The name of the format.
- Format Type
This column indicates whether the format is for importing data into or exporting data from the system.
- Default
The icon indicates that the Format has been set as default. To set a Format as default, click the icon.
- Actions
- Associations: Hover over the icon to view active associations to the format.
- View Activity Log: Click the icon to view a summary of events. Learn More About the Activity Log
- Modify: Click the icon to access the modify option. Learn More About Modifying Import Formats
- Delete: Click the icon to delete a format. A confirmation screen will appear to confirm the deletion. Default formats cannot be deleted.
Under the Format Builder tab, you can configure the Import format and Export format settings:
- Import Format
Import Format allows you to map your lead data to the correct DCDial system field. It also allows you to define various data scrubbing and compliance checks.
- Export Format
Export Format structures the data that is generated in daily campaign activity result files. Result files are the daily reports generated for your active campaigns and can be found in the File Manager.
CREATE IMPORT FORMAT
Click on the 'Create Format' button on the top right to create a new format. Complete the required fields in the pop-up window and click on 'Create' to proceed.

- Format Name
Enter a unique name.
- Select Format Type
Select Import Leads as the format type.
- Select Delimiter
The delimiter option allows the user to parse data in a text file into separate columns based on a common character. Choosing 'Auto' from the drop-down menu will automatically detect the delimiter used in the file.
- Choose File
You can upload the list file or a sample list file with the ideal format of the lead information by clicking on 'Choose File'.
STEP 1. Once a new Import Format is created, you will be directed to Step 1 of the Import Format Builder. Complete the required fields and click 'Next' to continue.
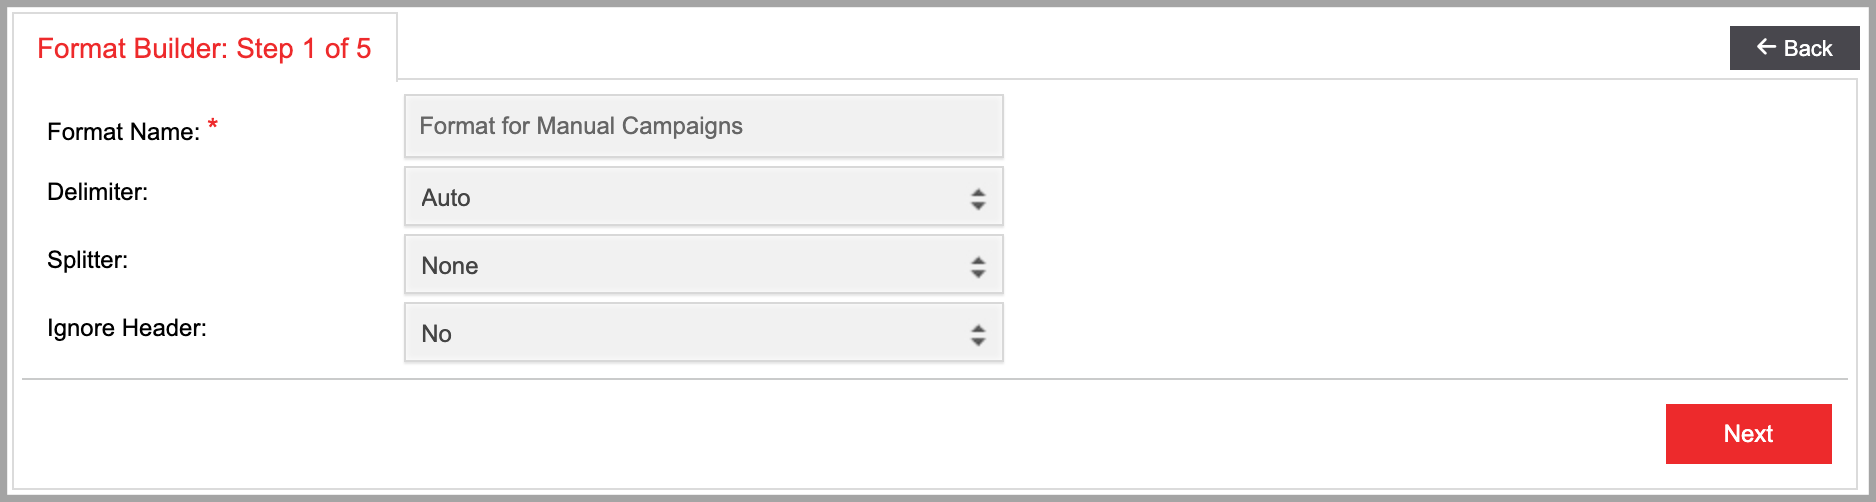
- Format Name
The name of the format.
- Delimiter
The delimiter option allows the user to parse data in a text file into separate columns based on a common character. Use the drop-down menu to select from seven options: Auto, Comma, Tab, Semicolon, Pipe Symbol, Colon, or Caret. Choosing 'Auto' from the drop-down will automatically detect the delimiter used in the file.
- Splitter
The splitter option allows the user to separate data from a single column into two columns based on a common character. For example, a Name column that contains the Last Name, First Name can be split into two columns using the comma (,) splitter. Use the drop-down menu to select from four options: Comma, Tab, Semicolon, or Pipe Symbol.
- Ignore Header
Select whether you want to ignore the header or not. You can use this if your file does not have column headers.
STEP 2. In this step, you can map the data in your sample file using DCDial's system fields. DCDial provides additional custom fields that you can use if none of the preset system fields apply to the data you are importing. You can update the custom field names using Field Labels.
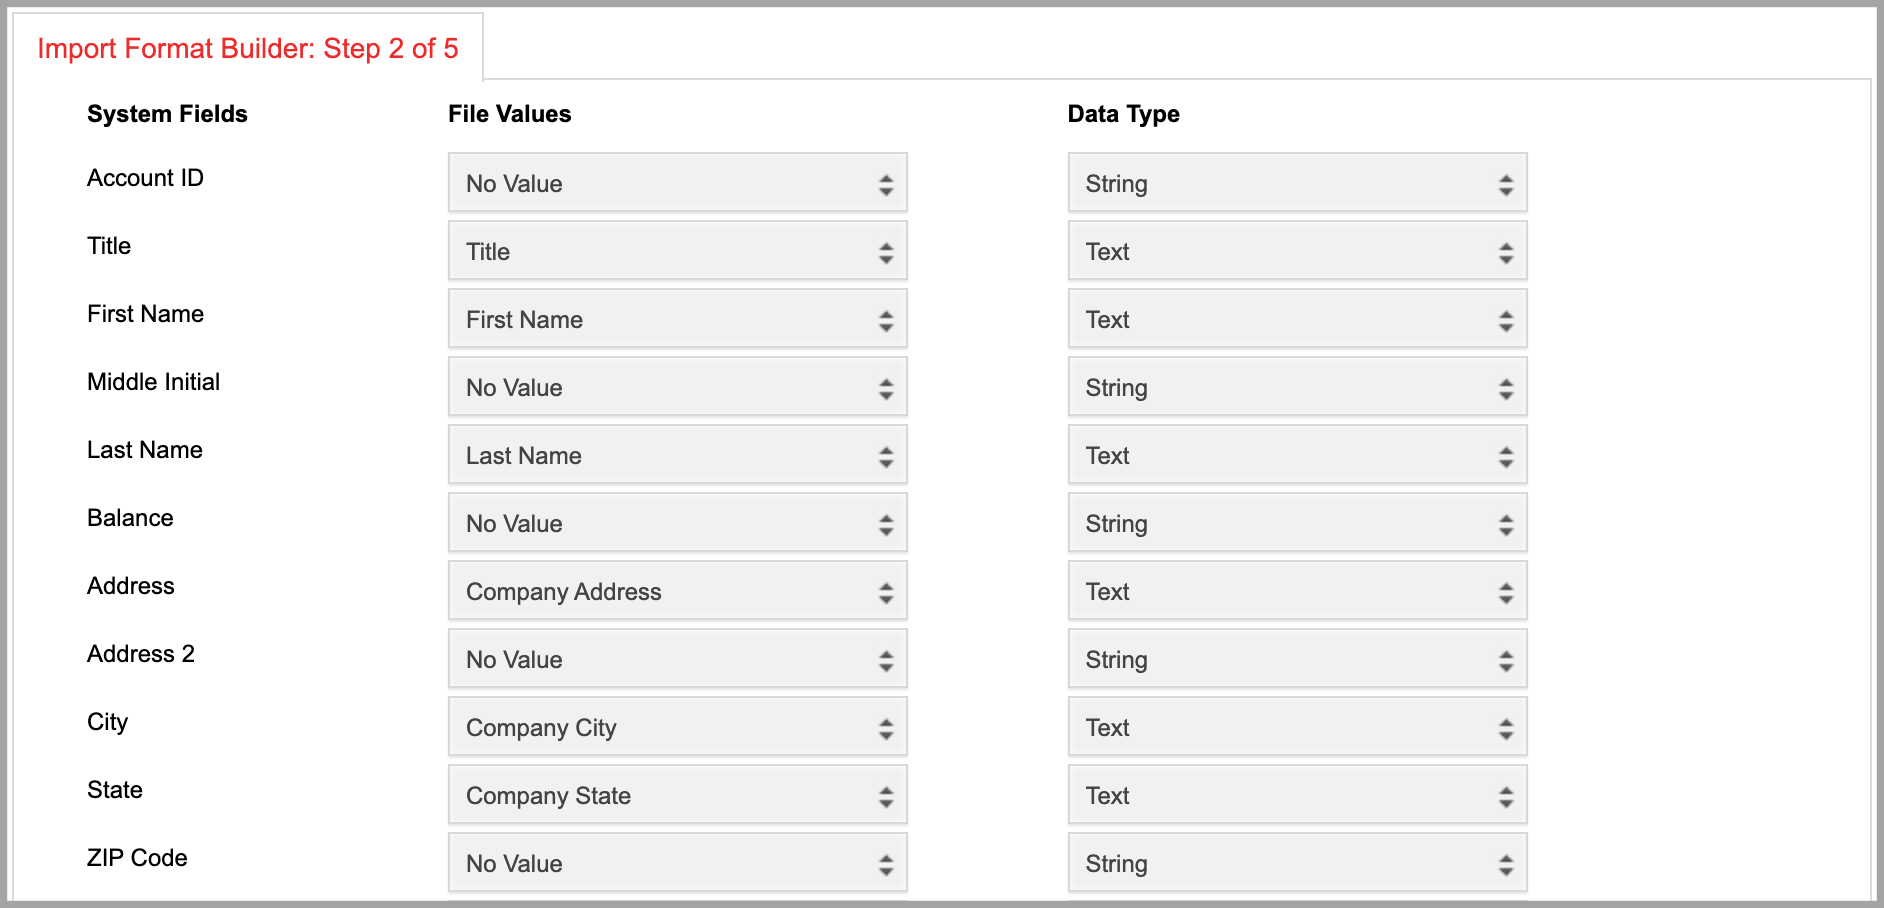
- System Fields
The system field values available in DCDial.
- File Values
The values from your uploaded sample file that you can map to the System Fields.
- Data Type
Select the data type of the mapped value. It is important to select the correct data type to ensure the values are properly displayed in DCDial. There are eight different data types:
- String
- Number
- Decimal
- Character
- Text
- Email Address
- Date
- Date Time
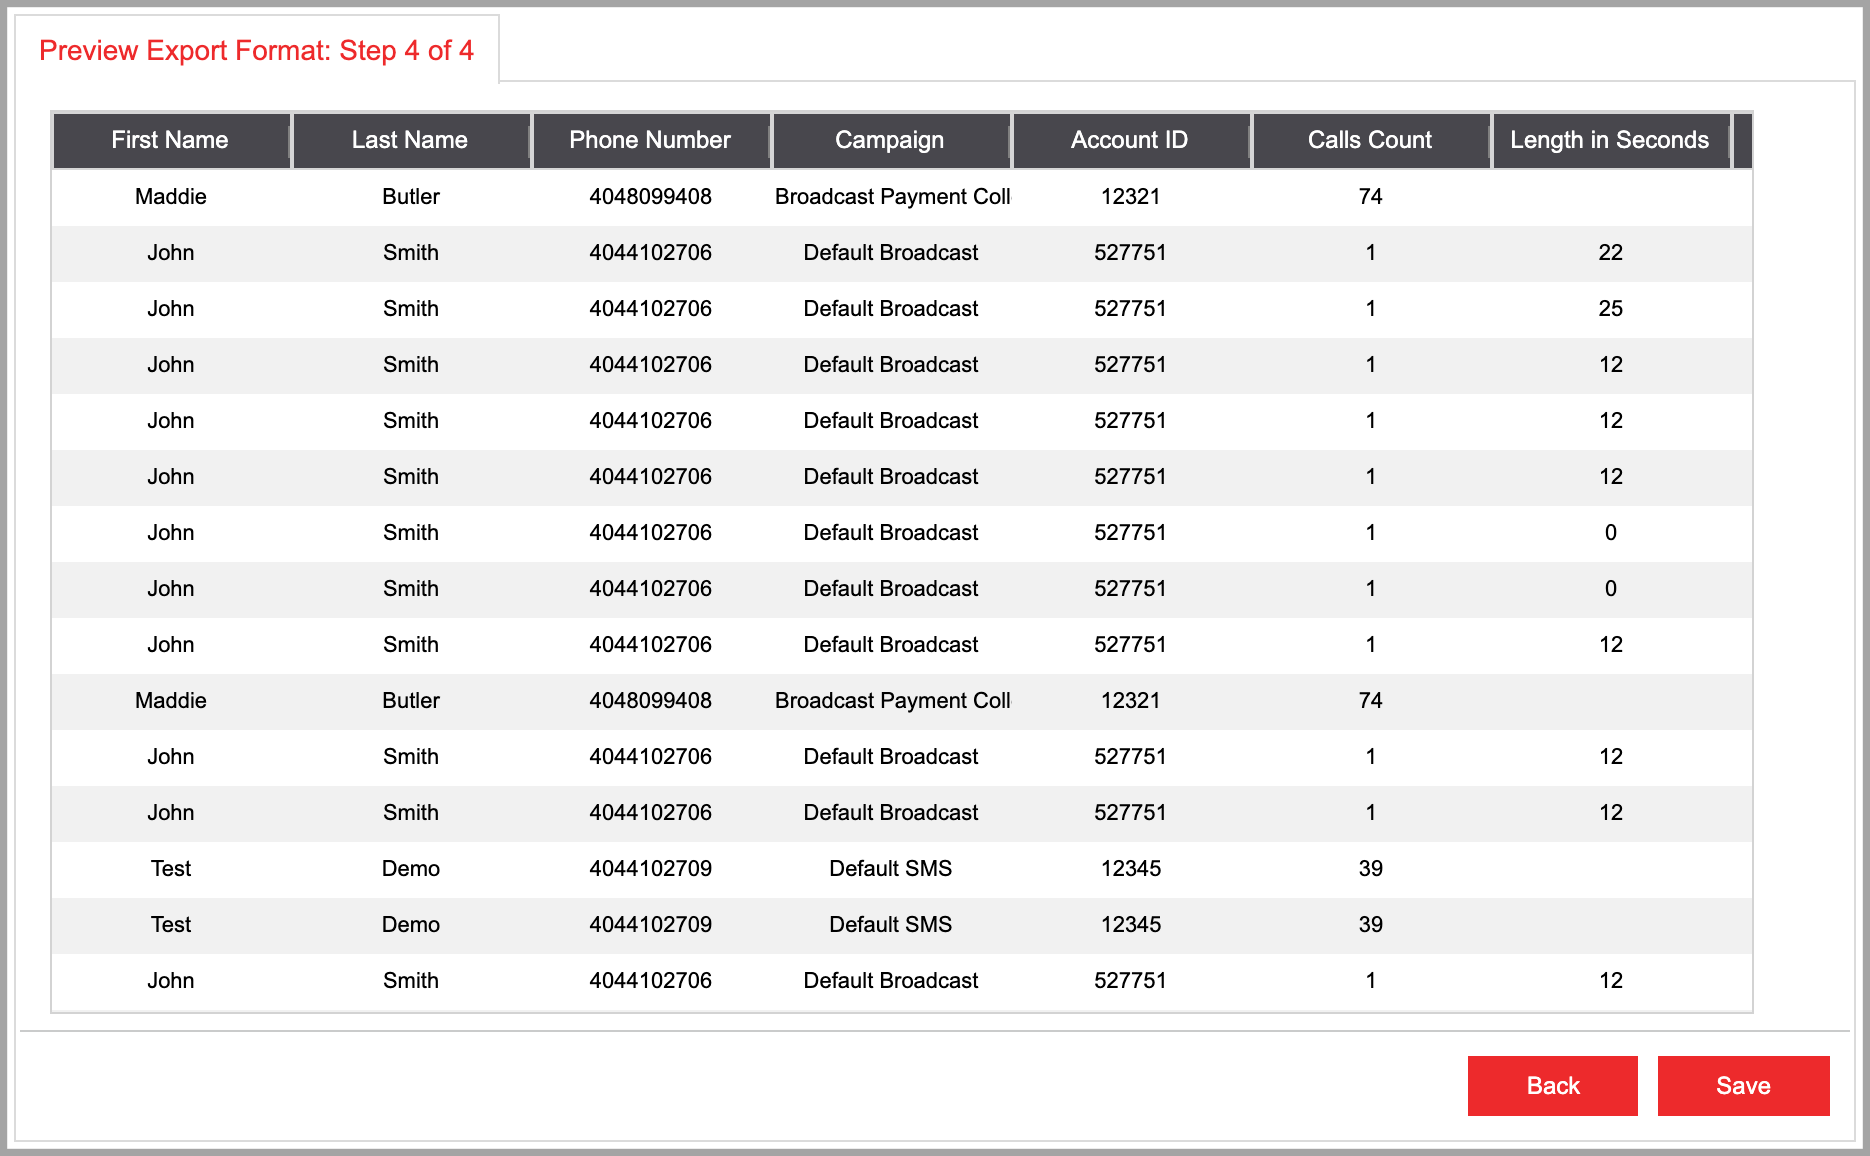
You can quickly preview the import format before moving on to the next step. The preview is updated every time you add or remove the system fields above.
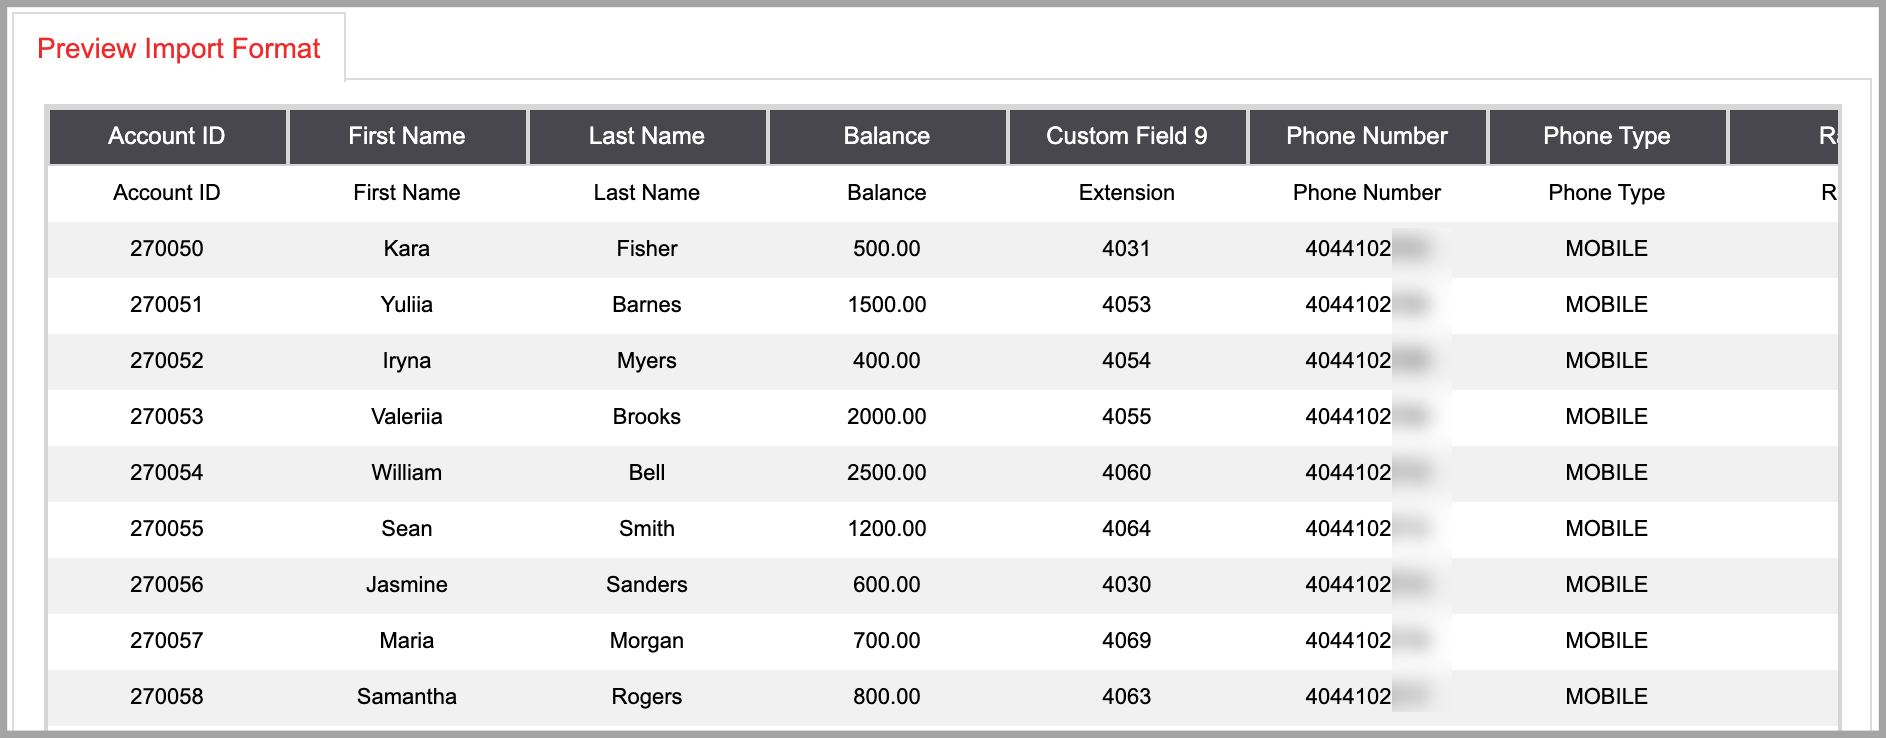
STEP 3. Map the phone numbers in your file to a Phone Label and select the correct phone type. Make sure to map each column with phone numbers to a separate Phone Label. To add additional Phone Labels, click on the plus icon. Remember to use the drop-down menu to select the correct phone type for each phone number you map in DCDial. You can preview the import format at the bottom to ensure that you mapped the values properly. Click 'Next' to continue.
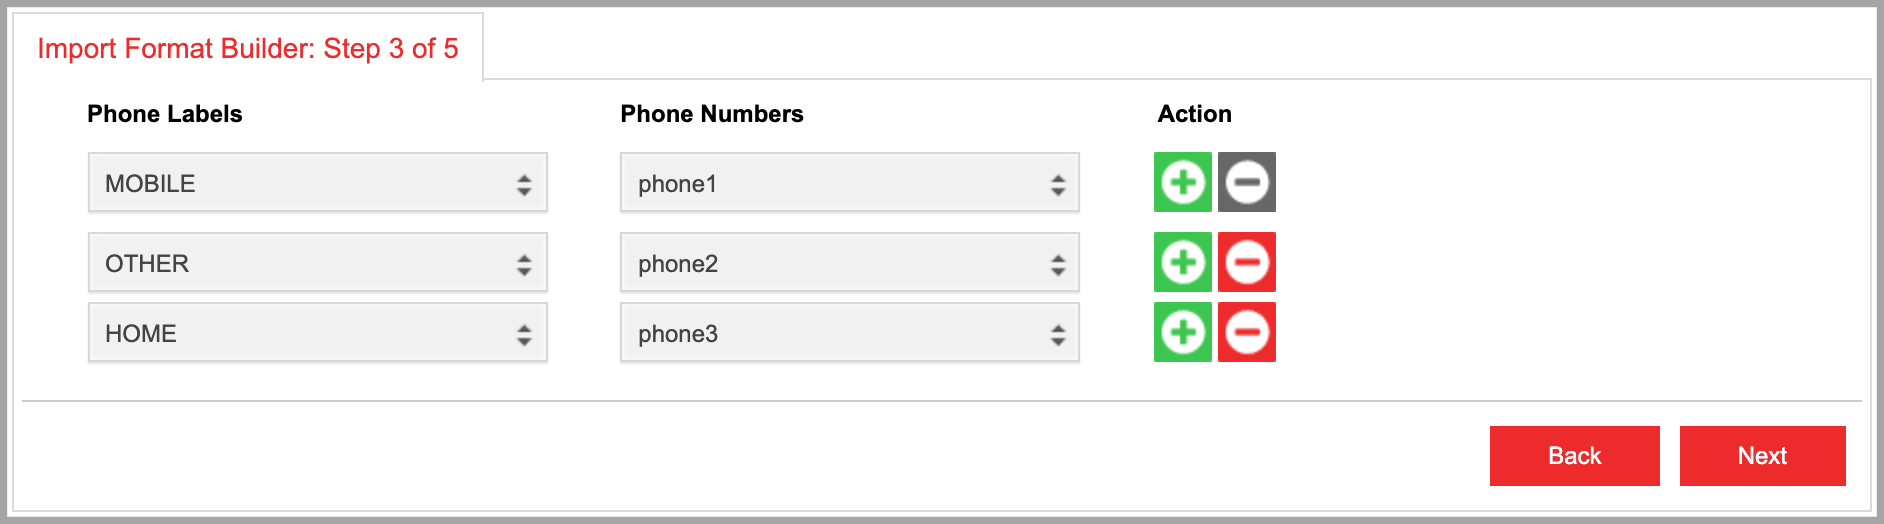
- Phone Labels
Use the drop-down menu to select the appropriate phone type for the phone number column you are mapping. Options are Home, Work, Mobile, and Other.
- Phone Numbers
Shows the values in the uploaded sample file. Use the drop-down menu to select the proper phone value.
- Action
Click on the icons to add or delete an extra field.
STEP 4. You can map DCDial users to your external CRM system's user accounts using this step. The lead owner is a DCDial user who owns the lead record in the DCDial system. Be advised that your sample file must contain a username column, and the DCDial users must be created beforehand. You can use this option to enable the lead-owner-only dialing in manual campaigns and for the payment-related features. Additionally, you can use the lead owner as your filter criteria when generating payment reports.
This step is optional. Click on 'Skip' to omit this step.

- Lead Owner
Select a DCDial user from the drop-down menu.
- File Value
Type in the corresponding name or username of the lead owner that matches your system record.
- Action
Click on the icons to add or delete an extra field.
STEP 5. In the final step, you can define how DCDial should scrub your list for invalid data and perform a variety of compliance checks. Once you configure this last step, click 'Save' to save your import format.
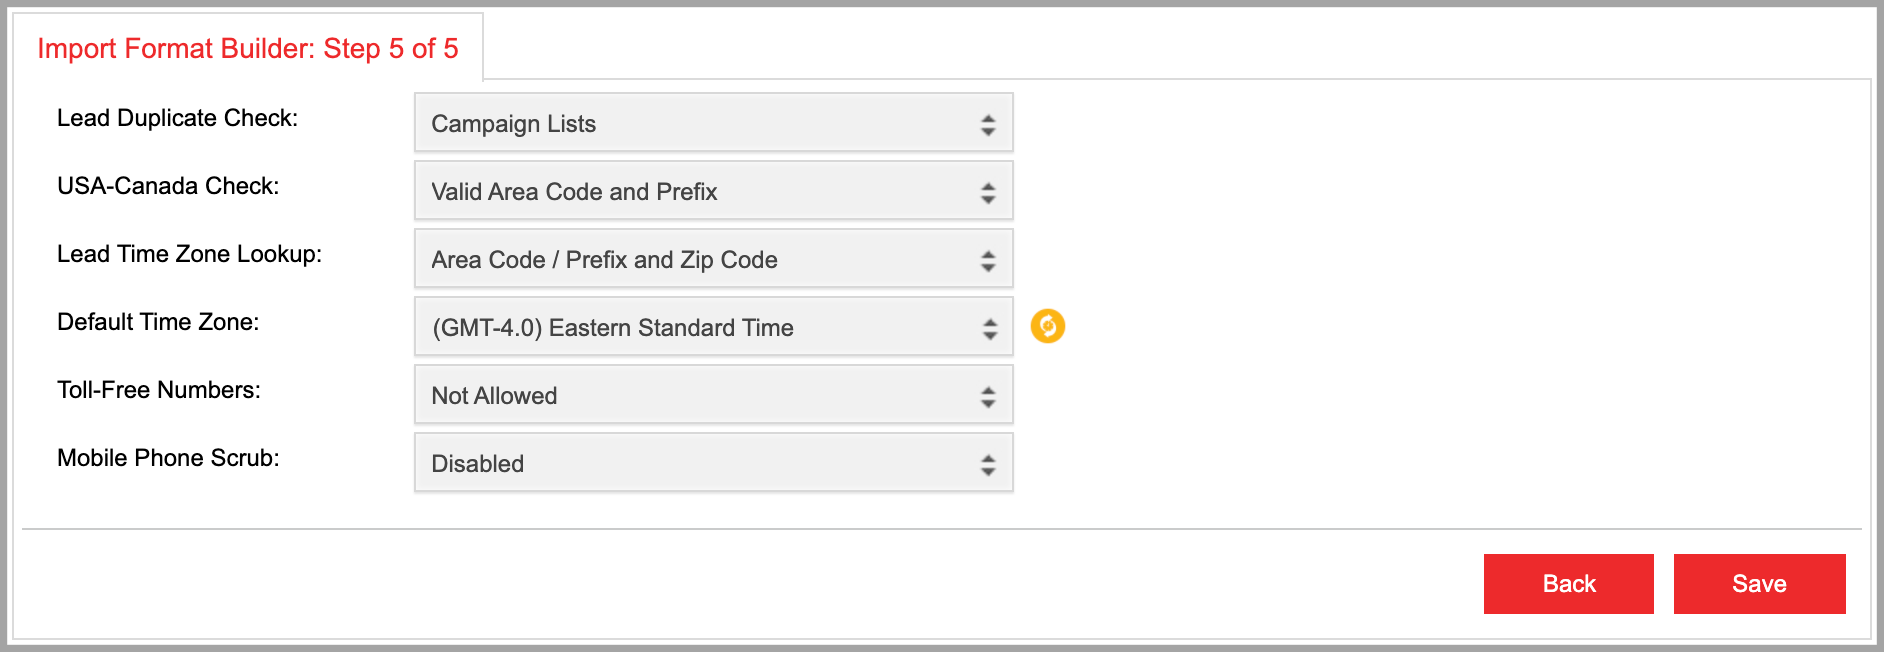
- Lead Duplicate Check
To check for duplicate leads, select one of the three options. The Lists option checks if there are duplicate leads within the same file you uploaded, Campaign Lists option checks for duplicates in this file against all the lists in the same campaign, and the System option checks for duplicates in this file against all lists system-wide.
- US-Canada Check
Next, you can check whether the numbers added to DCDial are valid for US or Canadian numbers. Choose whether you want to assess a phone number's validity using the area code (XXX) 555-1212, the prefix (404) XXX-1212, or both (XXX) XXX-1212. This allows you to filter out invalid numbers before starting your campaign.
- Lead Time Zone Lookup
To ensure that each lead is dialed within your defined contact schedule, specify how DCDial should determine in what time zone the lead is. The time zone can be determined by a lead's area code, zip code, or both. If you select both and there is a discrepancy between the area code and zip code, then DCDial will default to the later time zone. For example, if the area code is in Florida and the zip code is in California, DCDial will default to the California time zone:
- Area Code / Prefix and Zip Code
- Area Code / Prefix
- Zip Code
Please Note: If the zip code has not been mapped in Step 2, the Zip Code option will not be available.
- Default Time Zone
If DCDial is unable to determine which time zone a lead is in, it will default to the time zone specified here.
- Toll-Free Numbers
Select whether toll-free numbers should be added to the system. If 'Not Allowed' is selected, all toll-free numbers will be marked as invalid.
- Mobile Phone Scrub
Mobile phone scrub identifies which numbers in the list are mobile phone numbers. If this option is enabled and a number is identified as a mobile number, DCDial will automatically label it as a Mobile phone type.
MODIFY FORMAT
Click on to modify the format.
CREATE EXPORT FORMAT
Click on the ‘Create Format’ button on the top right to create a new Export Format. Complete the required fields in the pop-up window and click ‘Create’ to proceed. You will see a confirmation once the Export Format has been created successfully and you will be redirected to the format details page to complete the setup process.
- Format Name
Type in the name of the format.
- Select Format Type
Select 'Export Leads' as the format type.
- Select Delimiter
The delimiter option allows the user to parse data in a text file into separate columns based on a common character.
- Select File Extension
Use the drop-down menu to select whether you would like the result files to be generated in .CSV or .TXT format.
STEP 1. Once a new Export Format is created, you will be directed to Step 1 of the Export Format Builder. Make the proper selection and click 'Next' to continue.
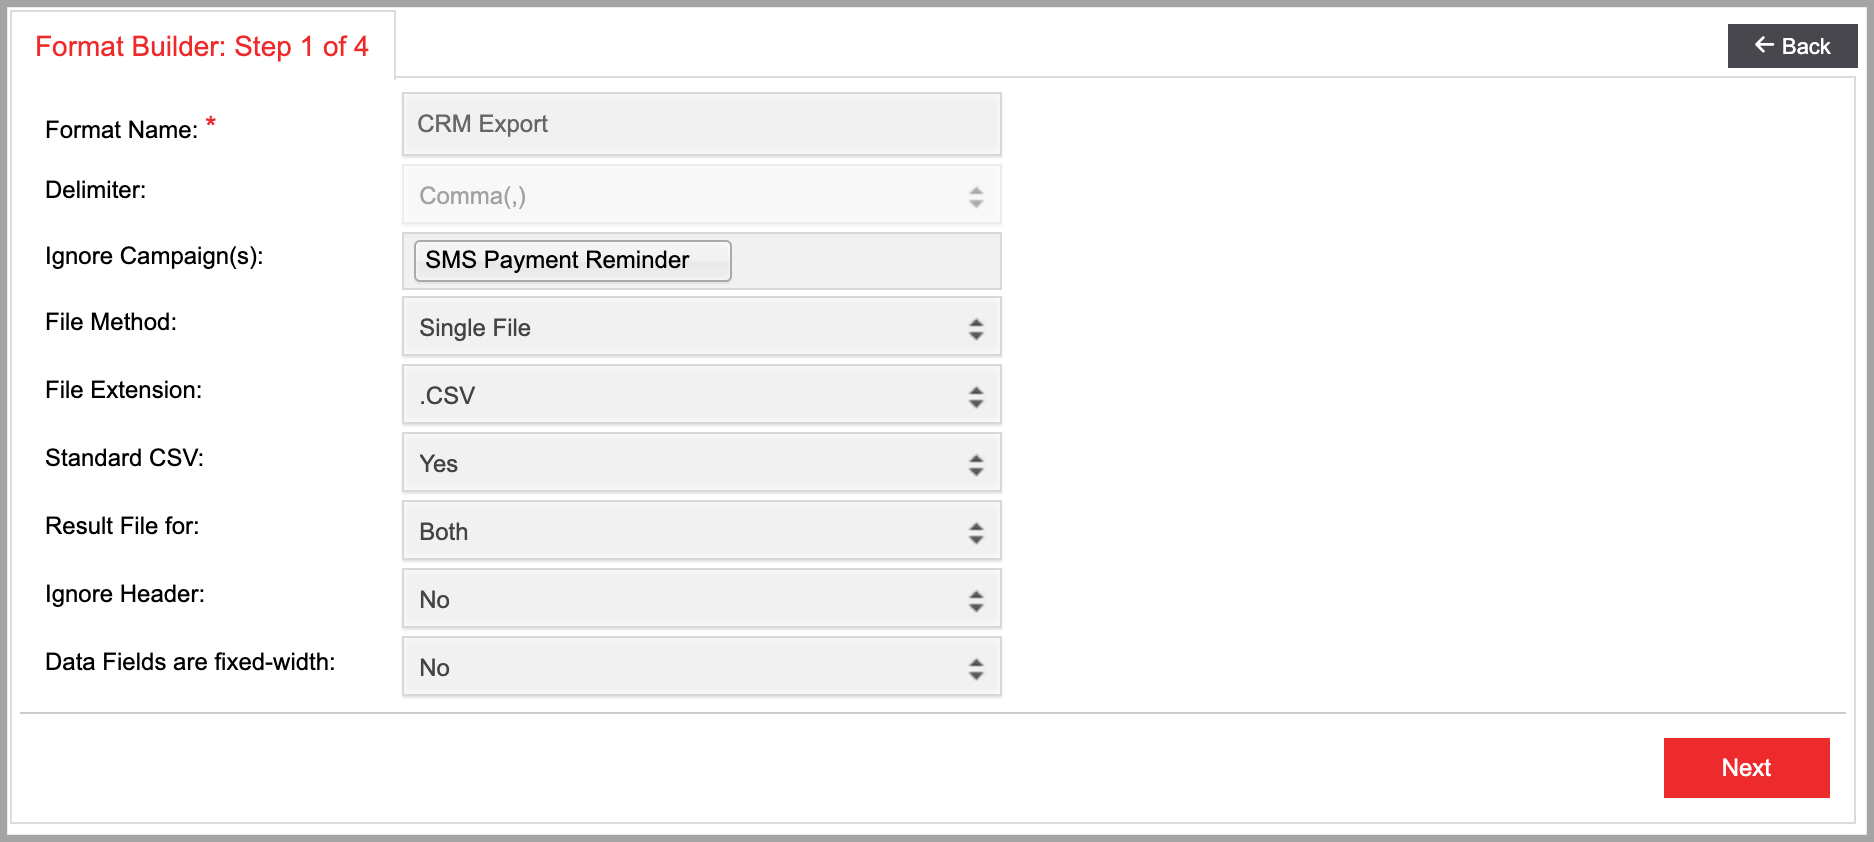
- Format Name
The name of the format.
- Delimiter
At this point, modifying the delimiter is disabled.
- Ignore Campaign(s)
Select the campaign you do not want to include in the export format from the drop-down menu.
- File Method
Use the drop-down menu to choose either Single File or Split by Campaign:
- Single File: A single export file will be created for all campaigns.
- Split by Campaign: Multiple export files will be created per campaign
- File Extension
- Standard CSV
- Standard CSV: Each cell value in the file is surrounded by double quotes and the value contained within the double quotes will appear in a single column
For example: "1234 Peachtree Rd, Atlanta, GA 30305" will be placed in a single column, and the values will not be separated by the comma within the double-quotes.
- Non-Standard CSV: Each cell value is not surrounded by double quotes and will be separated by the delimiter.
For example, 1234 Peachtree Rd, Atlanta, GA, 30305 will be allocated in 4 separate columns.
- Result File for
Use the drop-down menu to choose Inbound, Outbound, or both:
- Inbound: The export file will contain Inbound Call reports only.
- Outbound: The export file will contain Outbound Call reports only.
- Both: The export file will contain both Inbound and Outbound Call reports
- Ignore Header
- Data Fields are fixed-width
STEP 2. Select the system fields you want to include in your export file and assign each field to a dedicated column. You can add as many columns as you need. Click on 'Next' to proceed.
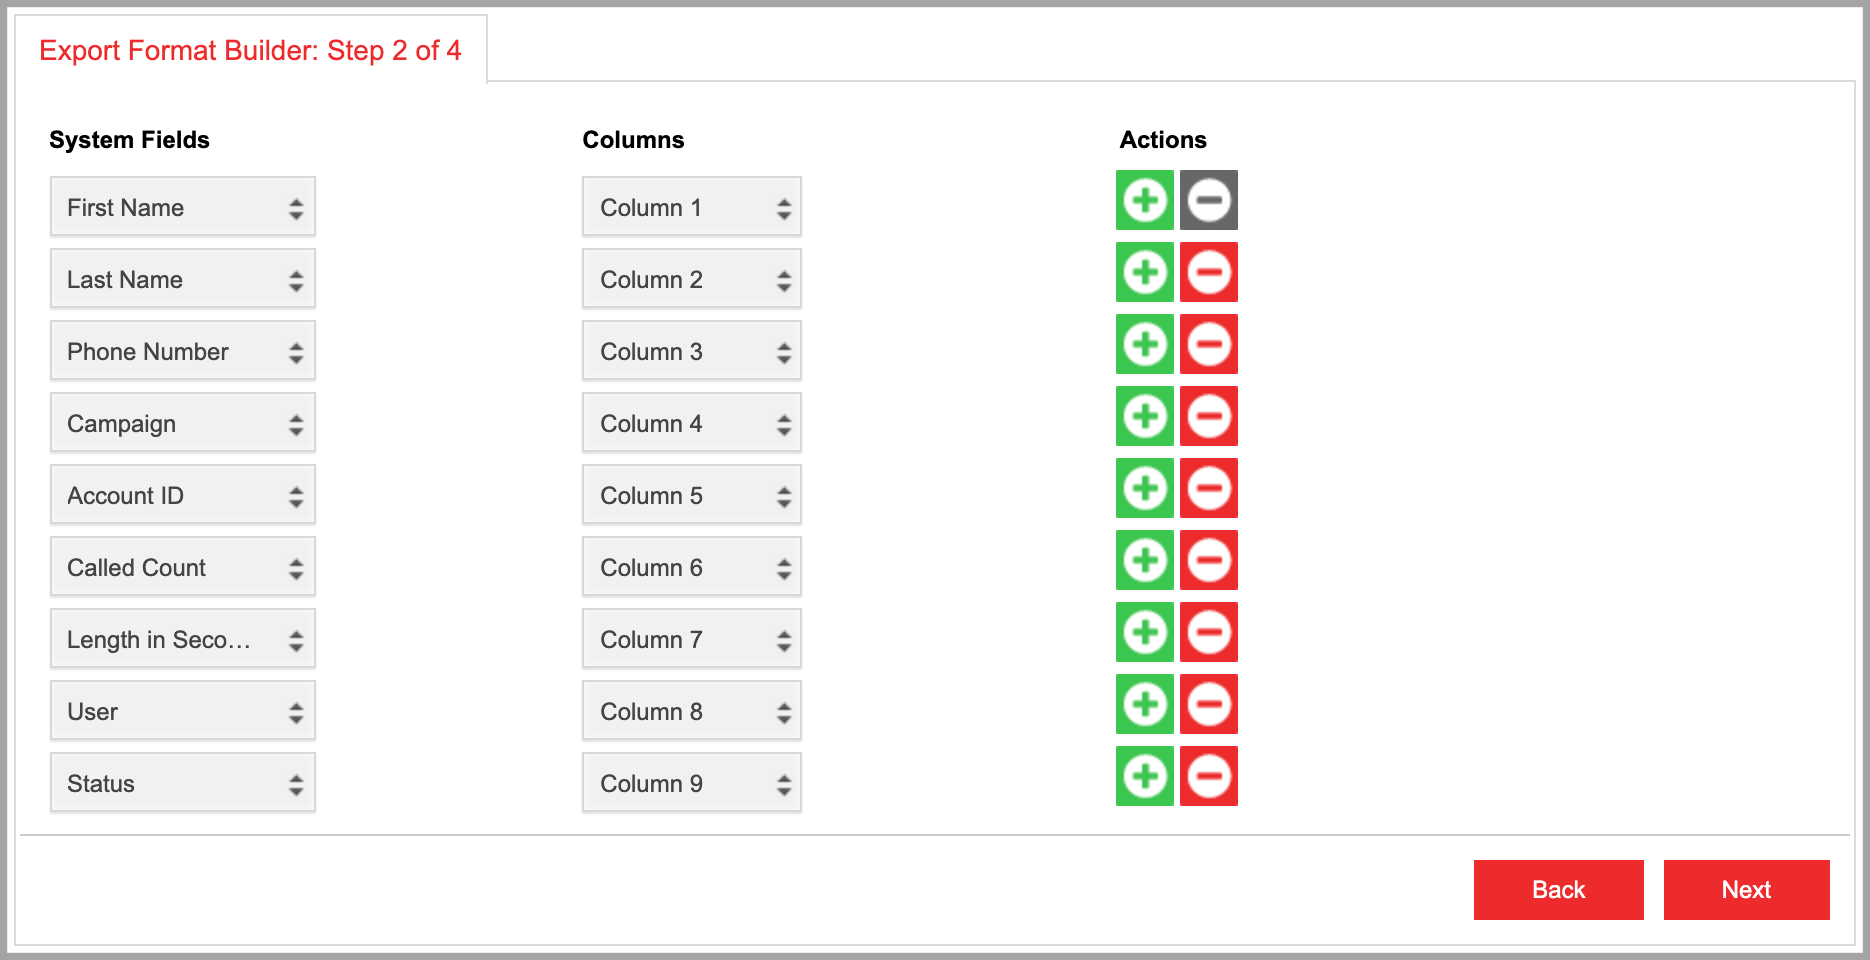
- System Fields
Select the system fields you want to include in the result file.
- Columns
Use the drop-down menu to order the columns in the result file.
- Width
Select the character limit for each column.
- Actions
Click on the icons to add or delete system fields, respectively.
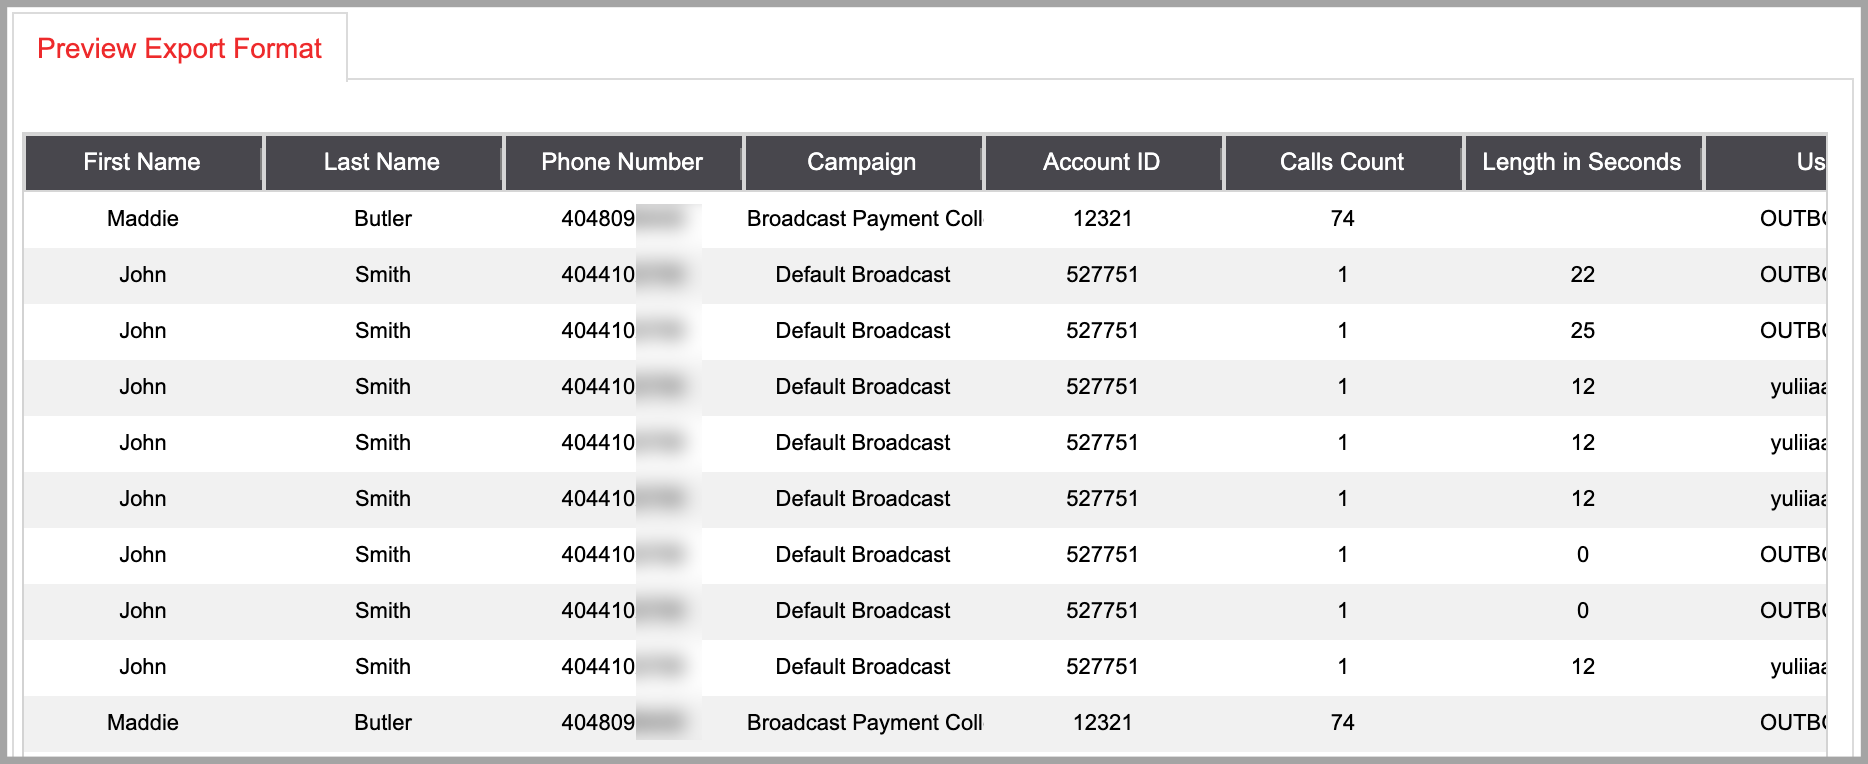
You can quickly preview the export format before moving on to the next step. The preview is updated every time you add or remove the system fields above.
STEP 3. Preview the status and its description. The export file format contains the status of each lead assigned based on the call outcome. You can customize the status description, if needed, by typing in the new value. Click on 'Next' to proceed.. Preview the status and its description. The export file format contains the status of each lead assigned based on the call outcome. You can customize the status description, if needed, by typing in the new value. Click on 'Next' to proceed.
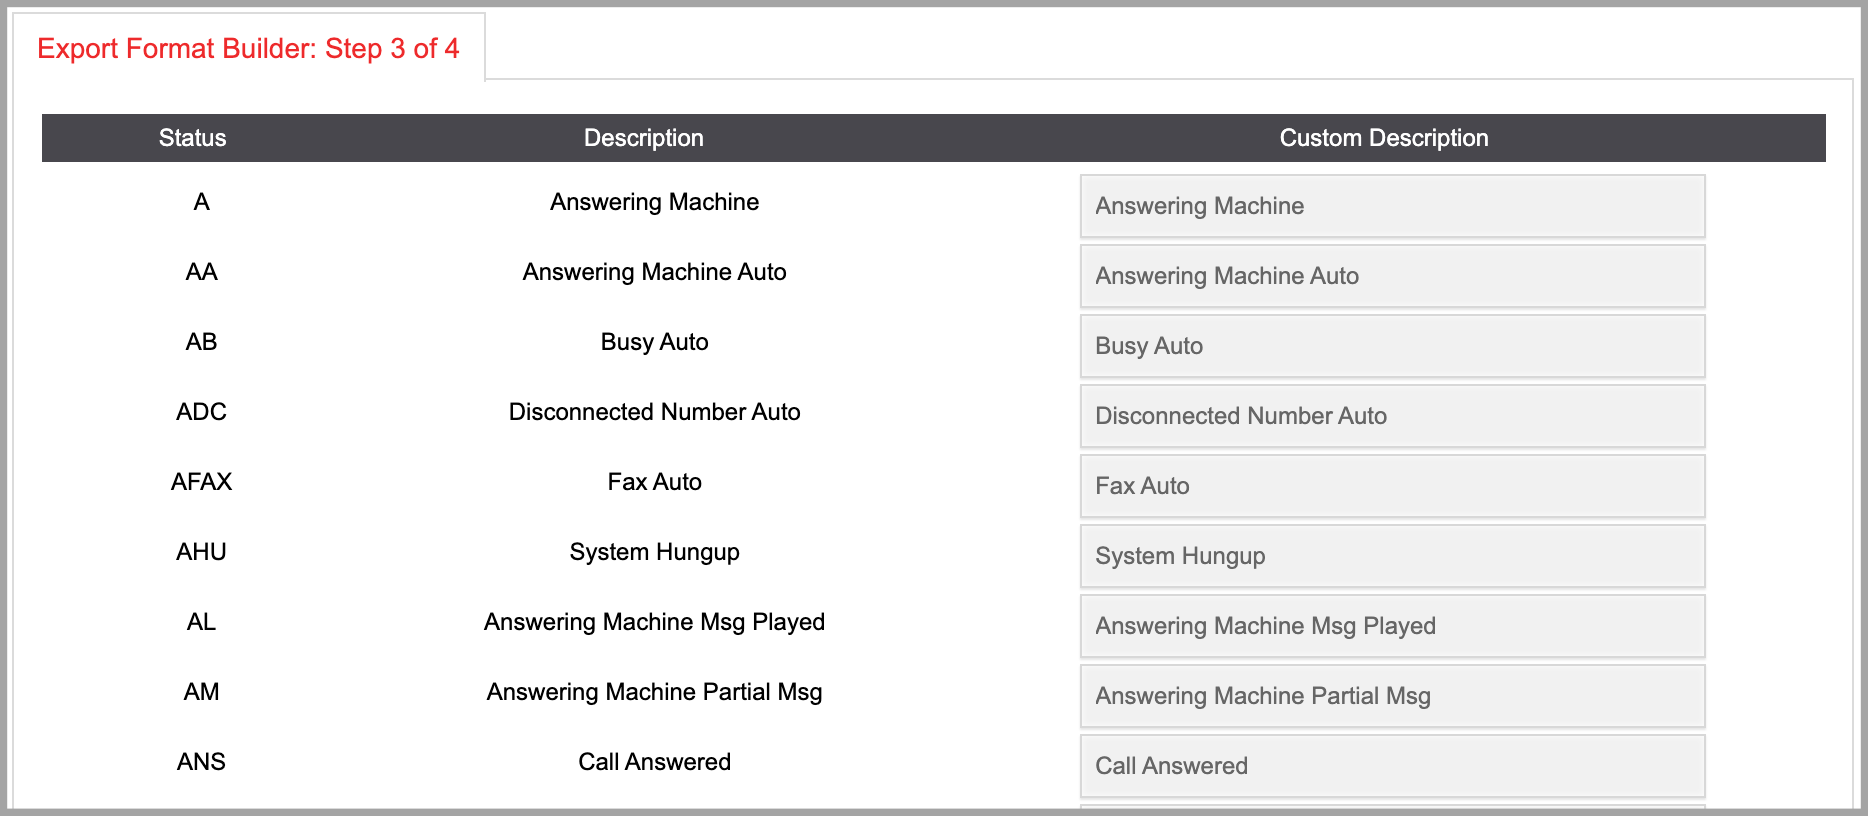
- Status
The status is assigned to a lead based on the call outcome.
- Description
A status description.
- Custom Description
Customize the status description as needed.
STEP 4. Preview the final export format. You can still go back and modify any settings or information. When done, click 'Save'.