Queues
When all your agents are busy, you can effectively manage the overflow by creating Queues that will keep customers on hold until the next agent is available.
You can enhance your caller’s experience with custom music or a personalized message while they wait for the next available agent. You can also customize each queue experience by choosing to play pre-recorded messages for customers as they wait, to keep them informed about relevant company information.
Queues can also intelligently route calls to agents based on various parameters such as the agents' priority in the queue or how long the agent has been waiting since their last call.
- Queue Priority
The setting is used to define the order in which the calls from the queue should be answered in relation to calls from other queues.
- Time Condition
Shows the contact schedule assigned to each queue. If a time condition is enabled for a queue, the contact schedule will be displayed. If no time condition is assigned to a queue, the queue will accept calls 24/7.
- Color
This is the color theme associated with the queue. Calls in a queue are color-coded in the agent portal so that agents can easily identify the source of each call.
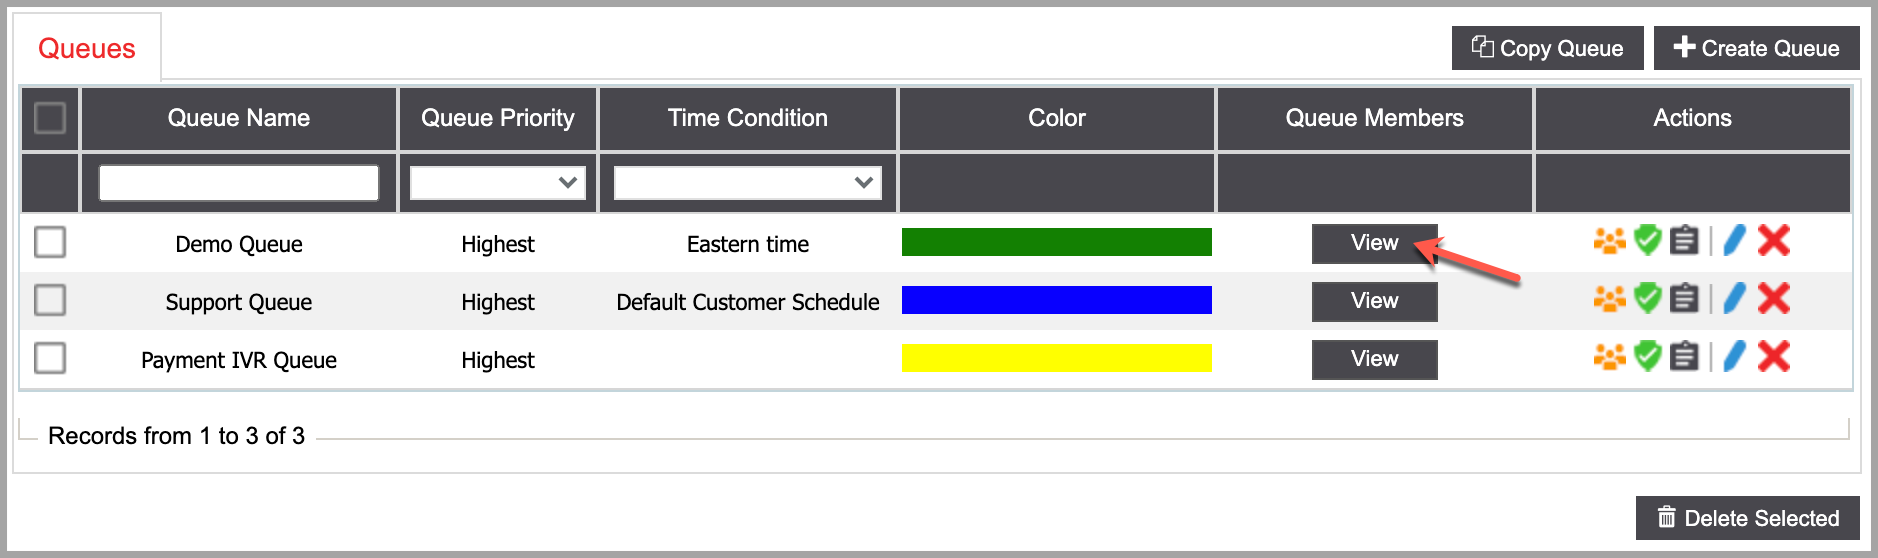
- Queue Members
The agents assigned to the queue. Click on the 'View' button to see the list of agents.
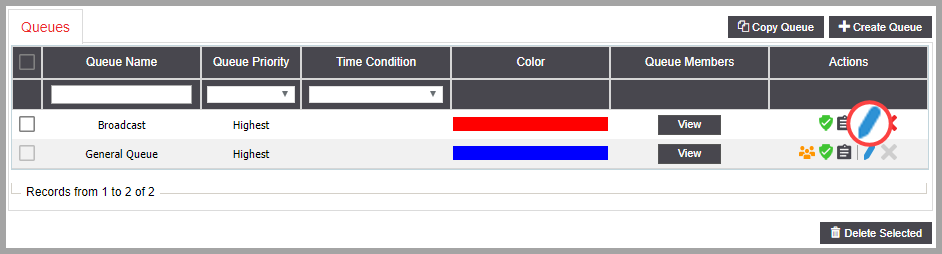
- Actions
- Associations: Hover over the icon to view the modules associated with the queue.
- Active: The queue is active. Click on the icon to deactivate the queue.
- Inactive: The queue is inactive. Click on the icon to activate the queue.
- View Activity Log: Click the icon to view a summary of events. Learn More About the Activity Log
- Modify: Click the icon to modify the queue. Learn More About Modifying Queues
- Delete: Click the icon to delete the queue. A confirmation screen will appear to confirm the deletion.
VIEW QUEUE MEMBERS
To view a list of agents who are members of the queue, click on the 'View'. The 'Live Agents' and 'Default Agents Screen' will open.
Live Agents and Default Agents
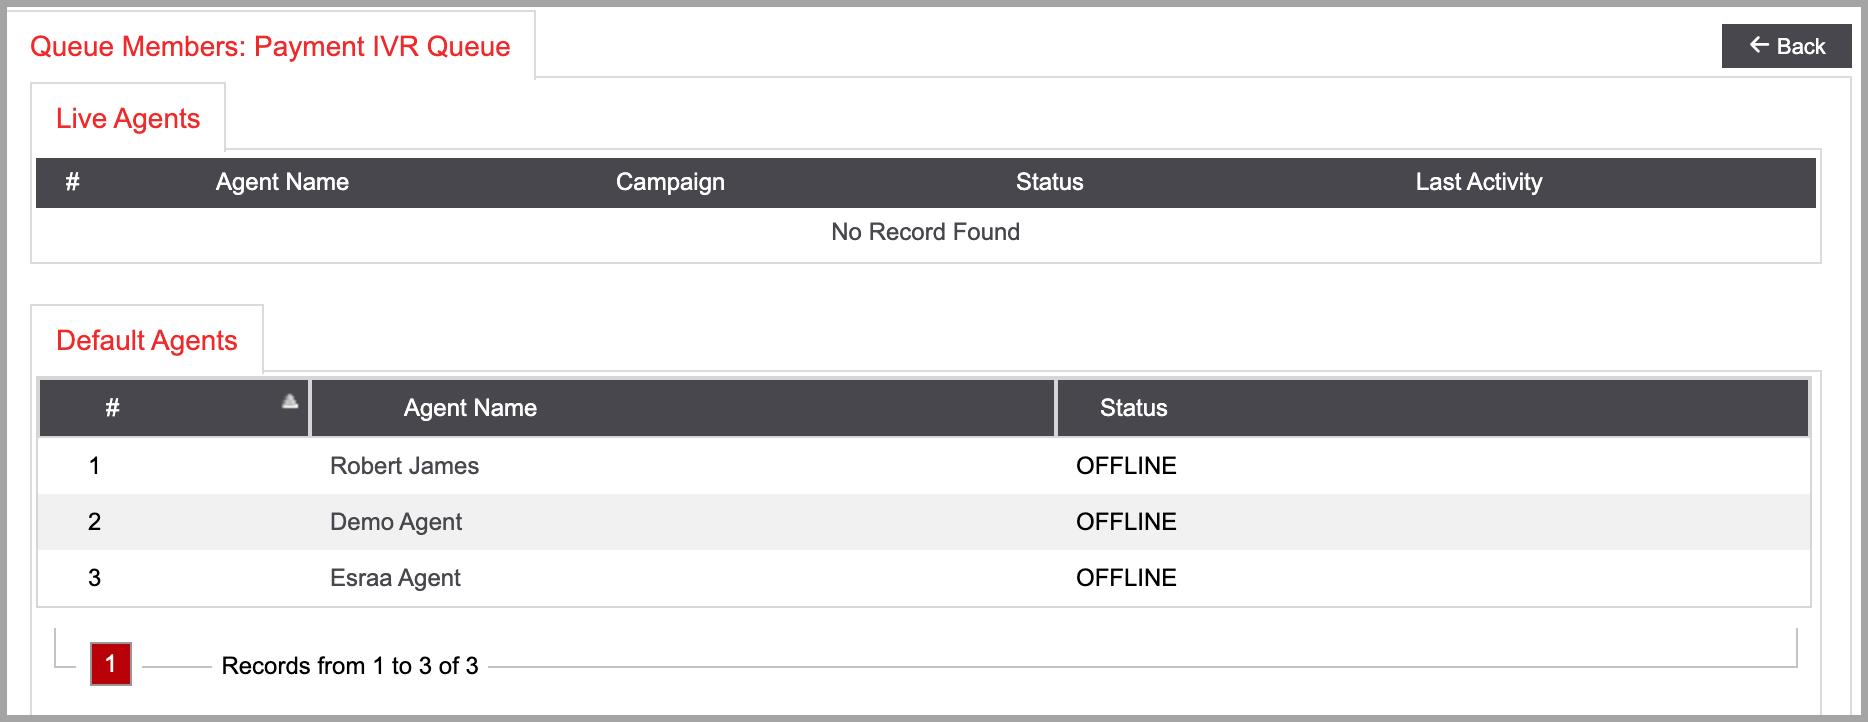
- Live Agents
The agents who are currently active and logged in to the Queue.
- Agent Name: The name of the agent who is currently logged in to the Queue.
- Campaign: The Campaign where the agent is currently logged in.
- Status: The agent's status (can be displayed as 'Ready', 'Paused', or 'Busy').
- Last Activity: The last time the agent's status was changed.
- Default Agents
A list of agents who are permanent members of the Queue.
CREATE QUEUE
Step 1. Click on the 'Create Queue' button on the top right to create a new Queue. Complete the required fields in the pop-up window and click 'Create' to proceed. You will see a confirmation once the Queue has been created successfully and redirected to the queue details page.
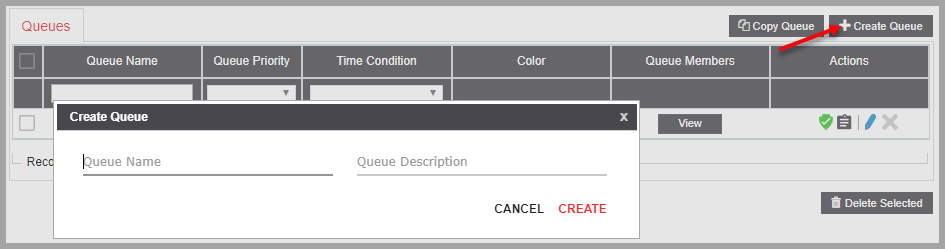
- Queue Name
Enter a unique name.
- Queue Description
Enter a description.
Step 2. Configure the Queue settings on the queue details page. When done, click on ‘Submit’ to save your changes.
Basic Settings
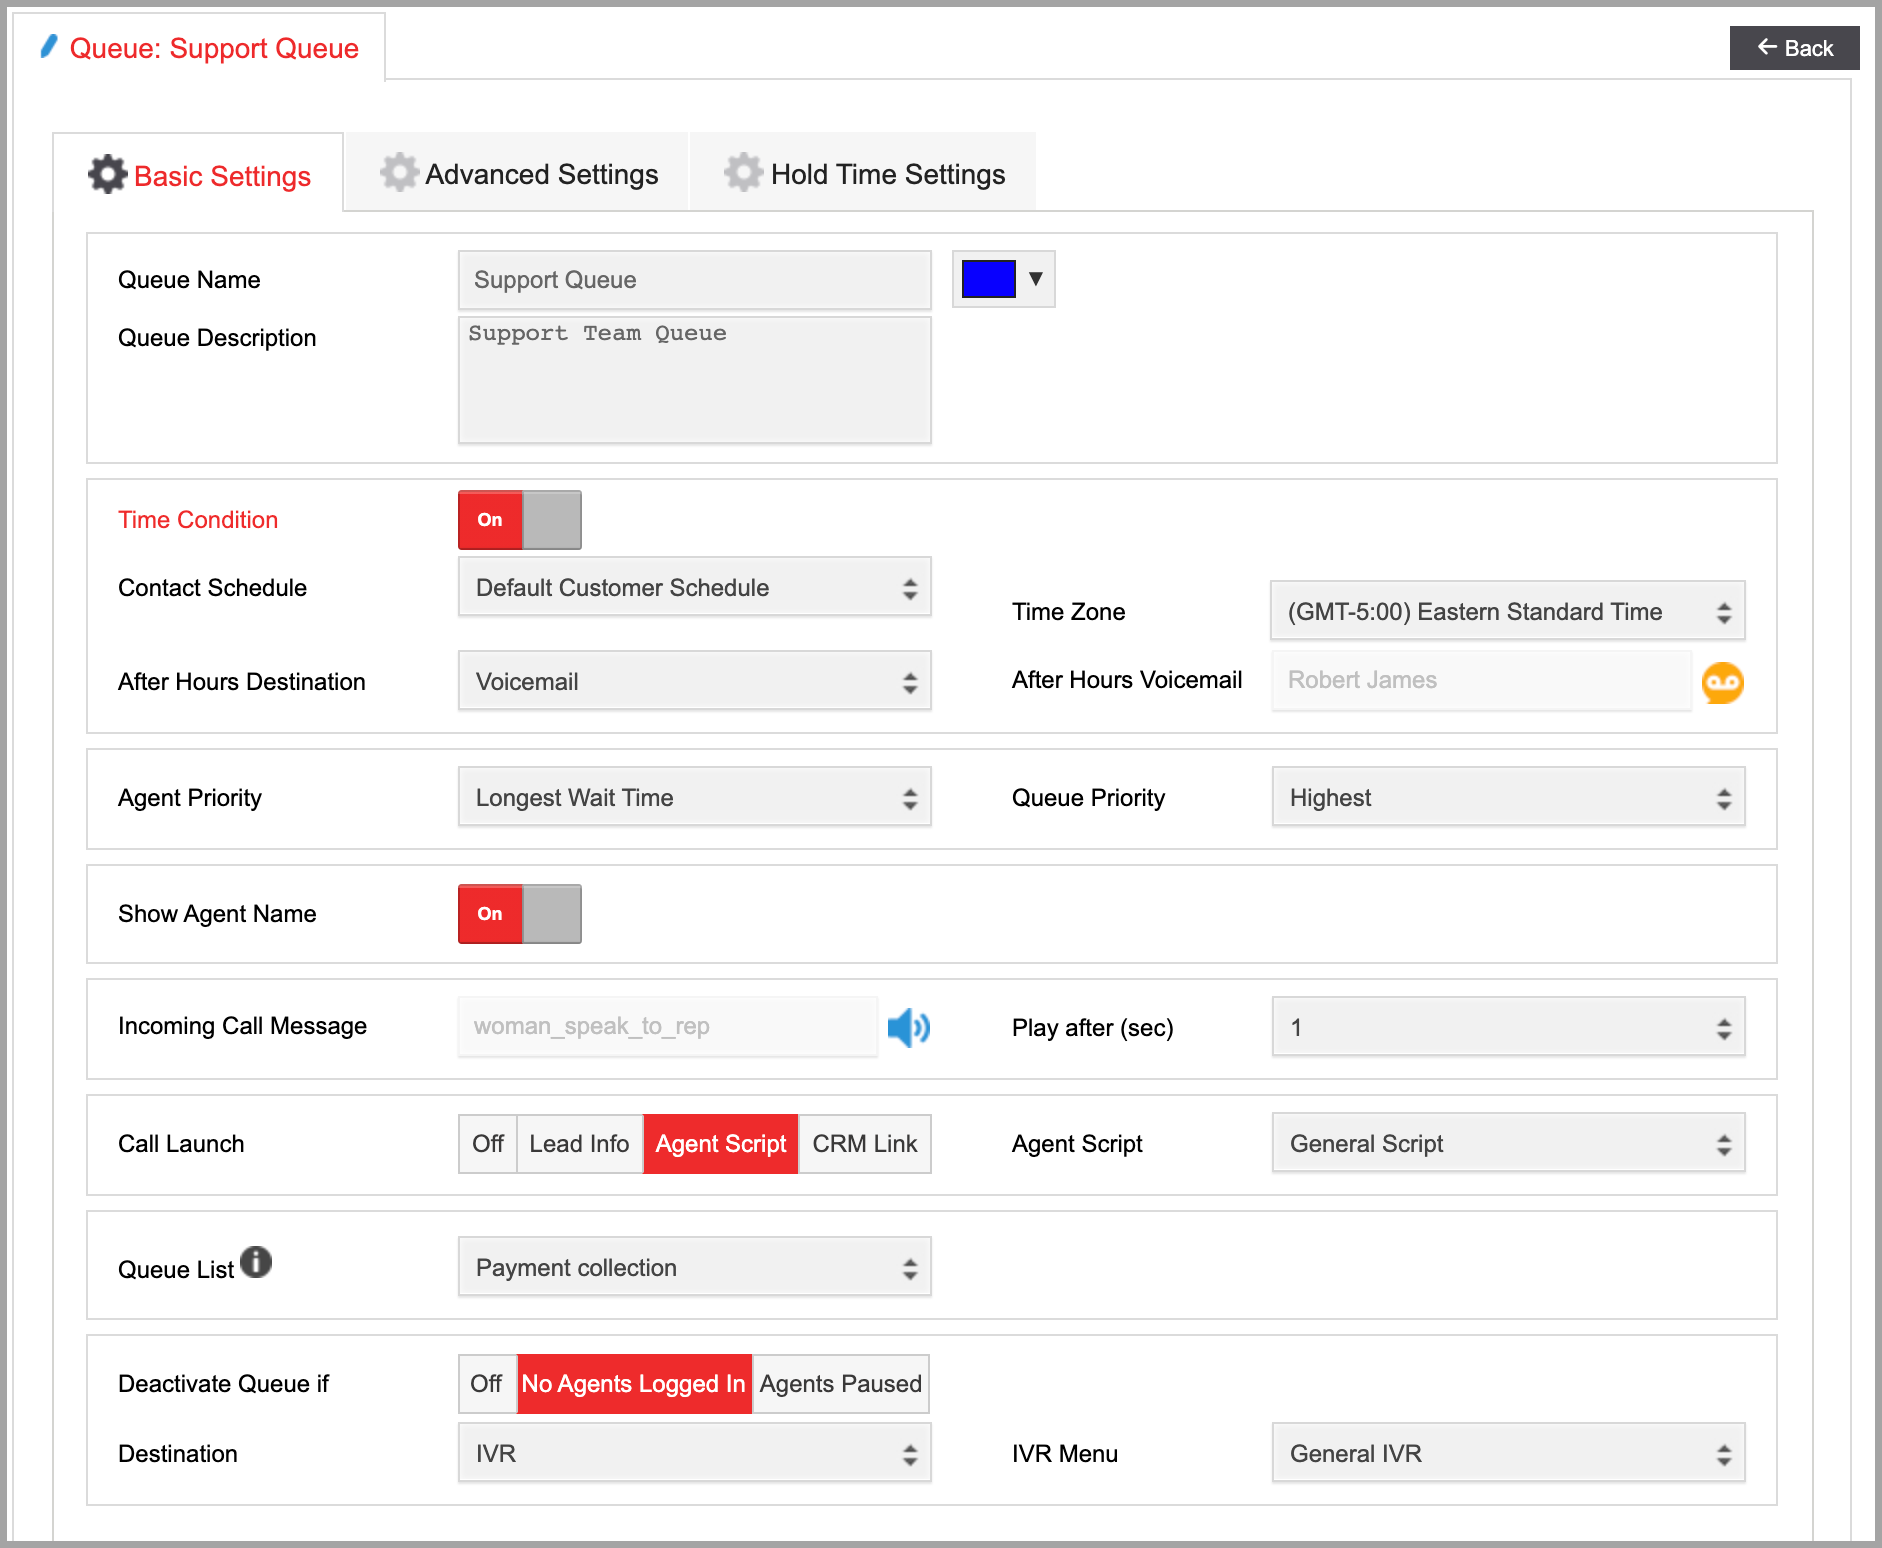
- Color
The color that is currently assigned to the Queue. To modify, click on the drop-down menu and select your desired color.
- Time Condition
Enabling 'Time Condition' allows you to assign a contact schedule to the queue. If the time of the call matches the contact schedule assigned, then the call will be allowed in the queue. If the call does not meet the contact schedule requirement, then it will be automatically routed to the After Hours Destination.
- Contact Schedule: Select a contact schedule from the available options. The queue will only accept calls that meet the contact schedule time condition.
- Time Zone: Select a time zone that will apply to this Queue.
- After Hours Destination: Select the destination of a call that comes in during the time that does not meet the contact schedule time condition. You can choose from the following options:
- Agent: Select which agent will receive calls.
- Audio: Select an audio message that will play by clicking on the icon.
- Hangup: Calls will be terminated.
- Voicemail: Calls will be routed to a voicemail box where the customer can leave a message. Click on the icon to choose the voicemail box.
- Queue: Calls will be routed to the selected queue.
- Agent Priority
This option allows you to prioritize which member of the queue receives the call first. Select from the available options:
- Random: Calls will be assigned to an agent randomly; no priority.
- Oldest Call Start: The agent waiting the longest since their last call started.
- Oldest Call Finish: The agent waiting the longest since their last call ended.
- Oldest Inbound Call Start: The agent waiting the longest since their last inbound call started.
- Oldest Inbound Call Finish: The agent waiting the longest since their last inbound call ended.
- Overall User Rank: Agents will be prioritized based on their rank defined in the queue member list.
- Fewest Calls: The agent with the fewest calls from the queue will be prioritized.
- Fewest Calls Campaign: The agent with the fewest calls from the campaign will be prioritized.
- Longest Wait Time: The agent with the longest wait time between calls will be prioritized.
- Ring All: All available agent phones will ring simultaneously until someone answers.
Please note: 'Ring All' option is not recommended for queues with a large number of agents or high call volumes. Agents with an external phone type will have to take calls from the Calls In Queue window in their agent interface. The amount of time an agent's phone will ring can be updated in the agent's external phone settings.
- Queue Priority
Queues sort callers on a first-in, first-out basis by default. This setting allows you to weigh callers from specific queues differently from others. By giving a queue a higher priority, callers from that queue are allowed to bypass all of the other callers in queues with a lower priority to receive services faster. The default setting is for all callers to have an Even priority. Callers from queues with a higher priority will be placed in front of callers in lower priority queues. Queue priorities are often used when providing service level agreements (SLAs).
- Show Agent Name
When an agent transfers a call to this queue, the agent's name is visible to the agent who receives the call. When the 'Show Agent Name' option is disabled, the popup will display the name of the queue instead.
- Incoming Call Message
An audio message can be played for the agent when they receive a call from a queue. This is useful to help the agent identify the source of the call or pass on other important information.
- Incoming Call Message: Once 'Show Agent Name' is On, click on the to choose an audio file to be set as the 'Incoming Call Message'. Select after how many seconds the recording will be played.
- Play after (sec): Select the delay in seconds that the system should wait to play the incoming audio message once the call is answered by an agent.
- Call Launch
You can choose which screen will appear when a call comes in. Enabling this option will override the campaign 'Call Launch' settings.
- Off: Option will be disabled.
- Lead Info: Choose 'Lead Info' for the lead details screen to open once a call comes in.
- CRM Link: Select this option if you would like your lead record opened in an external CRM. In the CRM Link field, enter your external CRM and then use the drop-down menu in the 'CRM Marker' field to choose the marker needed to locate the lead record. For example, if your CRM lead record can be viewed as https://hubspot.com/454322/accountID, then you should enter https://hubspot.com/454322/ as your CRM link and select the appropriate system field you used to map your leads account ID as your CRM Marker.
Agent Script: Select this option if you would like a script to open. Use the drop-down menu to select a script.
- Queue List
If the agent receives an inbound call from a phone number that does not exist in any campaign/system lists, the agent can add this number as a new lead. The agent can fill out the lead information in the lead details window.
- Deactivate Queue Options
This option allows you to set conditions that will automatically deactivate a queue.
- Off: The feature is disabled.
- No Agents Logged In: The Queue will be deactivated if there are no live agents logged into the queue through the Agent Portal.
- Agents Paused: The Queue will be deactivated if all agents logged in to the queue are in Paused status.
If deactivate condition is enabled, select a destination to route the call to Queue, IVR, DID, Audio, Agent, or Voicemail.
Advanced Settings
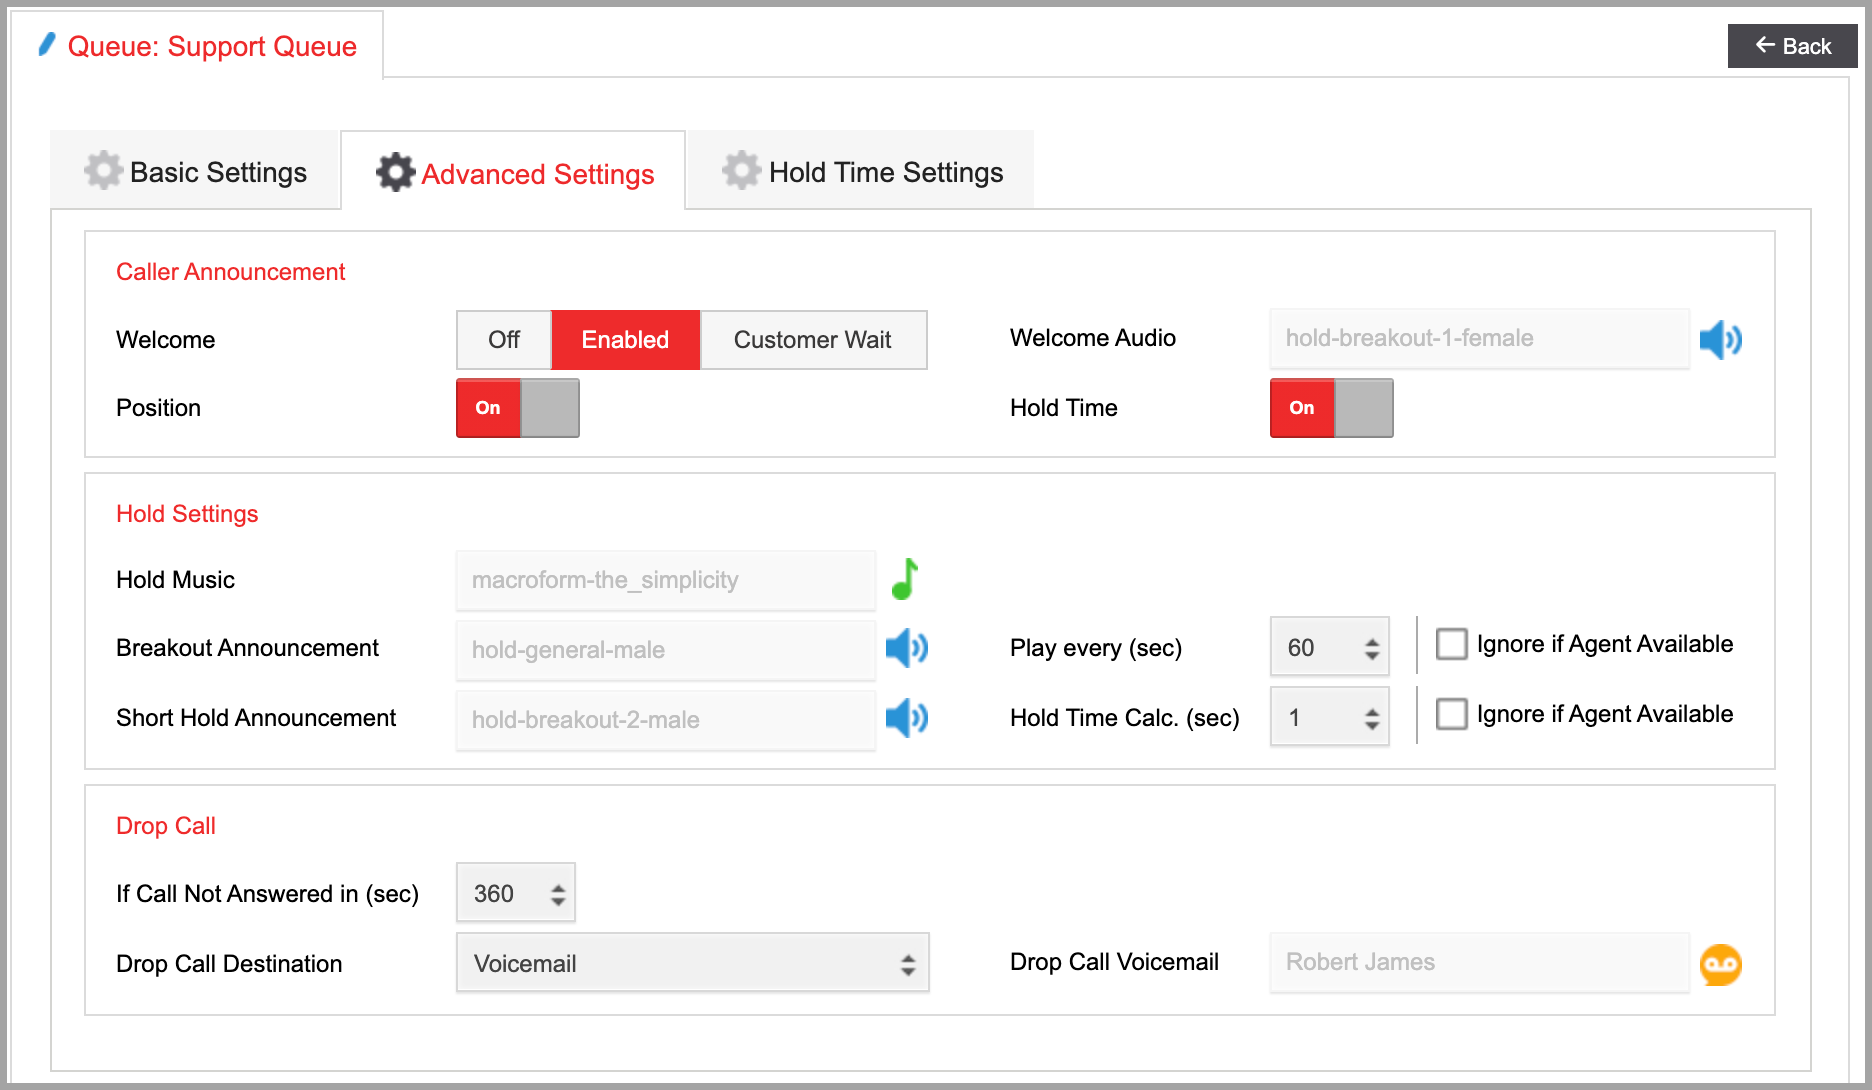
- Caller Announcement
'Caller Announcement' settings allow you to play a welcome message to the caller when they are connected to the queue.
- Welcome
- Enabled: Welcome audio will play when the caller is sent to the Queue.
- Off: No audio will play.
- Customer Wa
- it: Will only play the welcome audio if the call does not immediately go to an agent and the caller has to wait.
- Welcome Audio: Click on to choose the audio that will be played.
- Position: If turned on, the caller will hear an announcement indicating their position in line when they are connected to the queue.
- Hold Time: If turned on, callers will hear the estimated hold time while on hold for an agent. For example, if the estimated hold time is 50 seconds, the caller will hear that the estimated hold time is 50 seconds. Calls with a hold time of less than 15 seconds will not hear this prompt.
- Hold Settings
'Hold Settings' allow you to manage the Hold Music the caller will hear as well as define breakout announcements that can be played while the caller is on hold.
- Hold Music: Click on to choose the music the caller will hear while on hold
- Breakout Announcement: Click on to choose the audio announcement the caller will hear while on hold at specified time intervals. The audio must be 9 seconds or less in length.
- Play every (sec): Shows the time interval between each breakout announcement defined in seconds.
Please Note: Checking the 'Ignore If Agent Available' option will send the next caller in line to an available agent and skip the caller listening to the breakout announcement. If unchecked, the breakout announcement will play entirely before the caller is transferred to an available agent.
- Short Hold Announcement: If the hold time option is activated and the hold time for a live agent is less than 15 seconds, then the shorthold announcement will be played.
- Hold Time Calc (sec): Shows the number of seconds the caller will wait before the estimated 'Hold Time' will be calculated and optionally played.
Please Note: Checking the 'Ignore If Agent Available' option will send the next caller in line to an available agent and skip the caller listening to the short hold announcement. If unchecked, the shorthold announcement will play entirely before the caller is transferred to an available agent.
- Drop Call
You can set the call to automatically drop if it's not answered within the specified time limit. Use the drop-down menu to set the time limit in seconds. Next, select a destination the call should be routed to if it's not answered within the set time limit. You can send the call to the following destinations:
- Hangup: Calls will be disconnected.
- Agent: Calls will be routed to an available agent who is logged in to the campaign.
- Voicemail: Calls will be routed to a voicemail box where a caller can leave a message. Click on the icon to choose the voicemail box.
- Queue: Calls will be routed to the selected queue.
Hold Time Settings
This section allows you to define how the call in the queue is handled if either the customer hold time or the estimated hold time exceeds a set time limit.
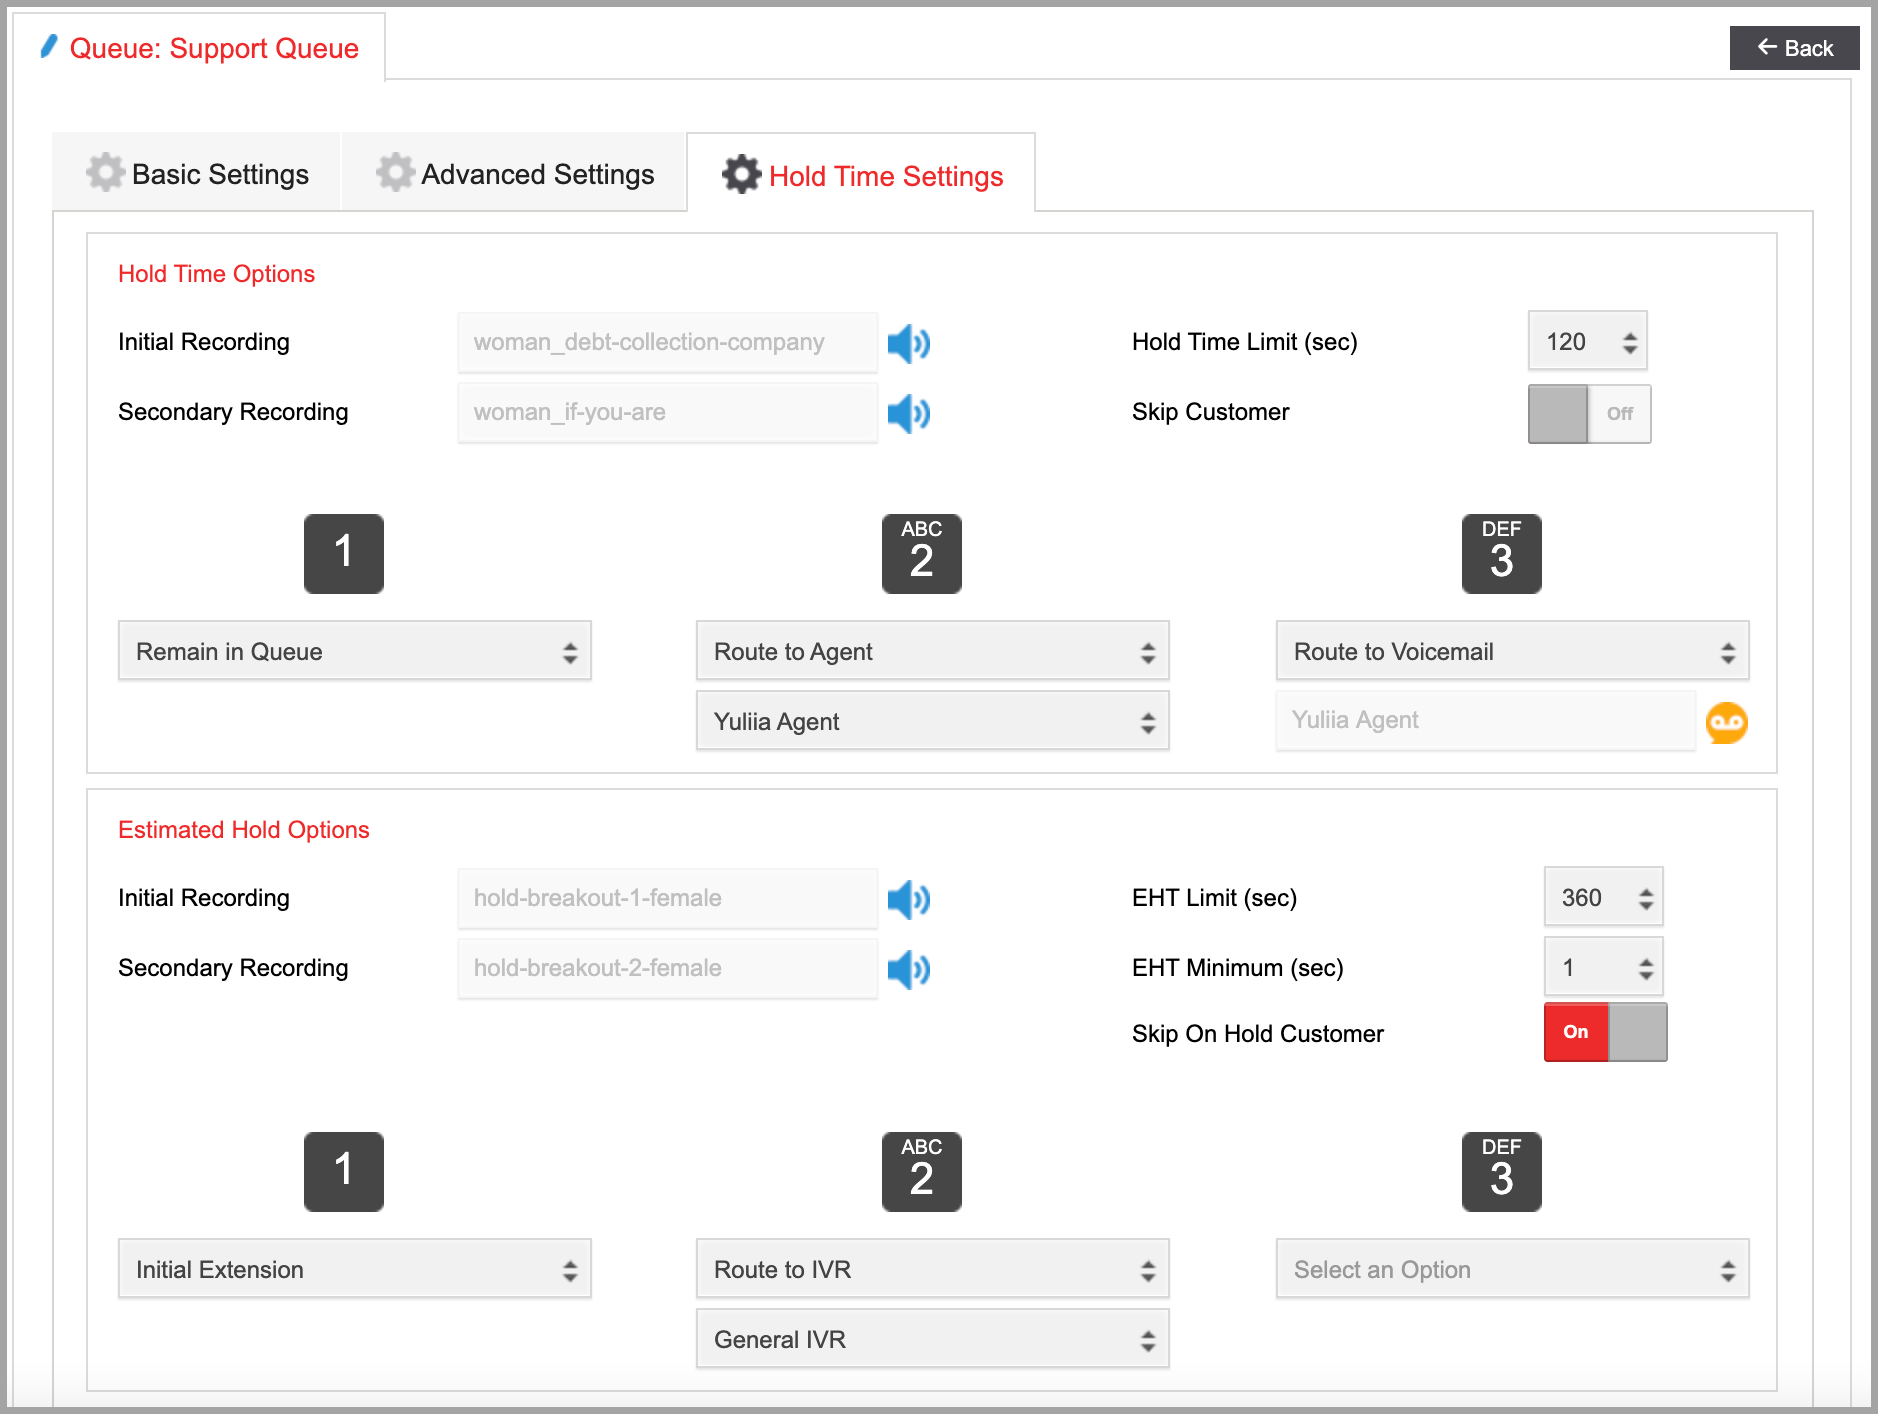
Hold Time Settings
- Hold Time Options
If the customer's hold time in the queue exceeds the set 'Hold Time Limit', you can play a recording and allow the customer to leave or remain in the queue by selecting one of the available options (remain in Queue, route to Voicemail, route to Agent, route to IVR, route to Queue)
- Estimated Hold Options
This option will automatically select whether both the waiting option and the on-hold option below are active or only one of the two. For example, if the 'EHT Limit' is set to 360, the 'Wait Time Limit' is set to 120 and the customer has been waiting for 120 seconds and there are still 400 seconds of estimated hold time, then they are both active at the same time and this setting will be checked to see what options will be offered.
- Hold Time Options
- Initial Recording: Initial audio will play if the hold time limit is reached.
- Secondary Recording: This audio will play after a customer selects one of the available options.
- Hold Time Limit (sec): The time limit in seconds a customer must wait before the hold time option is triggered.
- Skip Customer: Checking this option will send the next caller in line to an available agent and skip the caller listening to an audio message. If disabled, the audio will play entirely before the caller is transferred to an available agent.
- IVR Options: Use the drop-down menu to assign actions to the keypad digits you would like to enable.
- Estimated Hold Options
- Initial Recording: The initial recording will play if the estimated hold time limit is reached.
- Secondary Recording: This audio will play after a customer selects one of the available options.
- EHT Limit (sec): The number of seconds of estimated hold time that will trigger the on-hold option.
- EHT Minimum (sec): The minimum number of seconds the caller must be waiting before being presented with the on-hold options. The on-hold option will immediately activate at this time if the estimated hold time is greater than the hold time limit.
- Skip on Hold Customer: Checking this option will send the next caller in line to an available agent and skip the caller listening to an audio message. If unchecked, the audio will play entirely before the caller is transferred to an available agent.
- IVR Options: Use the drop-down menu to assign actions to the keypad digits you would like to enable.
Queue Membership
To allow agents to join this queue, toggle the 'Queue Membership' button to 'On'. You can also assign a rank to the queue members.

Associations
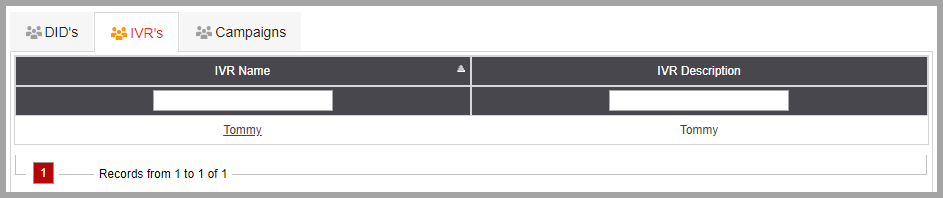
- DIDs
The DIDs that use the Queue.
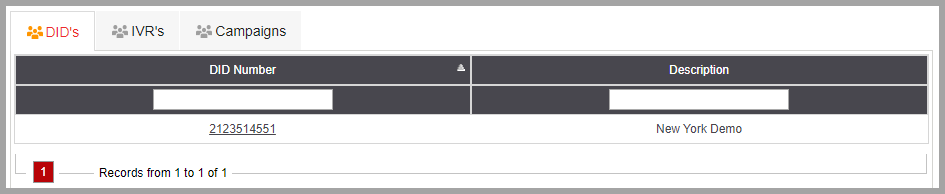
- IVRs
The IVRs that use the Queue.
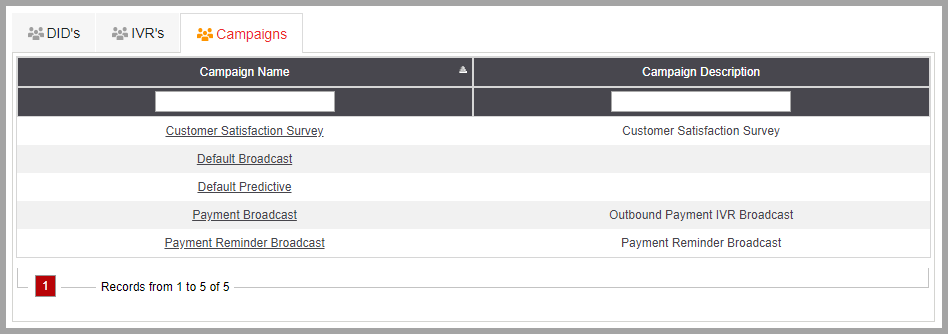
- Campaigns
The campaigns that use the Queue.
COPY QUEUE
Copying an existing Queue is a quick and easy way to create a similar queue, without starting from scratch. The 'Copy Queue' feature allows you to copy settings from an existing queue and modify them as needed.
Step 1. Click on the 'Copy Queue' button on the top right. Complete the required fields in the pop-up window and click on 'Create' to proceed. You will see a confirmation once the Queue has been copied successfully and redirected to the queue details page.
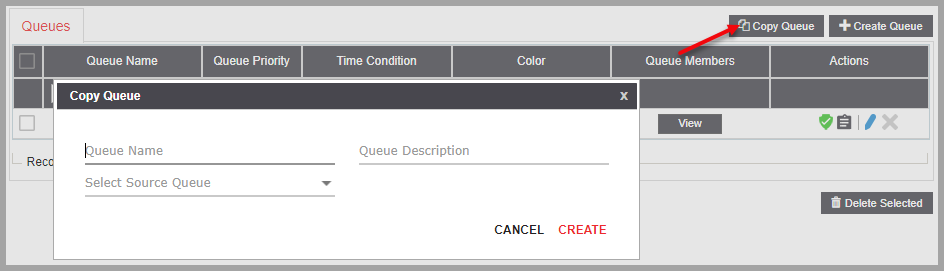
- Queue Name
Enter a unique name.
- Queue Description
Enter a description.
- Select Source Queue
Select the source queue you want to copy from.
Step 2. Configure the Queue settings on the queue details page. When done, click on ‘Submit’ to save your changes.
MODIFY QUEUE
Click on the to Modify the Queue.