Payment Agreement
DCDial's payment agreement helps you simplify and automate payment processing.
This automation process will help your business to collect your receivables with fewer administrative resources.
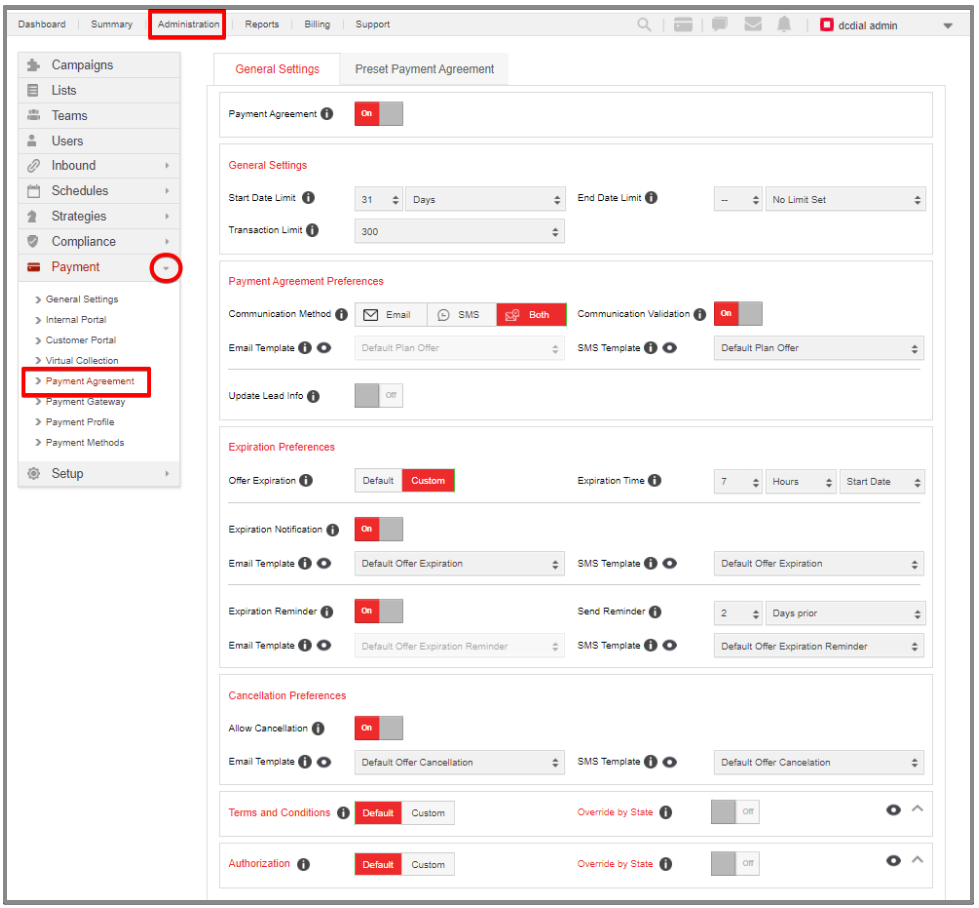
General Settings
Before creating a payment agreement, make sure you adjust the payment agreement settings according to your preferences and business needs.
- Start Date Limit: Limit how far in advance users can schedule the first payment. The maximum limit is 365 days.
- Transaction Limit: Enter the maximum number of transactions a user can schedule. To allow users to schedule only a single payment for a future date, select 1.
- End Date Limit: Limit how far in advance customers can set up their last scheduled payment.
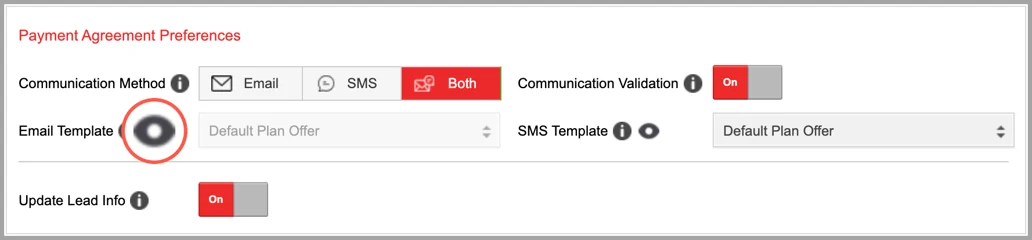
- Communication Method: Select the default communication method for sending a payment agreement to your customers along with any activity associated with the agreement.
- Email: customers will receive a payment agreement via email.
- SMS: customers will receive a payment agreement via SMS.
- Both: customers will receive a payment agreement via both email and SMS.
- Communication Validation: Enable this option if you would like the customer's communication method to be validated by the system. DCDial will ensure the email and/or mobile number used are valid.
- Email Template: If you have selected 'Email' as your preferred channel for sending a payment agreement, your customers will receive a default email template from DCDial.
- SMS Template: Select the SMS template that will be used to inform the customer about their payment agreement.
- Preview: Click on the 'Preview' icon to view how the email or text message appears to the recipients.
- Update Lead Info: Enable this option to update the customer's email address and/or phone number if the values used to communicate with the customer differ from the existing values.
Expiration Preferences
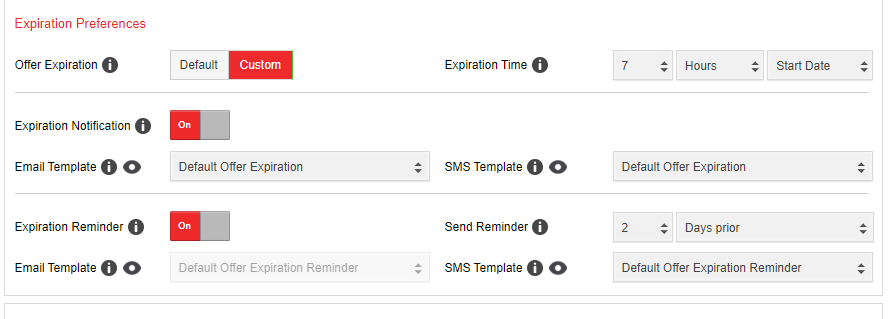
- Offer Expiration: By default, payment agreements expire at 11:55 pm Eastern Time (ET) on the initial payment date. Select 'custom' to define specific expiration criteria.
- Expiration Time: Select the time limit for the customers to complete their payment agreement.
- Send Date: The time limit counter starts when the agreement is sent to the customer and is only valid until 11:55 pm Eastern time (ET) on the agreement start date. Suppose you select 8 hours send date and send an agreement at 10:00 am ET. In this case, the agreement will expire at 8:00 pm ET on the same day you sent it.
- Start Date: The agreement expires in a specified number of hours/days/weeks before the initial payment date. Suppose you select 3 hours start date, and the initial payment date is set on 01/15/2022. In this case, the agreement will expire at 9 pm ET on 01/14/2022.
- Expiration Notification: Enable this feature to notify the customers about the expired payment agreement.
- Email Template: Select the email template used to inform the customers that their payment agreement has expired.
- SMS Template: Select the SMS template used to inform the customers that their payment agreement has expired.
- Preview: Click on the 'Preview' icon to view how the email or text message appears to the recipients.
- Expiration Reminder: Enable this option to send an automatic agreement expiration reminder to your customers.
- Send Reminder: Choose the time condition for when the payment agreement reminder is sent based on the offer expiration time.
- Email Template: If you have selected 'Email' as your preferred channel for sending agreement expiration reminders, your customers will receive a default email template from DCDial.
- SMS Template: Select the SMS template used to remind the customers about their upcoming payments.
Cancellation Preferences

- Allow Cancellation: Enable this feature to allow users to initiate an offer cancellation.
- Email Template: Select the email template used to inform the customers about the canceled agreement.
- SMS Template: Select the SMS template used to inform the customers about the canceled agreement.
- Preview: Click on the 'Preview' icon to view how the email or text message appears to the recipients.
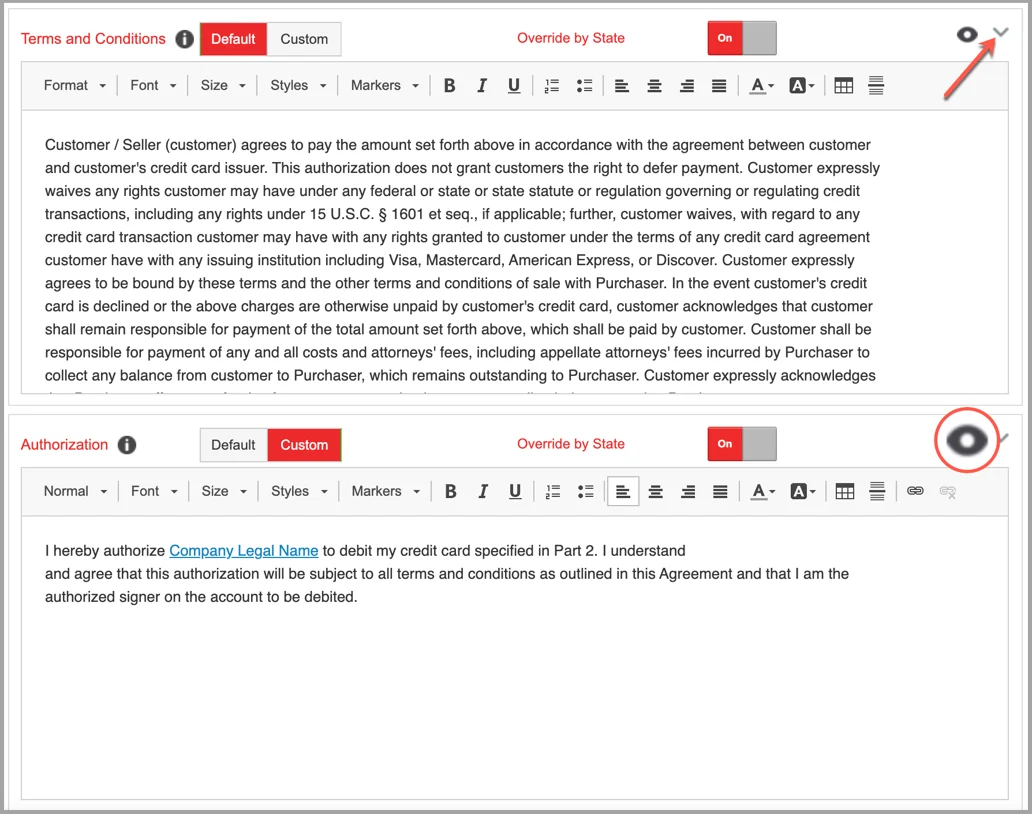
- Terms and Conditions: Customize the Terms and Conditions section by adding your custom text in the box. To use the default Terms and Conditions text, select 'Default'. You can insert dynamic fields from the 'Markers' drop-down menu. Click on the arrow in the top right corner to preview and/or edit the text.
- Override by State: To create the state-specific Terms and Conditions, enable the 'Override by State' option.
- Authorization: Customize the payment agreement authorization section by adding your custom text in the box. To use the default authorization, select 'Default'. You can insert dynamic fields from the 'Markers' drop-down menu. Click on the arrow in the top right corner to preview and/or edit the text.
- Override by State: To create the state-specific payment agreement authorization, enable the 'Override by State' option.
- Preview: Click on the 'Preview' icon to preview the payment authorization agreement.
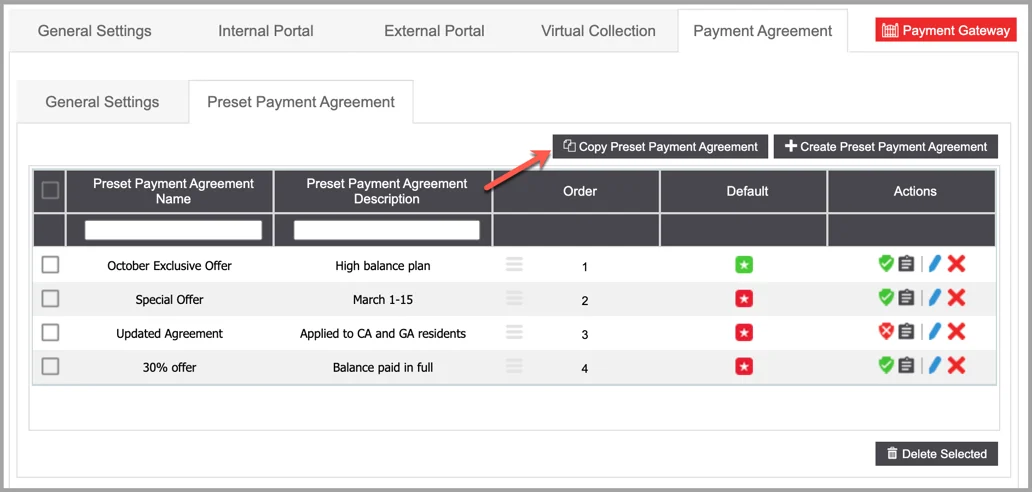
Preset Payment Agreement
You can use the preset payment agreement feature for sending payment agreements to your customers in bulk via SMS.
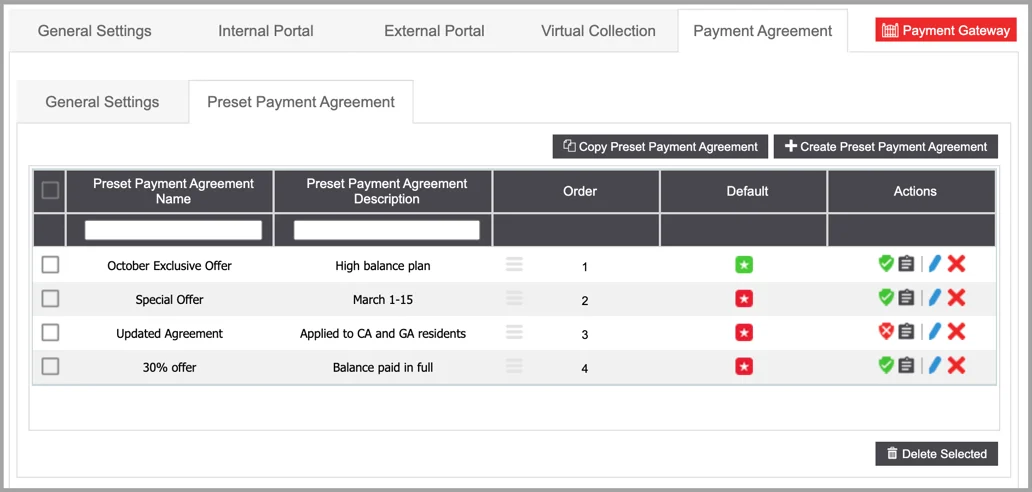
- Order: An account must meet the conditions added for a preset agreement to be applicable. The system will pick the agreement based on the order. You can change the order of the payment agreements by dragging and dropping the icon 1 icon.
- Default: The system will use a default payment agreement if the account does not meet any of the active payment agreement conditions.
green star Default: The payment agreement is set as your default option.
red star Not Default: The payment agreement is not set as default. Click on the icon to set the payment agreement as your default option.
- Actions:
- image2018-10-29 12_39_20-png-1 Active Status: This icon indicates that the payment agreement is active. Click on the icon to deactivate the payment agreement.
- image2018-10-29 12_38_42-png-1 Inactive Status: This icon indicates that the payment agreement is inactive. Click on the icon to activate the payment agreement.
- activity log-2 View Activity Log: Click on the icon to view a summary of events. Learn More About the Activity Log
- image12-png-Mar-28-2022-07-40-02-50-PMModify Preset Payment Agreement: Click the icon to modify the entry.
- image13-png-4 Delete Preset Payment Agreement: Click the icon to delete an entry. A confirmation screen will appear to confirm the deletion.
Create Preset Payment Agreement
Step 1. Click on the ‘Create Preset Payment Agreement’ button on the top right to create a new preset agreement. Complete the required fields in the pop-up window and click ‘Create’ to proceed. You will see a confirmation once the preset agreement has been created successfully and you will be redirected to the agreement details page to complete the setup process.
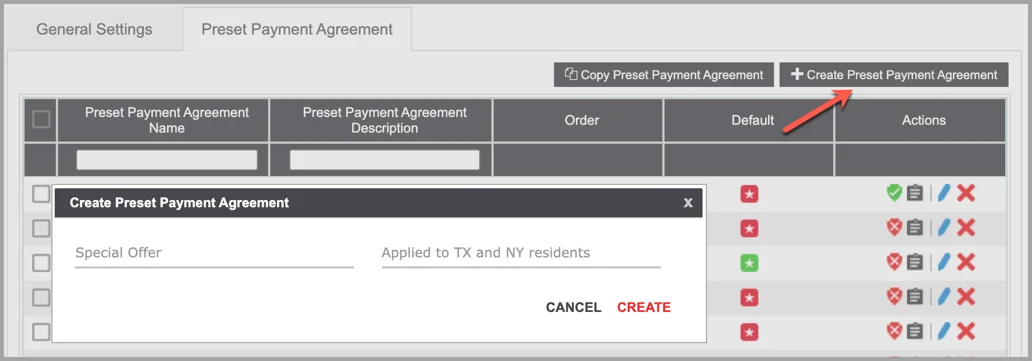
Preset Payment Agreement Name: Enter a unique name.
Preset Payment Agreement Description: Enter a brief description.
Step 2. Configure the settings on the payment agreement details page. When done, click on ‘Submit’ to save your changes.
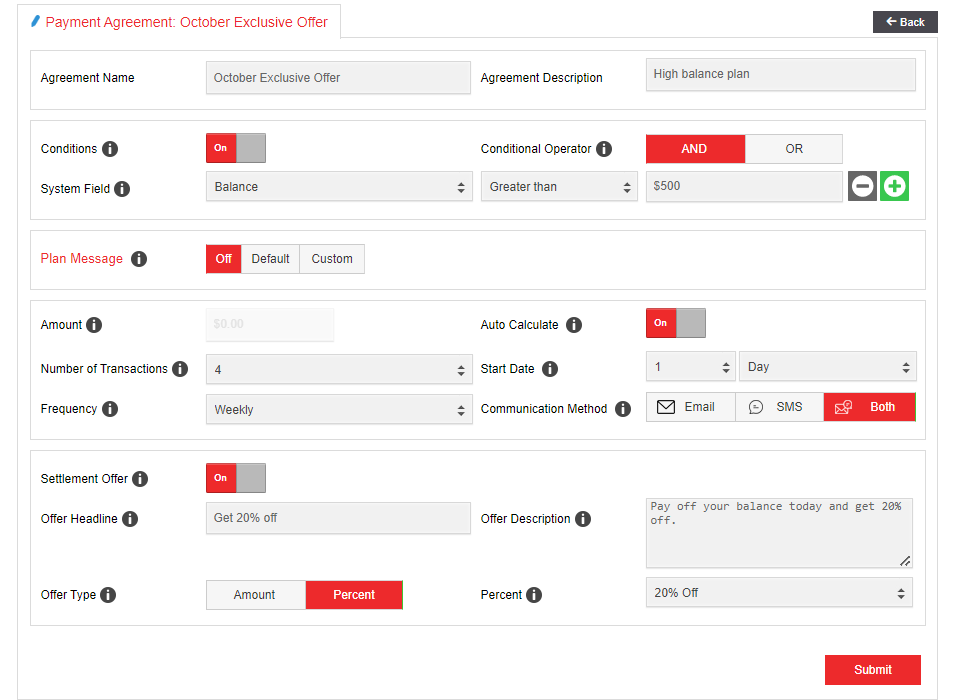
- Conditions: Define relevant criteria an account must meet for this payment agreement to be applicable.
- Conditional Operator: Select the 'AND' operator to ensure all conditions are met. Select the 'OR' operator to ensure at least one condition is met.
- Plan Message: Enter a custom message for your customers that will be displayed on the payment agreement.
- Amount: Enter the amount to be paid. This option is disabled if the Auto Calculate is ON.
- Auto Calculate: Enable this option to automatically calculate the payment amount. The amount will be calculated based on the lead's current balance. This option cannot be modified if the Settlement Offer is ON.
- Number of Transactions: Select the total number of payment transactions.
- Start Date: Enter the date at which the first scheduled payment is made. The first payment transaction will be processed based on the billing time configured under general settings.
- Frequency: Determine how often the payments will be made.
- Communication Method: Select the default communication method for sending agreement-related communication to your customers.
- Settlement Offer: Include a settlement offer to incentivize your customers to resolve their outstanding balance.
- Offer Headline: Enter an offer headline text that will be displayed in the customer portal to your customers.
- Offer Description: Enter a brief description to inform your customers about the details of the agreement.
- Offer Type: Incentivize your customers to resolve their outstanding balance by providing a discount through a fixed amount or a percentage of their balance.
- Amount: Enter a fixed amount that will be discounted from the customer's balance.
- Percent: Select a percentage discount that will be applied to the customer's balance.
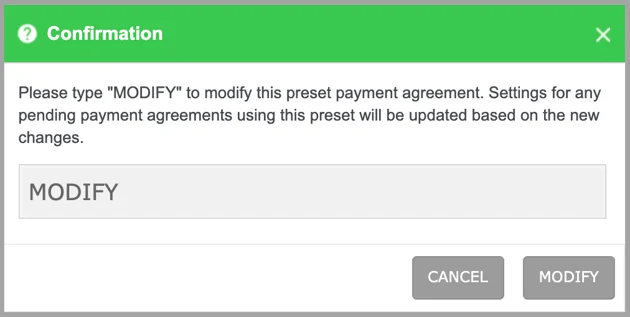
Step 3. Type "MODIFY" in the pop-up window to confirm the changes. When done, click on "Modify".
Copy Preset Payment Agreement
You can create a new preset agreement quickly without starting from scratch by copying an existing preset.
Step 1. Click on the ‘Copy Preset Payment Agreement’ button on the top right to copy an existing preset.
Step 2. Complete the required fields in the pop-up window and click ‘Create’ to proceed. You will see a confirmation once the preset agreement has been copied successfully and you will be redirected to the agreement details page to complete the setup process.
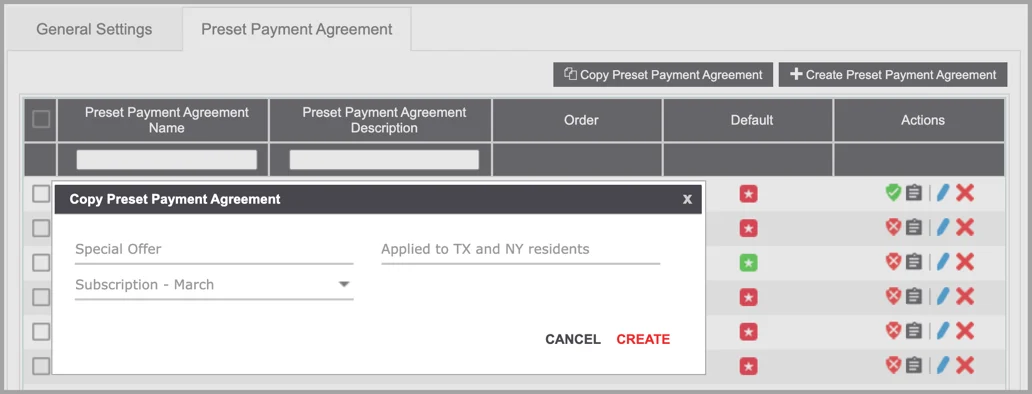
- Preset Payment Agreement Name: Enter a unique name.
- Preset Payment Agreement Description: Enter a brief description.
- Select Preset Payment Agreement: Select the preset agreement you want to copy. The settings of the original agreement will be applied to a new one.
Step 3. Configure the settings on the payment agreement details page. When done, click on ‘Submit’ to save your changes.