Voice Broadcast
Allows you to broadcast an interactive voice message to your contacts. It's an easy and cost-effective way to reach more people in less time, also referred to as a robocall.
Voice Broadcast has numerous applications such as sending important alerts, promotions, updates, and notifications to customers, employees, voters, and more. By enabling a dial pad interaction, when a live contact answers, they can simply press a button on their phone to transfer directly to a readily available representative or transfer to an IVR.

Settings
- Contact Schedule
The Contact Schedule delimits a time frame to call your contacts based on their local time zone. If your Contact Schedule is set from 10 am – 8 pm and the lead's local time is 8 am EST, then DCDial will not dial that lead until their local time is 10 am EST.
- Caller ID
Caller ID (CID) is the number that appears on your customer's phone when you call/message them. You can choose to display one Caller ID for all your outbound calls or use the Regional Caller ID feature to display a custom Caller ID based on the location you are calling.
To use a single campaign Caller ID, select the number from the drop-down menu to select the caller ID number. Go to the Company Numbers menu to add or modify caller ID numbers.
To enable Regional Caller ID, toggle the 'Reg CID' button to the 'On' position and select a caller ID set.

You can purchase numbers for your Regional Caller ID through DCDial in the Billing tab. Once the numbers have been purchased, you can set up the Regional Caller IDs in the DID Manager.
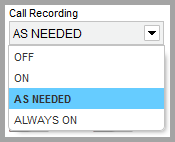
- Call Recording
To record inbound and outbound calls within the campaign, enable this setting.
Please Note: Inbound calls can be recorded only if the numbers were purchased through DCDial.
- Off: Recording is disabled
- On: Recording is enabled; however, agents with recording override permissions can disable recording from the Agent Portal.
- As Needed: Agents can enable the recording in the Agent Portal if needed.
- Always On: Recording is enabled and Agents will not be able to modify it even if they have permission to modify call recordings in the Agent Portal.
- Payment Collection
The payment IVR interacts with customers via touch tones allowing them to enter their card details, the amount they want to pay, etc. If payment collection is turned ON, the campaign will be automatically configured to collect payment.
- Response Destination
The call destination where the call will be routed to when a customer presses one of the response options defined in your campaign's broadcast settings.
There are six call destinations:
- Agent: Setting destination to Agent will route calls to available agents logged in to the campaign.
- External: Calls will be routed to the selected external number. Use the drop-down to select the number to use.
- Hangup: The call will be terminated.
- IVR: Calls will be routed to an interactive voice response (IVR) menu.
- Recording: This option will capture a voice recording from the customer. Customer recordings are saved in Broadcast Recordings under Compliance System Recordings
- Voicemail: Calls will be routed to a voice mailbox where the customer can leave a message.
To update the response destination and default destination detail, navigate to the Broadcast Settings tab on modify campaign page and use the drop-down to select the 'Response Destination'.
- No Response Destination
The call destination where the call will be routed to in case of no response from the customer. Select the call destination from the drop-down menu.
- Callback Number
Callback numbers can be dynamically inserted via text-to-speech to your live broadcast or voicemail messages. This option is relevant only if the campaign is using text-to-speech audio messages that incorporate a campaign call-back number. Go to the Company Numbers menu to add new call-back numbers or modify existing ones.
- Number of Lines
Select the number of outbound lines you would like to use for this campaign. The selected number represents the maximum number of concurrent calls the system will make at any given time.
- Simulation
Activating this mode allows you to get important insights on campaign behavior without making any real live calls.
- AMD
If Answering Machine Detection (AMD) is enabled, DCDial will detect answering machines and can either ignore that call or leave a message depending on your settings. To enable, toggle the AMD button to the ‘On’ position.
- ON: If AMD is activated, you will have the option to leave a voicemail message.
- OFF: If AMD is deactivated, you will not be able to choose the leave voicemail option.
- MSG (Message Settings)
This option allows users to automatically leave a voicemail message when an answering machine is detected. AMD must be enabled to use this option.
- ON: The system will automatically leave a voicemail message anytime an answering machine is detected.
- OFF: The system will disconnect the call anytime an answering machine is detected.

To view detailed settings for Leave Message (MSG), hover over the MSG button. To modify the Leave Message (MSG) settings, click on MSG_buttonbutton. Once you have modified your settings, click on 'Submit' to save all changes.
Leave Message settings
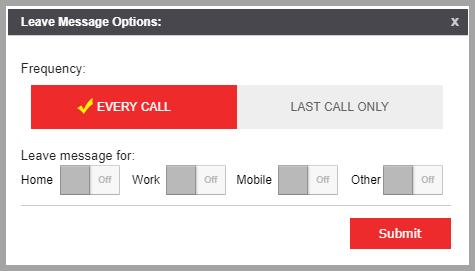
Frequency:
If a lead is called multiple times within the same day, you can define whether a voicemail message is left for every call attempt or only for the final call made to that lead. This setting is related to the Lead Recycle attempts setting in your Call Status Strategy. If you allow the system to recycle leads and would only like to leave a voicemail message once, then you should select Last Call Only.
- Every Call: A message will be left every time an answering machine is detected.
- Last Call Only: A message will be left when an answering machine is detected only during the last call attempt.
Leave a message for:
Voicemail messages can be left only for specific phone types: home, work, mobile, or other. To enable or disable a phone type, simply toggle the button to the ON or OFF position and then select a phone type.
For more information about running a campaign, advanced settings, and real-time campaign metrics, see this article: Dashboard.